 Petits lots, altes estàndards. El nostre servei d'prototipatge ràpid fa que la validació sigui més ràpida i fàcil —

Dissenyos de metall tallat làser: del primer esbós a l'entrega impecable
Comprensió dels fonaments del disseny de metall tallat amb làser
T'has preguntat mai com aconsegueixen els senyals metàl·lics intrincats, facades arquitectòniques impressionants , i panells decoratius per a parets uns detalls tan impecables? La resposta rau en els dissenys metàl·lics tallats amb làser, una tecnologia que ha revolucionat la manera de donar forma, crear i expressar idees a través del metall. Des de senyalització empresarial impactant fins a pantalles artístiques delicades, aquest mètode de fabricació de precisió ha transformat fulls metàl·lics en obres d'art funcionals.
Tant si ets un arquitecte que especifica revestiments per a edificis, un propietari d'empresa que busca senyalització vistosa, com un particular que somia amb peces decoratives personalitzades, entendre els fonaments del tall amb làser et permet prendre decisions informades. Explorarem la tecnologia que fa que la precisió microscòpica no només sigui possible, sinó també habitual.
Què converteix el tall amb làser en l'estàndard de precisió per al disseny metàl·lic
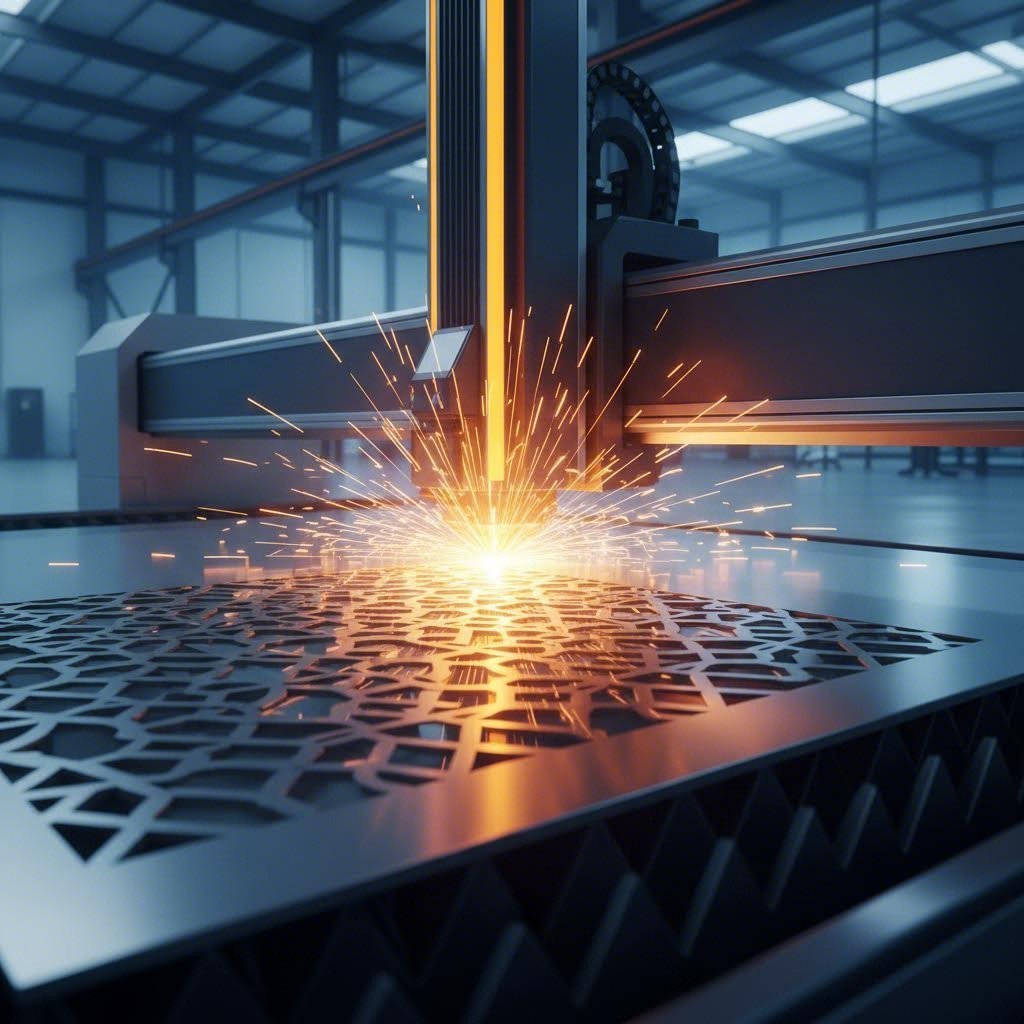
Imagineu enfocar la llum del sol a través d'una lupa per cremar una fulla—ara multipliqueu aquesta intensitat per milers. Aquest és el principi bàsic darrere d'un làser que talla metall. Un làser de tall de metall genera un feix molt concentrat d'energia lumínica, enfocant-lo mitjançant òptiques especialitzades fins a un punt tan petit com 0,001 polzades (0,025 mm). Quan aquest feix intens toca el metall, no només talla—sinó que vaporitza el material amb precisió quirúrgica.
El feix enfocat escalfa la superfície del metall fins al seu punt d'inflamabilitat gairebé instantàniament. Un gas a alta pressió, normalment oxigen o nitrogen, expulsa llavors el material fos del traç de tall. Aquest procés, conegut com a tall per "fusió i buit", permet amplàries de tall (l'amplada del material eliminat) tan petites com 0.004 inches (0.10 mm) —més prim que un cabell humà.
Els làsers de fibra moderns aconsegueixen una precisió de posicionament de 10 micròmetres i una repetitivitat de 5 micròmetres, amb toleràncies tan estretes com ±0,001 polzades en acer inoxidable: una precisió que el tall mecànic tradicional senzillament no pot igualar.
Aquesta precisió excepcional significa que els vostres dissenys de metall tallats amb làser es traslladen dels fitxers digitals als productes acabats amb una fidelitat remarcable. Els patrons geomètrics complexos, les formes orgàniques fluides i el text fi apareixen exactament com van ser dissenyats.
D’eina industrial a mitjà creatiu
El recorregut del tall amb làser, des de la necessitat industrial fins al mitjà creatiu, és fascinant. Quan cerqueu «tall de metall amb làser a prop meu», esteu accedint a una tecnologia que va començar a la fabricació aeroespacial a principis dels anys setanta. Aleshores, els làsers tallaven titani per a components d’aeronaus. Avui, aquesta mateixa precisió serveix artistes, dissenyadors i empreses que busquen creacions personalitzades en metall.
Dos tipus principals de làser dominen el panorama de la fabricació de metalls, cadascun adequat a diferents aplicacions:
- Làsers de CO2: Funcionant a una longitud d'ona d'aproximadament 10,6 µm, aquests sistemes versàtils destaquen en el tall de fusta, plàstics i tèxtils, a més de poder processar metalls de gruix reduït. Han estat l'eina fonamental de la indústria durant dècades i continuen sent populars per a aplicacions amb materials mixtos.
- Làsers de fibra: Amb una longitud d'ona d'uns 1.064 nanòmetres, els làsers de fibra produeixen mides de punt fins a 100 vegades més petites que els sistemes de CO2. Això els fa ideals per al tall de metalls reflectants com l'alumini, coure, llautó i acer inoxidable. Segons Kern Lasers , la tecnologia de fibra ofereix una alta potència en un equip compacte amb mínimes necessitats de manteniment.
Per a la majoria d'aplicacions de tallat làser en metall—senyals, panells, pantalles decoratives—els làsers de fibra s'han convertit en l'opció preferida. La seva eficiència amb els metalls, combinada amb un funcionament lliure de manteniment i uns costos operatius més baixos, els fa especialment adequats per a treballs de precisió en metall. Un tallador làser de qualitat per a metall pot processar acer inoxidable, acer suau, aluminio, coure i llautó amb resultats consistents en milers de peces.
Comprendre aquests fonaments us proporciona el vocabulari i els coneixements necessaris per discutir el vostre projecte amb confiança amb fabricants, i per apreciar com es transforma la vostra visió en una realitat impecable de metall tallat amb làser.
Guia de selecció de materials metàl·lics per a tallat làser
Ara que enteneu com funciona la tecnologia del tall per làser, aquí teniu la pregunta clau: quin metall heu d'escollir per al vostre projecte? El material que seleccioneu influeix en tot, des de la netedat amb què el làser talla el vostre disseny fins a com resistirà el vostre producte acabat l'exposició exterior. Tanmateix, la majoria de guies simplement enumeren els metalls disponibles sense explicar per què? per què un pot satisfer millor les vostres necessitats que un altre.
Canviem-ho. Ja sigui que creeu senyals de metall d'alumini per a un negoci costaner, senyals d'acer per a aplicacions industrials, o panells decoratius de coure per a disseny d'interiors , combinar les propietats del metall amb els vostres requisits específics assegura que els vostres dissenys de metall tallat per làser funcionin excel·lentment durant anys.
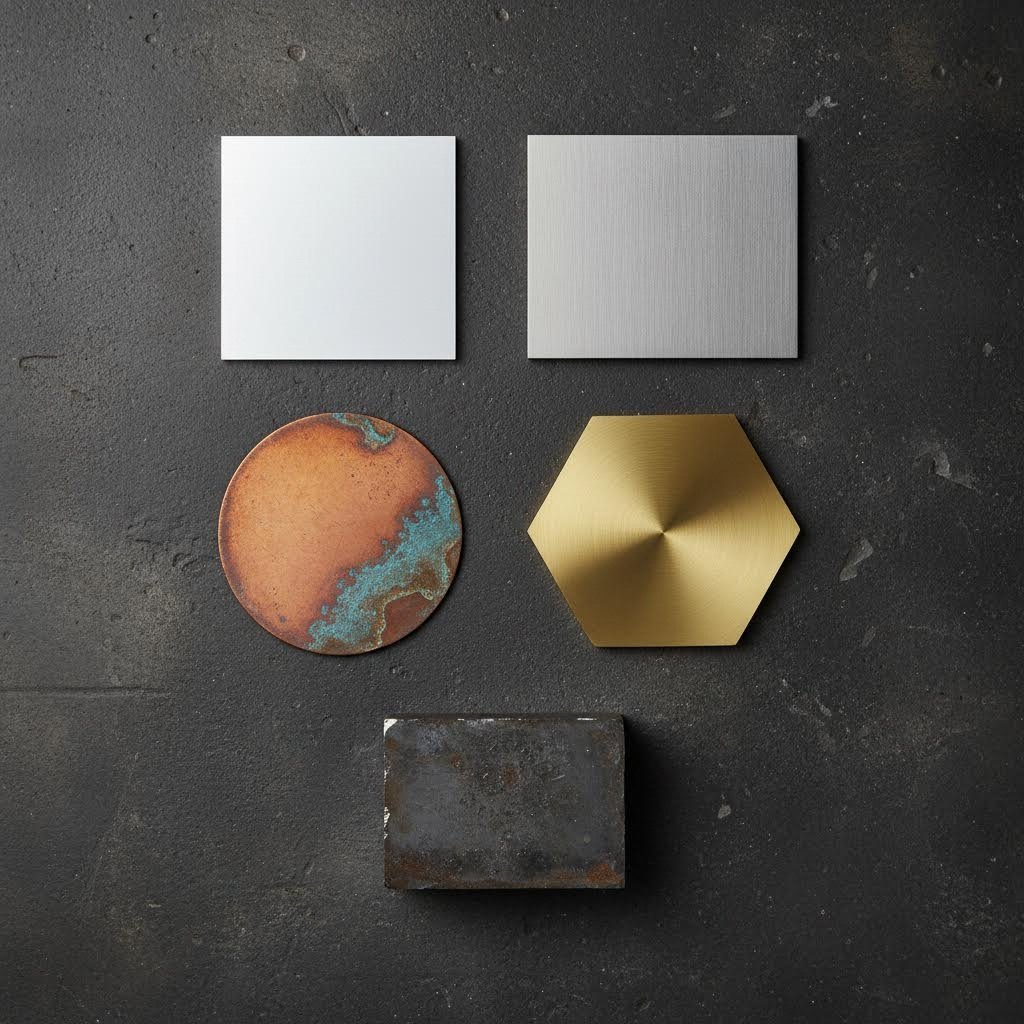
Comparativa de rendiment entre alumini, acer, llautó i coure
Cada metall aporta avantatges i limitacions diferents al tall per làser. Comprendre aquestes diferències us ajuda a prendre decisions de material amb confiança, en lloc d'endevinar o acceptar simplement el que proposi un fabricant.
| Tipus de Metal | Compatibilitat amb el tall per làser | Resistència a la corrosió | Pes (relatiu) | Rang de cost | Aplicacions ideals |
|---|---|---|---|---|---|
| Alumini | Excel·lent amb làsers de fibra; la superfície altament reflectant requereix una configuració adequada | Excel·lent; forma naturalment una capa d'òxid protectora | Molt Lleuger (⅓ del pes de l'acer) | Baix a Moderat | Senyalització exterior, panells arquitectònics, peces decoratives lleugeres |
| Acer dolç | Excel·lent; talla netament tant amb làsers de CO2 com de fibra | Pobre; requereix un acabat protector per a ús en exteriors | Pesant | Baix | Senyalització industrial, components estructurals, senyals metàl·liques d'acer amb recobriment en pols |
| Acer inoxidable | Excel·lent; produeix talls nets amb mínim desgarrament | Excel·lent; el contingut de crom impedeix la corrosió | Pesant | Moderat a Alt | Medis marins, senyalització per a servei alimentari, façanes arquitectòniques, aplicacions mèdiques |
| Llató | Bo amb làsers de fibra; requereix un control cuidados dels paràmetres | Bo; desenvolupa una patina atractiva amb el pas del temps | Pesant | Moderat a Alt | Plaques decoratives, senyalització interior, ferramenta arquitectònica, instal·lacions artístiques |
| Coure | Complicat; l'alta reflectivitat i conductivitat tèrmica requereixen ajustos especialitzats | Excel·lent; desenvolupa una patina verda distintiva | Pesant | Alta | Detalls decoratius per a teulades, art decoratiu, aplicacions elèctriques, detalls arquitectònics premium |
Sembla complex? Aquí hi ha la conclusió pràctica: el tall làser d'alumini ofereix la millor combinació d'assequibilitat, resistència a la corrosió i estalvi de pes per a la majoria d'aplicacions exteriors. Els senyals d'acer inoxidable ofereixen una durabilitat incomparable en entorns agressius però amb un cost i pes més elevats. El llautó i el coure destaquen quan l'estètica importa més que el pressupost: els seus tons càlids i la patina natural creen un caràcter distintiu que no es pot replicar amb altres materials.
Ajustar les propietats del metall als requisits del projecte
Més enllà de la taula comparativa, entendre com es diferencia el tall làser d'alumini del tallatge d'acer ajuda a valorar per què els fabricants poden recomanar materials específics per al vostre projecte.
Quan es treballa amb fulls metàl·lics tallats amb làser, cada metall respon de manera diferent al procés de tall:
- Alumini: Talla ràpidament i net amb làsers de fibra. La seva naturalesa lleugera (aproximadament 2,7 g/cm³ de densitat) el fa ideal per a panells grans que necessiten muntatge. Tanmateix, la seva suavitat significa que els gruixos fins poden doblegar-se durant la manipulació, una cosa a tenir en compte per a dissenys intrincats.
- Acer suau i acer al carboni: L'element fonamental de la fabricació metàl·lica. Segons New Mexico Metals LLC , l'elevat ús de l'acer al carboni en la construcció i maquinària fa essencial el tall làser per garantir la disponibilitat immediata de components tallats amb precisió. Espereu talls nets, però cal planificar un acabat protector en aplicacions exteriors.
- Acero inoxidable: Conegut per produir talls excepcionalment nets amb mínima generació de rebava. La seva resistència a la corrosió i la seva resistència fan que els senyals d'acer inoxidable siguin l'opció premium per a instal·lacions exteriors duradores, especialment en entorns costaners o industrials on la sal o els productes químics posen a prova materials menys resistents.
- Bruc i coure: Tots dos metalls són més tous i més fàcils de treballar que l'acer, però la seva alta reflectivitat i conductivitat tèrmica exigeixen operadors experimentats. Aquests materials recompensen aquest esforç addicional amb una calidesa visual impressionant, ideal per a aplicacions decoratives i artístiques on l'impacte visual justifica uns costos materials més elevats.
Comprendre les opcions de gruix i les especificacions de calibre
Quan demaneu fulls metàl·lics tallats per làser, us trobareu especificacions de gruix en dos formats: números de calibre i polzades decimals. Això pot resultar confús perquè, contraintuïtivament, els números de calibre més baixos signifiquen més gruixut metall.
Segons Cut2SizeMetals, el calibre és un sistema de mesura tradicional on el mateix número de calibre pot representar gruixos reals lleugerament diferents segons el tipus de metall. Això és el que heu de saber:
- Xapes d'acer inoxidable: Disponibles des del calibre 26 (0,018") fins al calibre 7 (0,1874") en graus estàndard com 304, 316 i 430
- Xapes d'alumini: Normalment indicades en forma decimal, amb un rang des de 0,016" fins a 0,19" en aliatges habituals com 3003 i 6061
- Xapes de coure: Van des del calibre 26 (0,0216") fins al calibre 11 (0,125"), sovint especificades en unces per peu quadrat en aplicacions arquitectòniques
- Xapes de llautó: Disponibles des de 0,020" fins a 0,125" de gruix decimal, sent l'aliatge 260 l'estàndard per a ús general
Com afecta el gruix als dissenys de metall tallat amb làser? Els materials més fins (nombres de calibre més alts) permeten detalls més intrincats i corbes més tancades, però potser no ofereixen la rigidesa adequada per a panells grans sense suport. Els materials més gruixuts ofereixen resistència estructural, però augmenten el pes i el cost, limitant la finesa dels detalls del disseny.
Per a la majoria d'aplicacions publicitàries i decoratives, un calibre 16 a 14 (aproximadament 0,060" a 0,075") proporciona un excel·lent equilibri entre capacitat de detall, rigidesa estructural i eficiència de cost. Els panells arquitectònics més grans sovint requereixen material de calibre 11 a 7 per evitar deformacions i assegurar una planor duradora.
Un cop definides clarament les opcions de material, la següent consideració és igualment important: comprendre les restriccions de disseny i les limitacions tècniques que determinen què és realment possible tallar, independentment del tipus de metall triat.
Restriccions de disseny i limitacions tècniques
Heu seleccionat el vostre metall i heu imaginat el vostre disseny, però aquí és on molts projectes tropecen. El vostre concepte bell pot semblar impecable a la pantalla, però convertir-se en alguna cosa impossible de tallar nítidament. Per què? Perquè tallar làser xapa metàl·lica implica realitats físiques de les quals el programari de disseny digital simplement no us avisa.
Comprendre aquestes limitacions abans de finalitzar el vostre disseny estalvia revisions costoses i resultats decepcionants. Penseu-hi d’aquesta manera: conèixer les regles us ajuda a ampliar els límits creatius sense creuar cap a allò que és impossible. Explorarem les limitacions tècniques que separen els èxits dels fracassos frustrants en projectes de tall per làser de xapa metàl·lica.
Mides mínimes de característiques i consideracions sobre l’amplada del tall
Recordeu aquell feix làser concentrat que vaporitza el metall? Aquest procés elimina una fina tira de material —anomenada tall— al llarg de cada trajectòria de tall. Segons SendCutSend, la tall del làser de fibra varia entre 0,006" i 0,040" (0,152 mm i 1 mm), segons el gruix del material, mentre que la tall del làser CO₂ sol oscil·lar entre 0,010" i 0,020" (0,254 mm i 0,508 mm).
Què implica això per al vostre disseny? Qualsevol característica més petita que l'amplada de la tall desapareix simplement durant el tall. Aquell detall intrincat de filigrana en què heu passat hores per perfeccionar-lo? Si les línies tenen un gruix inferior a 0,040", desapareixeran completament en materials més gruixuts.
Aquest és l’impacte pràctic:
- Es perden les geometries petites: Les característiques o obertures més petites que l’amplada de la tall (0,008" a 0,040", segons el procés i el material) no sobreviuran al tall
- L’amplada dels ponts és fonamental: Les fines bandes metàl·liques que connecten parts del vostre disseny necessiten una amplada adequada per mantenir la integritat estructural després del tall
- Els diàmetres dels forats tenen valors mínims: Una regla general: el diàmetre mínim del forat ha d’igualar o superar el gruix del material per obtenir resultats nets i consistents
La bona notícia? Els fabricants professionals solen compensar automàticament la tallada (kerf), desplaçant la trajectòria del làser de manera que les dimensions finals coincideixin amb les especificacions del disseny. No obstant això, encara heu d’evitar elements massa petits per sobreviure al procés de tall.
Regles de disseny específiques segons el material que heu de seguir
Els diferents metalls es comporten de forma diferent sota la tallada làser. Les zones afectades per la calor (HAZ) —àrees on les propietats del metall canvien a causa de la calor generada durant la tallada— varien significativament segons el material. L’alumini dissipa la calor ràpidament, mentre que l’acer inoxidable la reté durant més temps, fet que afecta la proximitat amb què es poden realitzar les tallades.
| Material | Gruix | Diàmetre mínim del forat | Amplada mínima del pont | Mida mínima de l’element |
|---|---|---|---|---|
| Alumini | 0,040" (1 mm) | 0.040" | 0.030" | 0.020" |
| Alumini | 0,125" (3 mm) | 0.125" | 0.060" | 0.040" |
| Acer dolç | 0,060" (1,5 mm) | 0.060" | 0.045" | 0.030" |
| Acer dolç | 0,125" (3 mm) | 0.125" | 0.080" | 0.050" |
| Acer inoxidable | 0,048" (1,2 mm) | 0.048" | 0.040" | 0.025" |
| Acer inoxidable | 0,125" (3 mm) | 0.125" | 0.075" | 0.045" |
| Bronze/Cobre | 0,040" (1 mm) | 0.050" | 0.040" | 0.030" |
Segons MakerVerse espaiar la geometria de tall com a mínim dues vegades el gruix de la xapa ajuda a evitar distorsions. Col·locar forats massa a prop dels marges augmenta el risc de rebentar o deformar-se —especialment si la peça ha de ser conformada posteriorment.
Errors habituals de disseny i com evitar-los
Quan es treballa amb un tallador làser de xapa metàl·lica, aquests errors apareixen repetidament, fins i tot en dissenyadors experimentats:
- Línies superposades: Els camins duplicats fan que el làser talli la mateixa àrea dues vegades, creant vores cremades i perdent temps. Sempre reviseu i elimineu la geometria solapada abans d'enviar els fitxers.
- Formes obertes: Els camins oberts confonen el programari de tall. Tota forma destinada a ser un forat ha de formar un bucle completament tancat.
- Text massa petit: Les lletres amb una alçada inferior a 0,25" sovint perden detall, especialment amb tipus de lletra serif. Les fonts sense serif com Arial o Helvetica es tallen de manera més fiable en mides petites.
- Ignorar la querxa en toleràncies ajustades: Si el vostre disseny requereix peces encaixables precises, cal tenir en compte l'amplada de la querxa en la planificació dimensional.
- Densitat excessiva de detalls: Emplenar massa característiques petites en una àrea crea acumulació de calor, amb el risc de deformar el metall o degradar la qualitat del tall.
Preparació de fitxers per a fulls metàl·lics tallats personalitzats impecables
El vostre fitxer de disseny uneix la imaginació i la realitat. Segons Kirin Laser , el format DXF és l'estàndard universal; és basat en vectors, es carrega ràpidament i es processa eficientment en màquines de tall. Els fitxers AI (Adobe Illustrator) funcionen bé per a la flexibilitat de disseny, però s'han de convertir a DXF per a la producció.
Abans de presentar el vostre fitxer per al tall làser de fulls metàl·lics:
- Converteix tot el text en contorns/trajectòries: Això evita problemes de substitució de tipus de lletra que podrien distorsionar la vostra tipografia
- Establiu unitats de manera coherent: Ajusteu les unitats del vostre fitxer (polzades o mil·límetres) a les especificacions del material
- Netegeu línies disperses: Elimineu línies de construcció, guies i qualsevol geometria que no estigui destinada al tall
- Verifiqueu l'escala: Confirmeu que les dimensions del disseny coincideixin amb la mida real prevista: els errors d'escala són sorprenentment comuns
- Simplifiqueu les trajectòries complexes: Reduiu els punts d'ancoratge innecessaris en les corbes per millorar la velocitat de processament sense afectar la qualitat visual
Un estudi de cas de Kirin Laser va descobrir que arreglar un fitxer amb 50 línies errants va reduir el temps de tall en un 30%. La preparació adequada dels fitxers no només evita errors, sinó que també accelera la producció i sovint redueix costos.
Entendre aquestes limitacions tècniques pot semblar restrictiu, però en realitat allibera la vostra creativitat. Quan sabeu exactament què és assolible, podeu dissenyar amb confiança dins d'aquests límits o bé superar-los estratègicament per aconseguir un efecte espectacular. Un cop el vostre disseny estigui optimitzat per garantir l'èxit en la producció, és hora d'explorar l'apassionant gamma d'aplicacions on els dissenys de metall tallat al làser brillen de veritat.
Aplicacions populars per a dissenys de metall tallat amb làser
Ara que coneixeu les bases tècniques—materials, restriccions i principis de disseny—on fan exactament més impacte els dissenys metàl·lics tallats per làser? Des de façanes arquitectòniques imponents fins a detalls íntims en jardins, aquesta tecnologia de precisió transforma requisits funcionals en declaracions visuals. La clau rau a combinar els enfocaments de disseny i les opcions de materials amb les necessitats úniques de cada aplicació.
Ja sigui que estigueu especificant senyals metàl·liques per a la visibilitat empresarial, seleccionant panells metàl·lics tallats per làser per a una façana d'edifici o triant pantalles decoratives per a la privacitat residencial, entendre les consideracions específiques de cada aplicació assegura que el vostre projecte ofereixi un valor durador, no només una atracció immediata.
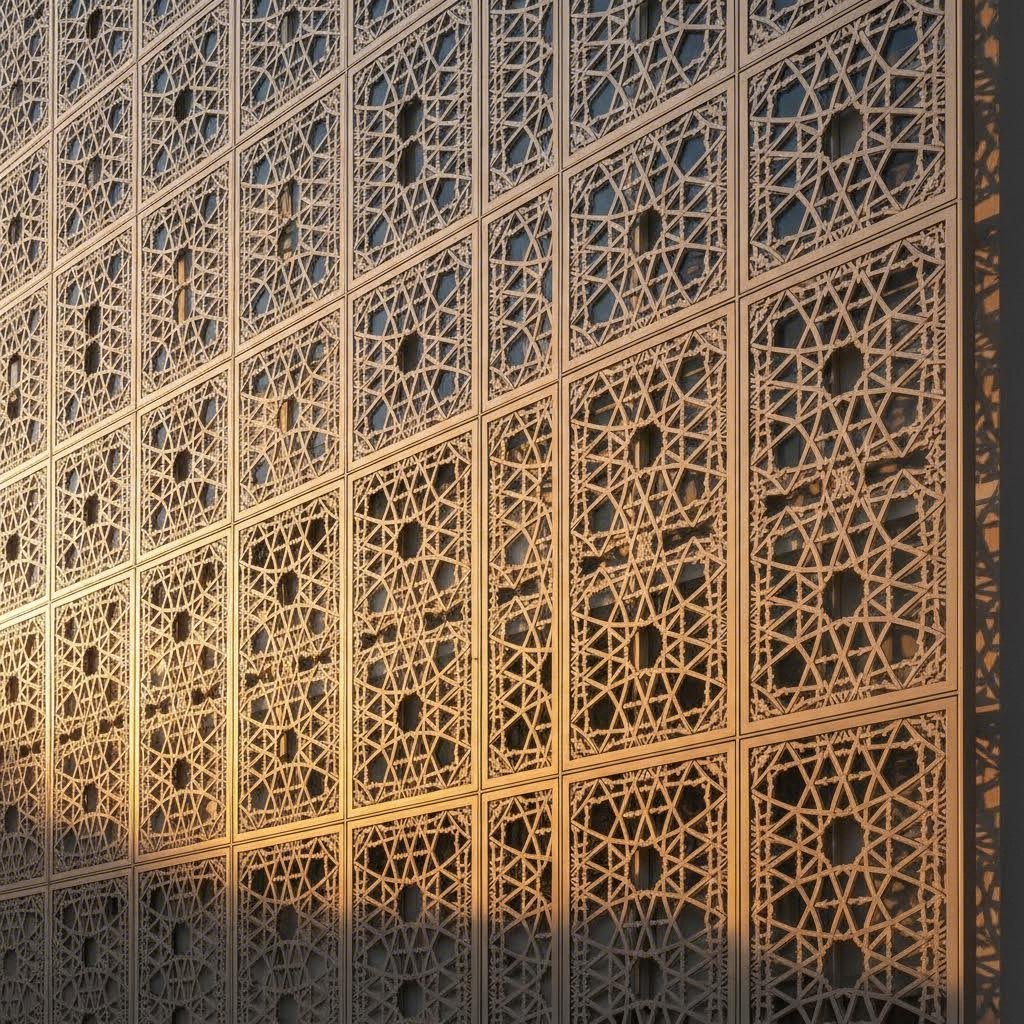
Panells arquitectònics i façanes d'edificis
Imagineu-vos caminant davant d'un edifici on la llum del sol filtra a través de patrons geomètrics complexos, projectant ombres en constant canvi a l'entrada. Aquesta és la màgia dels panells tallats amb làser arquitectònics: transformen estructures estàtiques en experiències visuals dinàmiques.
Segons KF Laser , els panells metàl·lics tallats personalitzats amb làser s'utilitzen àmpliament en disseny arquitectònic, des de façanes i parets exteriors fins a pantalles decoratives i separadors d'espais. El tall de precisió permet dissenys que juguen amb la llum i les ombres, afegint profunditat i caràcter impossible d'aconseguir amb mètodes tradicionals de construcció.
Això és el que fa únic a les aplicacions arquitectòniques:
- Revestiment exterior: Senyals i panells metàl·lics grans que cobreixen els exteriors dels edificis requereixen materials que resisteixin dècades d'exposició a les intempèries. L'alumini ofereix durabilitat lleugera amb resistència natural a la corrosió, mentre que l'acer inoxidable proporciona una longevitat incomparable en entorns agressius. Les consideracions de disseny inclouen el pes del panell (afecta els requisits estructurals), l'expansió tèrmica (requereix muntatges adequats) i la densitat del patró (afecta els càlculs de càrrega de vent).
- Pantalles de privacitat: Els panells de tamisat exterior equilibren el control de visibilitat amb la circulació d'aire i la transmissió de llum. L'obertura del patró sol variar entre el 30% i el 60%: percentatges més baixos ofereixen més privacitat però redueixen la llum natural. Per a patis, jardins i patis interiors, els pantalles d'alumini resisteixen la corrosió i alhora romanen prou lleugers per a muntatges residencials.
- Sistemes de protecció solar: Panells perforats o amb motius col·locats com a brise-soleil redueixen la calor solar mentre es mantenen les vistes. L'orientació del motiu i la mida dels forats afecten directament el rendiment d'ombra: les ranures horitzontals funcionen de manera diferent que les perforacions circulars per controlar diferents angles del sol.
La Metrix Group assenyala que l'escala i la proporció són fonamentals pels panells arquitectònics: pantalles grans poden sobrecarregar espais petits, mentre que els panells massa petits es perden en façanes extenses. En seleccionar motius, cal considerar com interactuen els dissenys amb la geometria del edifici i els elements del paisatge circumdant.
Solucions de senyalització des de l'àmbit empresarial fins al residencial
Què separa una senyalització oblidable dels senyals que aturen la gent en sec? Més enllà de la creativitat del disseny, la selecció de materials i l'acabat determinen si el seu senyal cridarà l'atenció durant anys o bé passarà inadvertit en pocs mesos.
Els senyals metàl·lics dissenyats a mida per a entorns específics superen de manera considerable les alternatives genèriques. A continuació s'explica com adaptar les estratègies de senyalització a diferents entorns:
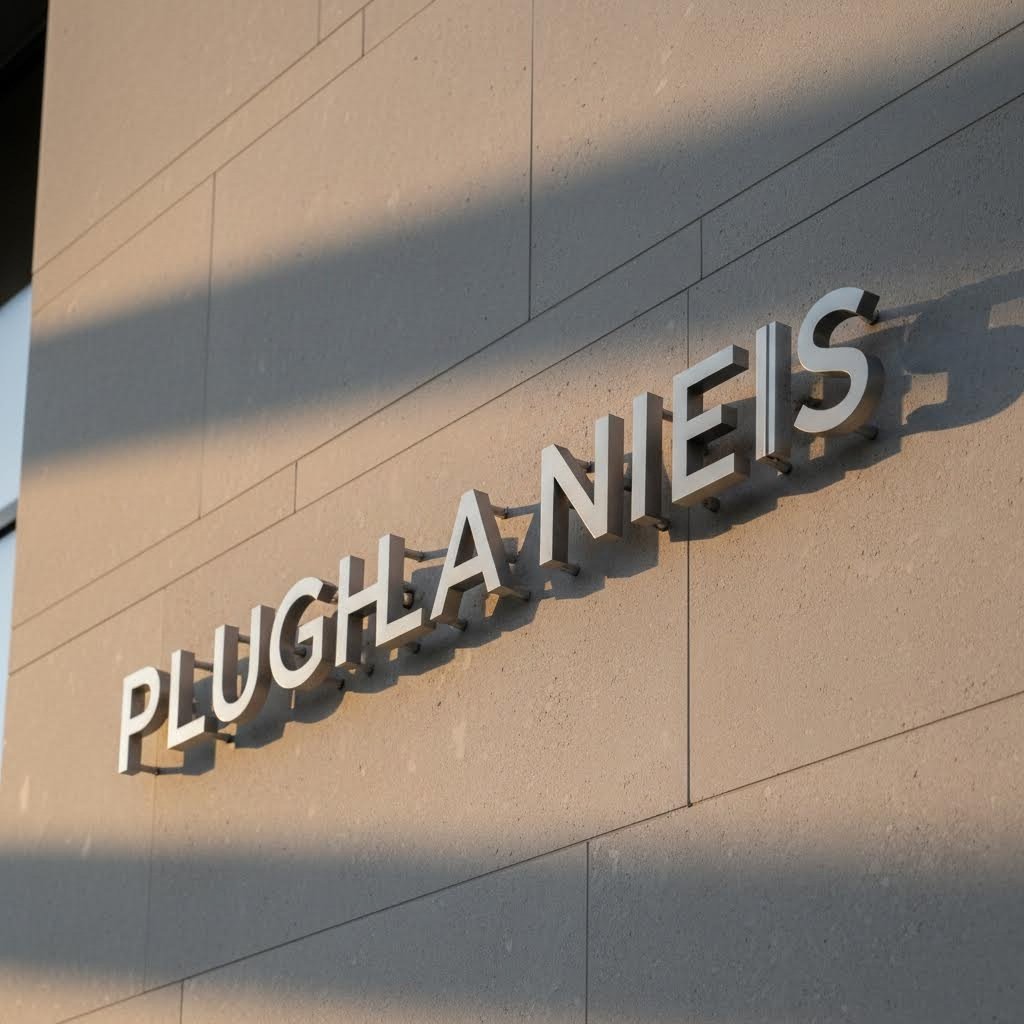
- Senyals comercials per a façanes: Les instal·lacions exteriors de senyals metàl·lics personalitzats han d'enfrontar-se a l'exposició als raigs UV, canvis de temperatura i precipitacions. Segons SmartSign, els senyals metàl·lics d'alumini ben mantinguts poden durar una dècada o més, oferint la millor longevitat entre els materials habituals per a senyals. Per assolir el màxim impacte, considereu l'ús de senyalització en relleu, on lletres tallades amb làser individuals es muntin lleugerament separades de la paret, creant profunditat d'ombra.
- Senyals metàl·lics per a identificació d'empreses: La senyalització permanent per a instal·lacions es beneficia de materials més gruixuts (calibre 11-14) que resisteixen el vandalisme i danys accidentals. L'acer inoxidable ofereix una aparença professional que transmet permanent i autoritat, especialment eficaç per a despatxos professionals, centres mèdics i institucions financeres.
- Senyals metàl·lics per a jardins i marcadors d'adreces: Les aplicacions residencials sovint prioriten l'estètica per sobre de la màxima durabilitat. Els mànecs d'alumini recoberts en pols suporten perfectament les condicions típiques del jardí i oferixen una àmplia varietat d'opcions de color. Dissenyos decoratius de senyals metàl·liques que incorporen números de casa, noms familiars o motius artístics afegeixen atractiu visual mentre compleixen funcions pràctiques d'orientació.
- Senyalització d'orientació i direccional: Els entorns universitaris, parcs i instal·lacions grans requereixen famílies de senyals consistents on múltiples peces comparteixen un disseny comú. El tall làser permet una reproducció precisa en desenes o centenars de senyals, mantenint la coherència de marca que reforça la identitat professional.
Art decoratiu de paret i aplicacions interiors
A l'interior dels edificis, els dissenys metàl·lics tallats amb làser compleixen funcions que van de purament decoratives a subtilment funcionals. L'entorn interior controlat permet triar materials centrats en l'estètica més que en la resistència als agents atmosfèrics.
- Senyals decoratives metàl·liques i art mural: Les peces interiors poden utilitzar acabats de coure, llautó i patinats que es deteriorarien a l'aire lliure. Els materials de calibre més fi (calibre 18-22) funcionen molt bé per a obres d'art penjades a la paret, ja que la rigidesa estructural és menys important que la delicadesa visual. L'il·luminació posterior transforma els panells plans en elements lumínics espectaculars; cal considerar la col·locació de les bandes LED en dissenyar peces destinades a ser il·luminades.
- Separadors d'habitacions i pantalles: Segons explica el Grup Metrix, les pantalles decoratives permeten que la llum passi mentre creen àrees diferenciades dins d'espais més grans, cosa que les fa ideals per a l'habitatge obert. A diferència dels murs sòlids, els panells perforats mantenen la connexió visual i la circulació de l'aire entre zones.
- Panells de sostre illuminació: Els panells suspesos tallats amb làser creen efectes superiors impressionants que interactuen tant amb la llum natural com amb la llum artificial. El disseny del motiu controla directament els efectes d'ombra: els motius geomètrics produeixen ombres nítides, mentre que els motius orgànics creen ombres més suaus i difuses.
- Insercions d'armari i detalls de mobiliari: Panells decoratius de metall a escala per a aplicacions de mobiliari afegeixen caràcter personalitzat als mobles empotrables, portes d'armari i peces de mobiliari personalitzades. Els materials més fins (calibre 20-24) s'integren perfectament en projectes de fusteria.
Graelles funcionals, ventilacions i elements pràctics
No totes les aplicacions de tall làser prioriten la decoració; moltes compleixen funcions funcionals essencials afegint alhora valor estètic:
- Graelles i cobertes de ventilació HVAC: Les cobertes personalitzades transformen obertures utilitàries en elements de disseny. El percentatge d'àrea oberta ha de mantenir un flux d'aire adequat: normalment un 50 % o superior per a les sortides d'aire, potencialment inferior per als conductes de retorn. La selecció del patró equilibra l'atractiu visual amb els requisits pràctics de circulació de l'aire.
- Cobertes de radiadors: Els panells tallats amb làser amaguen els elements de calefacció assegurant alhora la distribució de la calor. Els dissenys perforats permeten la convecció tèrmica mentre afegeixen un estil acord amb l'època o contemporani a qualsevol habitació.
- Pantalles de seguretat i portes: La densitat del patró i el gruix del material determinen el nivell de seguretat. Els gruixos més gruixuts (7-11) amb obertures més petites ofereixen propietats de barrera física, mentre que els materials més lleugers amb obertures més grans prioritzan la dissuasió visual i la privacitat.
- Coberts de claveguera i reixes: Les aplicacions exteriors requereixen materials resistents a la corrosió com l'acer inoxidable o l'acer galvanitzat. El disseny del patró ha d'evitar l'acumulació de residus mantenint alhora la capacitat de drenatge: sovint, els patrons radials tenen un millor rendiment que els patrons de quadrícula per a aquest propòsit.
Connectar les decisions de disseny amb resultats del món real
Cada categoria d'aplicació exigeix prioritats diferents. A continuació, es mostra una referència ràpida que connecta els tipus de projecte amb els factors clau de decisió:
| Tipus d'aplicació | Elecció principal del material | Gruix típic | Preocupació clau sobre durabilitat | Nivell de manteniment |
|---|---|---|---|---|
| Panells arquitectònics exteriors | Alumini o acer inoxidable | 11-14 gauge | Corrosió, desgast per UV | Baixa (neteja periòdica) |
| Senyals metàl·liques personalitzades per exteriors | Alumini amb recobriment en pols | 14-16 gauge | Intemperies, exposició a la llum UV | Baix a Moderat |
| Panells decoratius interiors | Acer, brass o coure | 18-22 gauge | Vetges digitals, pols | Moderada (eliminació de pols) |
| Pantalles de privacitat (exteriors) | Alumini | 14-16 gauge | Càrrega de vent, corrosió | Baix |
| Reixes funcionals | Acer o acer inoxidable | 16-20 gauge | Exposició a la calor, escombres | Moderat |
Fixeu-vos com les aplicacions exteriors prefereixen consistentment l'alumini i l'acer inoxidable per la seva resistència a la corrosió, mentre que les peces interiors poden explorar tot el ventall de materials, incloent-hi el llautó i el coure. Els gruixos més gruixuts serveixen per finalitats estructurals i de seguretat, mentre que els materials més fins permeten detalls decoratius més refinats.
Comprendre aquestes consideracions específiques de l'aplicació us ajuda a especificar projectes que funcionin tan bé cinc anys després de la instal·lació com el primer dia. És clar que les decisions de materials i disseny només representen una part de l'equació; pressupostar amb precisió requereix comprendre els factors de cost que influeixen en el preu final del projecte.
Factors de cost i consideracions pressupostàries
Heu seleccionat el vostre material, refinat el disseny dins dels límits tècnics i identificat l'aplicació perfecta. Ara arriba la pregunta que tothom es fa però que pocs recursos responen clarament: quant costarà realment? A diferència dels productes comercials amb preus fixos, els dissenys de metall tallats amb làser impliquen múltiples variables que es combinen per determinar la vostra inversió final.
Comprendre aquests factors que determinen el cost us permet prendre decisions informades: potser simplificant un element del disseny per millorar la qualitat del material, o ajustant la quantitat per obtenir preus per volum. Desglossarem exactament què influeix en els costos del tall làser i com planificar realment el pressupost del vostre projecte de senyalització o panell metàl·lic personalitzat.
Què determina el preu del tall làser
Segons Komacut, els factors principals que afecten els costos del tall làser inclouen el tipus de material, el gruix, la complexitat del disseny, el temps de tall, els costos de mà d'obra i els processos de acabat. Cada element influeix en l'eficiència i en els recursos necessaris per al procés de tall. Aquesta és la manera en què aquests factors es tradueixen en el pressupost del vostre projecte:
| Factor de cost | Nivell d'impacte | Com afecta a la fixació de preus | Consells per optimitzar el pressupost |
|---|---|---|---|
| Tipus de material | Alta | Els costos de les matèries primeres varien significativament: l'alumini costa menys que l'acer inoxidable, que al seu torn costa menys que el coure o el llautó | Ajusteu el material als requisits reals; no especifiqueu més del necessari |
| Gruix del material | Alta | Els materials més gruixuts requereixen velocitats de tall més lentes i més energia, augmentant així el temps de màquina | Utilitzeu el gruix mínim que compleixi els requisits estructurals |
| Complexitat de Disseny | Alta | Més forats signifiquen més punts de perforació i trajectòries de tall més llargues; els detalls intrincats exigeixen una major precisió | Simplifiqueu la geometria allà on el detall no sigui visible |
| Longitud total de tall | Mitjà-Alta | Els recorreguts de tall més llargs augmenten directament el temps de màquina i el consum d'energia | Optimitzeu els recorreguts; combineu múltiples peces en fulls individuals |
| Quantitat del pedido | Mitjà | Els costos de preparació es reparteixen entre més unitats; normalment, els comandes en gran quantitat reben descomptes sobre els materials | Valorieu la possibilitat de demanar peces addicionals per a necessitats futures |
| Requisits d'acabat | Mitjà | La pintura en pols, l’anodització i altres acabats suposen costos addicionals de mà d’obra, materials i temps de producció | Avalieu si l’acabat és necessari o només estètic |
Per què és tan important l’escorça del material? Segons La guia de costos de fabricació de Shixinproto , els materials més gruixuts requereixen més energia i velocitats de tall més lentes per obtenir tallades netes. Això augmenta el temps de tall i el consum d’energia, amb un increment resultant dels costos totals. Un senyal metàl·lic personalitzat en alumini de 1/8" es talla significativament més ràpid que el mateix disseny en acer inoxidable de 1/4".
Planificació pressupostària per a projectes metàl·lics personalitzats
Quan planifiqueu el pressupost per a senyals metàl·liques personalitzades o panells decoratius, ordenar els factors de cost segons el seu impacte us ajuda a prioritzar on centrar els esforços d'optimització:
- Selecció del material i gruix — El factor de cost més important. Triar l'alumini en lloc de l'acer inoxidable pot reduir els costos del material entre un 40 i un 60% per a dimensions equivalents. Reduir una mica la gruixositat (un gauge menys) sovint suposa estalvis d'un 15-25% amb un compromís estructural mínim.
- Complexitat del disseny i longitud del tall — Cada punt de perforació on el làser inicia un tall afegeix temps i energia. Un disseny amb 50 forats petits és més car que un altre amb 10 obertures més grans que cobreixin la mateixa àrea oberta. Les trajectòries de tall més llargues també augmenten el desgast de l'equipament.
- Quantitat del pedido — Els costos fixos d'instal·lació (programació, càrrega del material, calibratge de la màquina) es reparteixen entre totes les peces. Demanar 10 senyals metàl·liques personalitzades en comptes de 5 rarament duplica el cost total: el preu per unitat disminueix significativament amb la quantitat.
- Processos Secundaris — Acabar, desbaratar, xamfranar i roscar cada peça afegeix mà d'obra i temps d'equipament especialitzat. Segons Komacut, aquests processos augmenten la complexitat i la durada del cicle de fabricació.
- Eficiència del posicionament — La manera com encaixen eficientment les peces en una fulla afecta el desperdici de material. Segons Komacut, l'optimització del desplegament maximitza l'ús del material disposant les peces properes entre si, minimitzant el residu i reduint la necessitat de materials en brut.
Dissenyos personalitzats vs patrons estàndard: fer la inversió adequada
Aquí hi ha una pregunta amb què es troben molts compradors: justifica un disseny completament personalitzat per a una senyalització metàl·lica el seu cost addicional respecte a l'adaptació de patrons estàndard? La resposta depèn de la situació específica.
Quan els dissenys personalitzats justifiquen la inversió:
- La identitat de marca requereix elements visuals únics que els patrons estàndard no poden oferir
- La integració arquitectònica exigeix dissenys que complementin característiques específiques dels edificis
- Els requisits funcionals (àrees obertes específiques, punts de muntatge o dimensions) no coincideixen amb els estàndards disponibles
- El volum és prou elevat perquè els costos de disseny personalitzat s'amortitzin en moltes unitats
- La instal·lació és molt visible, cosa que converteix un disseny distintiu en una avantatge competitiu
Quan té sentit utilitzar patrons estàndard:
- Les limitacions pressupostàries restringeixen les opcions, i els dissenys estàndard satisfan les necessitats funcionals
- La pressió del calendari fa inviable el desenvolupament de dissenys personalitzats
- L'aplicació és utilitària i no defineix la marca
- Provar conceptes abans de comprometre's amb un desenvolupament complet personalitzat
Molts fabricants ofereixen opcions semi-personalitzades: patrons estàndard amb elements personalitzables com ara dimensions, sistemes de muntatge o text incorporat. Aquest terme mitjà sovint ofereix el 70% de l'impacte d'un disseny personalitzat al 30% del cost de desenvolupament.
La planificació pressupostària més efectiva considera el cost total del projecte, no només reduir el preu. Un material de menor cost que requereixi un acabadó costós pot acabar costant més que un material més car amb resistència natural a la corrosió. De manera similar, invertir en una optimització adequada del disseny des del principi sovint dóna dividends mitjançant una reducció del temps de tall i del desperdici de material.
Un cop establerta la vostra estructura pressupostària, hi ha una variable de cost important que mereix una exploració més profunda: les opcions d'acabat. El tractament superficial adequat protegeix la vostra inversió durant dècades, mentre que l'elecció equivocada pot portar a una fallada prematura independentment del que hagueu gastat en el tall.
Opcions d'acabat i tractaments superficials
El vostre disseny de metall tallat per làser surt de la màquina de tall amb vores precises i geometria perfecta, però encara no està preparat per a la instal·lació. Sense un tractament superficial adequat, aquest bell treball en metall fa front a un enemic invisible: la corrosió. L'acabat correcte transforma el metall cru vulnerable en una obra d'art resistente als elements. L'elecció equivocada? La vostra inversió es deteriorarà en qüestió de mesos.
L'acabat no és només cosmètic. Segons les proves comparatives de recobriments de SendCutSend, diferents acabats tenen un comportament molt diferent en condicions reals: alguns destaquen en resistència a l'abrasió mentre que altres ofereixen una millor protecció contra la corrosió. Comprendre aquestes compensacions us ajuda a especificar l'acabat perfecte per a la vostra senyalització exterior, panell arquitectònic o peça decorativa.
Pintura en pols vs Anoditzat vs Galvanització per immersió en calent
Tres mètodes d'acabat dominen la indústria del tall de metall amb làser, cadascun amb avantatges i limitacions definits. A continuació es mostra com es comparen en funció dels factors més rellevants per al rendiment a llarg termini:
| Tipus de acabat | Metalls compatibles | Qualificació de durabilitat | Cost relatiu | Opcions de color | Entorns recomanats |
|---|---|---|---|---|---|
| Revestiment en polvere | Acer, Alumini, Acer Inoxidable | Excel·lent (abrasivitat, impacte) | Baix a Moderat | Colors RAL gairebé il·limitats, metàl·lics, textures | Interior, Exterior, Industrial lleuger |
| Anodització Tipus 2 | Només aluminio | Bo (superfície prima però dura) | Moderat | Limitat—transparent, negre, bronze, daurat, vermell, blau | Interior, Exterior, Arquitectònic |
| Anoditzat tipus 3 (recobriment dur) | Només aluminio | Excel·lent (molt dur, resistent a l’abrasió) | Alta | Limitat — normalment gris fosc fins a negre | Industrial, d’alt desgast, marí |
| Revestiment de zinc | Només acer | Bo (protecció catòdica contra la corrosió) | Baix a Moderat | Aspecte metàl·lic argentat/gris | Industrial, exterior moderat |
| Galvanització per Immersió en Calent | Només acer | Excel·lent (capa gruixuda de zinc) | Moderat | Només gris metàl·lic | Exterior, marí, industrial, agrícola |
Què signifiquen aquestes qualificacions en la pràctica? Les proves d'abrasió de SendCutSend van revelar que l'acer amb recobriment en pols va superar notablement tots els altres acabats, durant gairebé 10 vegades més que el segon classificat abans que el recobriment s'acabés desgastant. Tanmateix, un cop ratllat, el recobriment en pols no ofereix cap protecció subsegüent, mentre que els acabats basats en zinc continuen protegint fins i tot quan estan malmesos.
Comprensió dels punts forts de cada acabat
Explorarem quan cada acabat és més adequat per al vostre projecte:
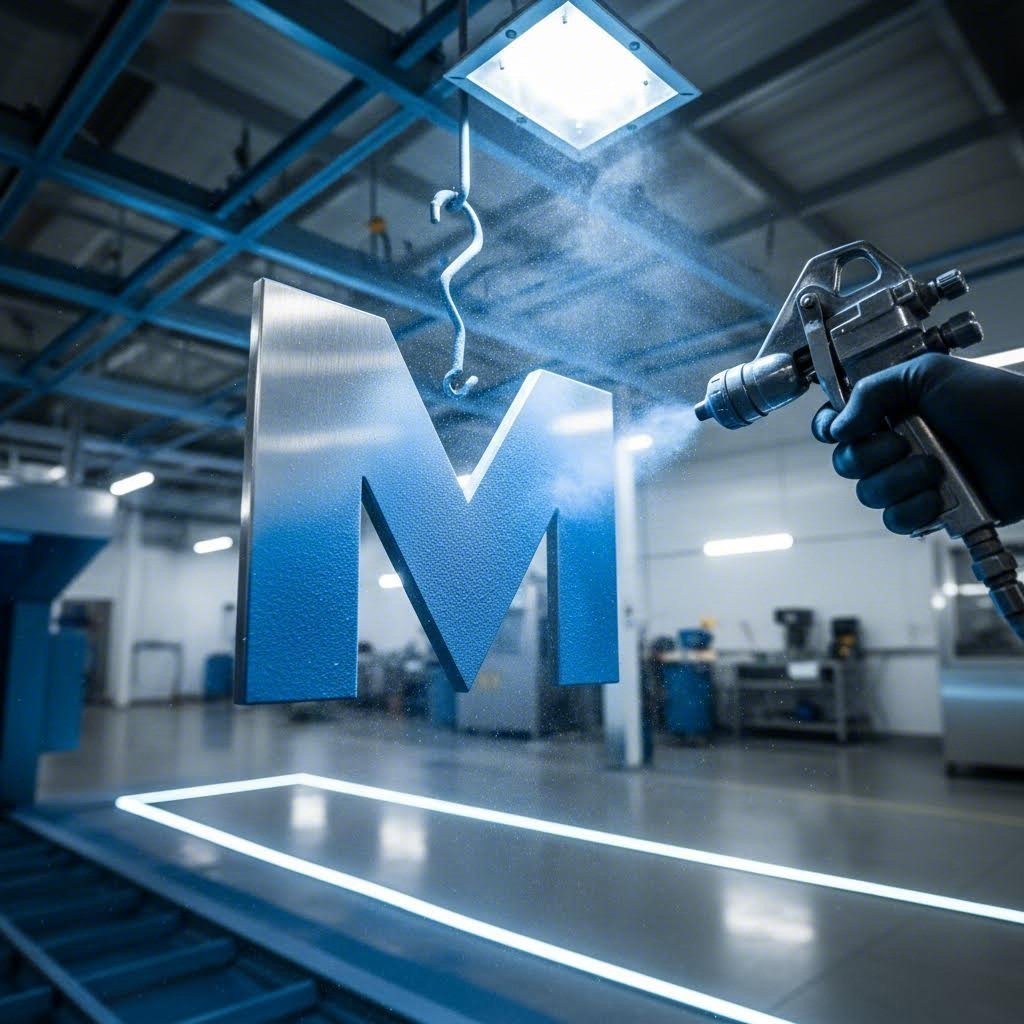
Revestiment en pols: Aplicat electrostàticament i curat amb calor, el recobriment en pols crea una capa gruixuda i durable que es fixa mecànica i químicament a les superfícies metàl·liques. Segons Palm City Iron Works , aquest procés crea una unió molt més gruixuda i dura que la pintura, fet que explica per què les estructures metàl·liques amb recobriment en pols tenen una vida útil significativament més llarga que les peces pintades. L'acabat evita l'oxidació —la causa arrel de la ferruga— i ofereix opcions de color sense igual.
- Ideal per: Senyals metàl·liques exteriors, panells decoratius, elements arquitectònics que requereixin colors específics de marca
- Vida útil esperada: 15-20 o més anys amb una preparació adequada i polsim de qualitat
- Manteniment: Neteges periòdiques amb sabó suau; inspecció anual per detectar esquerdes o danys
Anodització tipus 2: Aquest procés electroquímic converteix la superfície d'alumini en una capa d'òxid d'alumini dur. A diferència dels recobriments que es dipositen a sobre, l'anodització esdevé realment part del metall. Les proves de SendCutSend han confirmat que l'anodització tipus 2 ofereix el recobriment més fi amb un impacte dimensional mínim, alhora que proporciona una bona durabilitat.
- Ideal per: Senyals metàl·liques personalitzades a l'aire lliure, perfils arquitectònics, aplicacions que requereixin toleràncies ajustades
- Vida útil esperada: 10-20 anys segons l'entorn i el color
- Manteniment: Neteges senzilles; manteniment extremadament baix
Anodització tipus 3 (Hardcoat): Una versió més gruixuda i dura de l'anoditzat estàndard, el tipus 3 ofereix una excepcional resistència al desgast. Les proves van mostrar que era la segona millor opció en resistència a l'abrasió, afegint un gruix mínim. L'acabat va tenir un rendiment molt bo en totes les proves de durabilitat, cosa que el converteix en una opció segura per a aplicacions exigents.
- Ideal per: Senyals metàl·liques exteriors amb alt trànsit, components industrials, ambients marins
- Vida útil esperada: Més de 20 anys en condicions típiques
- Manteniment: Mínim; neteja ocasional
Galvanitzat de zinc i galvanització per immersió en calent: Ambdós processos apliquen zinc a superfícies d'acer, però mitjançant mètodes diferents i amb resultats molt diversos. El galvanitzat de zinc crea una capa fina i uniforme, ideal per a aplicacions interiors o protegides. La galvanització per immersió en calent submergeix l'acer en zinc fos, creant un recobriment molt més gruixut. Segons McLean Company assenyala, els recobriments de zinc actuen com a protecció sacrificial: el zinc es corroeix en lloc de l'acer subjacent, continuant protegint fins i tot quan està ratllat.
- Ideal per: components estructurals, senyals exteriors metàl·liques en ambients agressius, equip agrícola
- Vida útil esperada: 25-50+ anys per a la galvanització per immersió en calent; 5-15 anys per al recobriment de zinc
- Manteniment: inspeccionar la presència de èxid blanc (òxid de zinc); en general, manteniment baix
Ajustar els acabats a les condicions ambientals
On estarà el vostre disseny de metall tallat per làser? Les condicions ambientals haurien de determinar la selecció de l'acabat més que la preferència estètica. Aquesta és la manera d'ajustar els acabats a condicions d'exposició específiques:
- Ambients interiors: Gairebé qualsevol acabat funciona. Trieu segons l'estètica i el pressupost. Considereu recobriments transparents per preservar l'aparença natural del metall o la pintura en polvo per afegir color. El llautó i el coure poden quedar sense tractar per desenvolupar una patina natural.
- Exposició exterior estàndard: Les nanses d'alumini recobert amb pols o d'alumini anoditzat suporten perfectament les condicions meteorològiques típiques. Pel cas de l'acer, el recobriment en pols sobre superfícies correctament preparades ofereix una excel·lent protecció. En senyals metàl·liques per a instal·lacions exteriors, cal especificar formulacions de pols estables a la UV per evitar la descoloració.
- Ambients costaners i marins: L'escuma salina accelera enormement la corrosió. L'alumini anoditzat tipus 3 o l'acer inoxidable marí graduable són els que més bé funcionen. Per a l'acer, la galvanització per immersió en calent amb un recobriment superior de pols proporciona la màxima protecció. El recobriment de zinc estàndard falla relativament aviat en ambients salins.
- Entorns industrials: L'exposició a productes químics, l'abrasió i altes temperatures exigeix solucions especialitzades. L'anodització tipus 3 resisteix l'atac químic, mentre que el recobriment en pols suporta maltractaments físics. Consulteu amb els proveïdors de recobriments sobre exposicions específiques a substàncies químiques: alguns ambients requereixen recobriments especials.
Criteris de selecció de acabats segons l'aplicació
Quan especifiqui els acabats per al seu projecte de metall tallat al làser, avaluï aquests criteris segons l’ordre d’importància per a la seva aplicació concreta:
- Exposició ambiental: Interior, exterior, marí o industrial? Aquest únic factor elimina immediatament moltes opcions.
- Compatibilitat amb el substrat: L’anodització només funciona sobre alumini; la galvanització, només sobre acer. La tria del material pot determinar les opcions d’acabat.
- Requeriments de color: Necessita colors específics de marca? La recobriment en pols ofereix opcions il·limitades. Pot treballar amb tons metàl·lics o una gamma limitada de colors? L’anodització o la galvanització podrien ser suficients.
- Tolerància dimensional: L’anodització de tipus 2 afegeix un gruix mínim (aproximadament 0,0007" per costat). El recobriment en pols en afegeix més, normalment entre 0,002" i 0,004". La galvanització per immersió en calor en afegeix el màxim, cosa que pot afectar l’ajust de peces de precisió.
- Restriccions de Pressupost: El recobriment en pols sol oferir la millor relació qualitat-preu per a la majoria d’aplicacions. L’anodització de tipus 3 té un preu premium, però ofereix un rendiment excepcional.
- Vida útil prevista: Quant de temps ha de durar l'acabat? Especifica en conseqüència: sobre-dissenyar malgasta pressupost, mentre que sub-dissenyar provoca avaries prematures.
Les proves realitzades per SendCutSend van demostrar que cap acabat únic excel·leix en tot. El recobriment en pols és el millor en resistència a l'abrasió i als impactes. El galvanitzat de zinc ofereix protecció contra la corrosió de tipus sacrificial que continua funcionant fins i tot quan està malmès. L'anodització tipus 3 ofereix el millor rendiment general per a l'alumini, una opció segura que funciona bé en totes les proves.
L'acabat que triis té un impacte directe en el temps que els teus senyals metàl·lics exteriors, panells arquitectònics i elements decoratius conservaran l'aspecte desitjat. Invertir en un acabat adequat durant la fabricació costa molt menys que haver de substituir-los precoçment o fer restauracions extenses més endavant. Un cop tinguis presents les consideracions sobre l'acabat, entendre tot el procés del projecte, des del concepte inicial fins a l'entrega final, et permetrà navegar pel procés de fabricació amb confiança.
El recorregut complet del projecte des del concepte fins a la lliurament
Heu investigat els materials, heu entès les restriccions de disseny i heu especificat l’acabat perfecte. Però què passa realment entre la presentació del vostre disseny i la recepció de les senyals metàl·liques tallades al làser acabades? Per a molts compradors per primera vegada, aquest recorregut de producció sembla una caixa negra: els fitxers s’envien, les peces surten i la màgia que hi ha al mig roman misteriosa.
Aquest misteri acaba ara. Comprendre cadascuna de les fases del procés de fabricació us ajuda a establir expectatives realistes, a detectar possibles problemes de forma precoç i a avaluar si el vostre fabricant ofereix la qualitat que el vostre projecte mereix. Sigui quin sigui el cas, ja sigui que demaneu senyals metàl·liques personalitzades tallades al làser per a una nova empresa o senyals metàl·liques personalitzades tallades al làser per a un regal especial, conèixer aquest recorregut reforça la vostra confiança en la vostra inversió.
Des del concepte inicial fins als fitxers preparats per a la producció
Cada projecte de senyalització metàl·lica tallada al làser comença amb una idea, però transformar aquesta visió en un disseny fabricable implica diversos passos essencials. A continuació us mostrem com és el procés complet, des del vostre primer esbós fins a la lliurament final:
- Desenvolupament del concepte: El vostre recorregut comença definint què necessiteu. Esteu creant senyals metàl·liques tallades al làser per a la marca exterior? Panells interiors decoratius? Pantalles arquitectòniques funcionals? Clarificar la finalitat, les dimensions, els requisits d'instal·lació i els objectius estètics condiciona totes les decisions posteriors. Molts fabricants ofereixen consultoria de disseny en aquesta fase: aprofiteu-ne l'oportunitat. Els fabricants experimentats han vist milers de projectes i poden suggerir opcions que potser no havíeu considerat.
- Creació del disseny i preparació dels fitxers: Un cop el vostre concepte s’ha consolidat, cal crear fitxers aptes per a la producció. Això pot fer-ho el vostre dissenyador, l’equip del fabricant o un servei especialitzat. Segons Steelway Tall per Làser , els moderns talladors làser comercials utilitzen sistemes de control numèric per ordinador (CNC) que segueixen patrons digitals precisos. El vostre disseny ha de traduir-se en fitxers vectorials —normalment en format DXF— amb geometria neta, escala adequada i sense línies superposades. Aquesta fase sovint implica diverses revisions quan la intenció del disseny es troba amb la realitat de la fabricació.
- Revisió del disseny i anàlisi DFM: Abans de començar a tallar, els fabricants qualificats revisen els vostres fitxers per verificar-ne la fabricabilitat. Aquest anàlisi de Disseny per a la Fabricació (DFM) identifica possibles problemes: detalls massa petits per ser tallats neta, amplàries de pont massa estretes per a la integritat estructural o geometries que podrien deformar-se durant el procés. Segons MakerVerse , l'ample de tall (kerf) sol variar entre 0,1 mm i 1,0 mm segons el material i els paràmetres de tall; el vostre fabricant hauria de confirmar que el vostre disseny té en compte aquestes realitats.
- Selecció i adquisició de materials: Un cop finalitzat el vostre disseny, el fabricant obté el material especificat. Els terminis d'entrega varien significativament: els calibres habituals d'alumini i acer solen enviar-se en pocs dies, mentre que les ales especials o gruixos poc comuns poden requerir setmanes. Els fabricants qualificats verifiquen les especificacions del material entrant, comprovant el gruix, la composició de l'aliatge i l'estat superficial abans del procés.
- Producció de tall làser: El tall real té lloc sorprenentment ràpid si es compara amb el temps de preparació. Com assenyala Steelway, un cop les instruccions s'introdueixen al tallador làser, el feix concentrat segueix totes les especificacions sense intervenció humana: el cap de tall es mou automàticament segons sigui necessari. Aquesta precisió sense manipulació manual fa que les peces tallades per làser per a senyals metàl·liques personalitzades surtin exactament com estan programades, tant si demaneu cinc peces com cinc-cents.
- Procés secundari i acabat: Les peces tallades en brut normalment requereixen treball addicional. El desbarbat eliminia les vores afilades. El plecament o formació dóna forma a peces planes en formes tridimensionals. La preparació de la superfície —neteja, gravat o projecció— prepara les peces per al acabat. Aleshores arriba l'acabat especificat: recobriment en pols, anodització, galvanitzat o altres tractaments que protegeixen i embelliren la vostra peça.
- Inspecció de Qualitat: Abans de l'enviament, els fabricants reputats inspeccionen les peces acabades segons les especificacions. Això inclou la verificació dimensional, l'avaluació de la qualitat de l'acabat i la inspecció visual per detectar defectes. Segons West River Welding, les mesures de control de qualitat normalment inclouen procediments d'inspecció i proves exhaustives realitzades al llarg de diverses fases de producció.
- Embalatge i lliurament: L'embalatge adequat evita danys durant el transport que podrien arruïnar setmanes de feina cuidadosa. Els senyals i panells metàl·lics tallats amb làser necessiten protecció contra ratllades, indents i humitat durant el trànsit. El vostre fabricant hauria d'explicar el seu mètode d'embalatge i les opcions d'enviament durant la pressupostació.
Punts de control de qualitat durant la fabricació
Com podeu saber si el vostre fabricant ofereix treballs de qualitat? Busqueu aquests indicadors en cada fase de producció:
Indicadors de qualitat abans de la producció:
- Fan preguntes per aclaridores sobre la vostra aplicació, no només sobre les dimensions
- Proporcionen retroalimentació DFM identificant possibles problemes abans del tall
- Confirmen per escrit les especificacions del material, inclosos l'aliatge i el grau de temprat
- Ofereixen mostres o referències de projectes anteriors similars
Indicadors de qualitat durant la producció:
- Les vores tallades semblen netes i uniformes, sense excés de llots, rebave o decoloració
- La precisió dimensional coincideix amb les especificacions dins dels marges establerts
- La geometria complexa es reprodueix fidelment sense distorsió
- El material no presenta torsió, especialment en panells grans o calibres fins
Indicadors de qualitat d'acabat
- La cobertura del revestiment és uniforme, sense zones primes, goteigs ni àrees descobertes
- El color coincideix amb les mostres aprovades o amb els estàndards RAL/Pantone especificats
- La textura de la superfície roman consistent en totes les peces de la vostra comanda
- Els forats i vores dels accessoris reben una cobertura completa sense acumulacions
Preguntes essencials que cal fer als fabricants potencials
Abans de comprometre's amb qualsevol fabricant per al vostre projecte de senyals metàl·liques tallades per làser, aquestes preguntes revelen les seves capacitats, processos i compromís amb la qualitat:
- Quines són les vostres capacitats i equipament? Segons West River Welding , entendre els tipus de materials amb què tenen experiència—com ara l'acer, l'alumini o aliatges especials—ajuda a assegurar que puguin complir els requisits específics del vostre projecte. Consulteu sobre els tipus de làser (fibra vs. CO2), mides de llit i capacitats d'espessor.
- Podeu proporcionar referències o estudis de casos? Les experiències prèvies de clients atesten la fiabilitat i la qualitat del treball. Demaneu exemples de projectes similars als vostres; si han dut a terme amb èxit treballs comparables, és probable que també tinguin èxit amb el vostre projecte.
- Com assegureu el control de qualitat? Els fabricants qualificats descriuen procediments específics d'inspecció i proves realitzats durant les diferents fases de producció. Respostes vagues indiquen processos inconstants.
- Quins són els temps de lliurament habituals? Entendre els terminis d'entrega ofereix una mesura inicial d'eficiència i gestió de la càrrega de treball. Pregunteu específicament sobre l'abast del vostre projecte i la cartera actual de feina pendent.
- Quines toleràncies garanteixeu? Els fabricants professionals especifiquen toleràncies dimensionals concretes, normalment ±0,005" a ±0,010" per al tall làser. Eviteu els fabricants que no puguin o no vulguin comprometre's amb estàndards mesurables.
- Com gestioneu els fitxers que necessiten modificacions? La seva resposta revela si rebutjaran senzillament els fitxers problemàtics o si treballaran amb vostè per assolir la seva visió dins dels límits de fabricació.
- Quines opcions d'acabat oferiu internament i quines externalitzeu? L'acabat intern generalment significa un temps de resposta més ràpid i un millor control de qualitat. L'acabat externalitzat allarga el termini d'entrega i pot generar bretxes de comunicació.
- Com embaleu i envieu les peces acabades? Aquesta pregunta, sovint ignorada, revela l'atenció als detalls. Els fabricants de qualitat descriuen mètodes d'embalatge específics adequats al seu material i acabat.
El procés de fabricació pot semblar complex, però cada etapa té un objectiu: transformar el vostre concepte en una realitat duradora i estètica. Els fabricants que expliquen el seu procés de manera transparenta demostren confiança en la seva feina i respecte pel vostre investiment. Aquells que tracten la producció com un misteri podrien estar amagant una qualitat inconsistent o capacitats desactualitzades.
Amb coneixements sobre el procés i les preguntes adequades, esteu preparats per avaluar eficaçment els possibles col·laboradors. Però comprendre el procés és només una part del èxit del projecte; aplicar bones pràctiques de disseny específiques per al tipus d'aplicació assegura que els vostres dissenys de metall tallat amb làser aconsegueixin el màxim impacte.
Millors pràctiques de disseny segons el tipus d'aplicació
Heu seleccionat els materials, entès les restriccions tècniques i mapat tot el procés de fabricació. Ara arriba la part creativa: dissenyar peces metàl·liques tallades al làser que realment funcionin. Però això és el que la majoria de guies passen per alt: les bones pràctiques de disseny no són universals. Allò que fa que un senyal metàl·lic decoratiu sigui espectacular pot fracassar estrepitosament com a senyal comercial. El patró que crea una xarxa de privacitat elegant pot comprometre la integritat estructural de grans panells arquitectònics.
Resolem aquesta manca. Sigui quin sigui el vostre projecte —senyals de fusta tallades al làser per a una botiga, senyals artístics metàl·liques per a una galeria o reixes funcionals per a aplicacions de climatització i ventilació (HVAC)—, aquests principis específics per a cada aplicació us ajuden a dissenyar amb intenció, no a l’atzar.
Principis de disseny de senyalització per a un impacte màxim
La vostra senyalització metàl·lica té una finalitat principal: la comunicació. Totes les decisions de disseny haurien de contribuir a la llegibilitat, el reconeixement de marca i l'impacte visual des de la distància prevista de visualització. Sembla senzill? Us sorprendria veure com sovint aquests aspectes fonamentals es sacrifiquen per embelliments estètics que menyspreen la funció bàsica del cartell.
Millors pràctiques per a senyals làser tallades comercials i empresarials:
- Mida de les lletres segons la distància de visualització: Una regla general: cada polzada d'alçada de lletra proporciona aproximadament 10 peus de distància llegible. Un cartell pensat per ser llegit a 50 peus necessita un alçada mínima de lletra de 5 polzades. Les tipografies decoratives poden requerir mides encara més grans per mantenir la claredat.
- Prioritzeu el contrast sobre la complexitat: Segons Stealth Industry , la claredat és essencial en crear senyalització metàl·lica personalitzada. Les fonts excessivament complexes o ornamentals poden semblar atractives de prop, però dificultar la lectura des de lluny. Trieu mides de text adequades, estils de font clars i combinacions de colors amb bon contrast.
- Considereu el muntatge tridimensional: Les lletres tallades amb làser i muntades amb separadors creen una profunditat d'ombra que augmenta notablement la visibilitat. Aquesta tècnica senzilla transforma senyals plans en expositors dimensionals cridaners sense incrementar significativament els costos de materials.
- Disseny per a la integració de llum: Si el vostre senyal estarà il·luminat, planifiqueu-ho des del principi. L'il·luminació posterior amb LED, la il·luminació de vores i els efectes halo requereixen consideracions de disseny diferents: les mides dels forats, les disposicions de muntatge i la transparència del material influeixen tots en l'efecte final.
- Ajusteu el pes del material al sistema de muntatge: Un senyal d'acer inoxidable pesat requereix uns elements de fixació robustos. Dissenyar un senyal de mida gran sense tenir en compte les realitats de la instal·lació porta a solucions d'enginyeria costoses o, encara pitjor, a riscos de seguretat.
Errors habituals en projectes de senyals metàl·liques decoratives:
- Utilitzar tipus de lletra serif en mides petites: els detalls fins desapareixen durant el tall
- Oblidar que l'espai negatiu (forats) defineix el disseny tant com les àrees plenes
- Ignorar com el recobriment en pols afegeix gruix, podent omplir detalls fins
- Dissenyar sense tenir en compte com apareixeran les ombres a la superfície de muntatge
Els senyals gravats amb làser ofereixen una alternativa quan el vostre disseny requereix detalls fins que el tall no pot assolir. El gravat superficial preserva patrons intrincats mantenint la integritat estructural, ideal per a logotips detallats, codis QR o vores decoratives que envolten tipografia tallada.
Patrons de panells arquitectònics que funcionen
Les aplicacions arquitectòniques a gran escala exigeixen més que una simple atracció estètica: necessiten un criteri d'enginyeria estructural. Un patró bonic que funciona a escala de taula pot doblegar-se, deformar-se o fallar completament quan es fa servir en façanes d'edificis.
Millors pràctiques per a panells arquitectònics i pantalles de privacitat:
- Mantenir amplades de pont consistents: El metall sòlid entre els forats (ponts) proporciona integritat estructural. Variar l'amplada dels ponts en un panell crea una distribució desigual de les tensions i possibles deformacions. Mantingueu els ponts uniformes i no feu-los més estrets que el mínim recomanat per al vostre material i calibre.
- Tingueu en compte l'expansió tèrmica: Els panells metàl·lics grans s'expandiran i es contrauran amb els canvis de temperatura. Els sistemes de muntatge han d'acomodar aquest moviment; un muntatge rígid provocaria arrugaments. Disseny eu disposicions de muntatge que permetin un moviment controlat.
- Calculeu el percentatge d'àrea oberta: L'obertura del patró afecta la càrrega de vent, la transmissió de llum i la privacitat. Documenteu el percentatge d'àrea oberta del vostre disseny i verifiqueu que compleixi els requisits del projecte abans de la producció.
- Considereu l'orientació del patró: Els patrons horitzontals tenen un comportament diferent dels verticals sota la gravetat i la càrrega de vent. L'orientació del panell durant la instal·lació hauria de coincidir amb la intenció del vostre disseny.
- Especifiqueu el calibre adequat: Segons MakerVerse, espaiar la geometria de tall com a mínim dues vegades el gruix de la fulla ajuda a evitar distorsions. Les plaques més grans normalment requereixen gruixos més gruixuts per mantenir la planor: no subestimeu els requisits estructurals.
Millors pràctiques per a art decoratiu de paret i peces interiors:
- Disseny per a l'angle de visió: Les peces muntades a la paret s'observen típicament de front, mentre que les instal·lacions al sostre es veuen des de baix. La densitat del patró i l'escala del detall haurien de coincidir amb la perspectiva principal de visualització.
- Planificar els efectes de retroil·luminació: Les plaques interiors sovint incorporen il·luminació. Considereu com passarà la llum a través dels forats: perforacions més petites i denses creen un resplandor difós, mentre que obertures més grans projecten patrons d'ombra definits.
- Equilibrar l'espai positiu i negatiu: Els rètols d'art metàl·lic més impactants aconsegueixen harmonia visual entre el metall ple i les àrees tallades. Cap dels dos no hauria de sobrecarregar l'altre llevat que aquest desequilibri compleixi un objectiu de disseny específic.
- Considerar la patina del material: Les aplicacions interiors poden mostrar materials com el coure i el llautó que desenvolupen caràcter amb el temps. Dissenyi pensant en aquesta evolució: l'aparença inicial és diferent de la bellesa envellecida.
Millors pràctiques per a reixes funcionals i cobertes de ventilació:
- Prioritzi la superfície oberta per al flux d'aire: Els patrons decoratius han de mantenir una superfície oberta adequada, típicament un 50 % o més per als registres d'entrada. Els patrons bonics que restringeixen el flux d'aire comprometen el rendiment del sistema HVAC.
- Eviti geometries que acumulin residus: Les ranures horitzontals acumulen pols més ràpidament que les obertures verticals. Sovint, els patrons radials o diagonals equilibren estètica i consideracions pràctiques de manteniment.
- Dissenyi per a facilitar la seva retirada: Les reixes necessiten neteja periòdica o accés als sistemes situats darrere. Incloui elements de fixació que permetin la seva retirada fàcil sense eines ni danys.
Evitant errors i malentesos habituals
Després d'examinar milers de projectes de tall làser en metall, certs errors apareixen repetidament. Comprendre aquestes trampes li ajuda a evitar revisions costoses:
Error: Més detall equival a un disseny millor.
Realitat: Els detalls excessius augmenten el temps de tall, incrementen els costos i sovint es degraden més ràpidament durant l'acabat. La simplificació estratègica sovint millora tant l'estètica com la durabilitat. Recordeu que els dissenys de metall tallat amb làser es veuen des de distància: els microdetalls visibles al programari CAD desapareixen en la instal·lació real.
Error: Qualsevol fitxer vectorial està preparat per a la producció.
Realitat: Els fitxers de disseny requereixen una preparació específica per al tall làser. Les línies superposades provoquen talls dobles. Els camins oberts confonen el programari de tall. El text s'ha de convertir en contorns. Segons MakerVerse, la preparació adequada dels fitxers no és opcional: afecta directament la qualitat del tall i l'eficiència de producció.
Error: La selecció del material és purament estètica.
Realitat: Els diferents metalls responen de manera diferent a dissenys idèntics. Un patró que talla bé en aluminio pot deformar-se en coure a causa de les diferències de conductivitat tèrmica. La selecció del material i el desenvolupament del disseny haurien d'anar junts, no seqüencialment.
Error comú: L'acabat cobreix els defectes de disseny.
Realitat: El recobriment en pols i altres acabats en realitat posen de relleu les imperfeccions. Les vores esdevenen més prominents. Les planxes torçades continuen torçades. Un bon acabat millora un bon tall; no pot compensar una mala fabricació.
Treballar amb dissenyadors versus enfocaments fes-ho tu mateix
Quan has de contractar ajuda professional de disseny i quan pots fer front al disseny tu mateix amb confiança? La complexitat del projecte ofereix la guia més clara:
Projectes adequats per fer tu mateix:
- Patrons geomètrics senzills amb característiques uniformes
- Senyalització basada en text utilitzant tipus de lletra estàndard
- Adaptacions de dissenys existents a noves dimensions
- Peça única amb exemples de referència clars
- Projectes personals en què l'aprenentatge importa més que la perfecció
Disseny professional recomanat:
- Treballs d'identitat de marca que requereixen un llenguatge visual distintiu
- Instal·lacions arquitectòniques a gran escala amb requisits estructurals
- Patrons complexos que requereixen anàlisi d'enginyeria
- Producció en alt volum on l'optimització té un impacte significatiu en els costos
- Projectes amb requisits específics de rendiment (flux d'aire, transmissió de llum, càrrega)
La inversió en disseny professional sovint s'amortitza gràcies a una optimització en l'ús de materials, menys revisions i resultats finals superiors. En avaluar dissenyadors, busqueu experiència específica amb metall tallat al làser: les habilitats en disseny gràfic no impliquen automàticament una comprensió de les limitacions de fabricació.
Per a projectes de fabricació de metall de precisió que requereixin suport complet de Disseny per a Fabricació, fabricants com Shaoyi proporcione assessorament DFM que ajudi a optimitzar els dissenys per a l'eficiència de producció. Aquest tipus d'entrada experta és inestimable quan el seu disseny ha de compatibilitzar objectius estètics amb les realitats de fabricació: els fabricants experimentats entenen les limitacions dels materials que poden passar per alt dissenyadors purament visuals.
Llista de comprovació del disseny abans d'enviar els fitxers
Abans d'enviar el seu disseny per a la producció, verifiqui aquests elements clau:
- Tot el text convertit a contorns/rutes
- Cap línia superposada ni duplicada
- Totes les formes completament tancades
- Les mides mínimes de les característiques compleixen els requisits del material
- Les amplàries de pont són adequades per a la integritat estructural
- Les unitats del fitxer coincideixen amb les dimensions previstes
- El disseny està escalat a la mida real de producció
- Provisions de muntatge incloses quan sigui necessari
- Percentatge d'àrea oberta documentat (per a aplicacions funcionals)
- Material i acabat especificats en la documentació adjunta
Aquest enfocament sistemàtic detecta problemes que causen retards en la producció i desbordaments de costos. Dedicar una hora extra per revisar minuciosament els fitxers sovint estalvia dies de cicles de revisió.
Un cop dominades les millors pràctiques de disseny per a la vostra aplicació específica, roman una decisió crítica: seleccionar el soci de fabricació adequat per transformar el vostre disseny optimitzat en una realitat impecable. Els criteris per a aquesta avaluació —i les preguntes que revelen la capacitat real— mereixen atenció concentrada.
Triar el soci de fabricació adequat
Ja heu dominat els materials, entès les restriccions, optimitzat el vostre disseny i mapatgejat el recorregut de producció. Ara arriba la decisió que determina si tota aquesta preparació es tradueix en resultats espectaculars o en una decepció frustrant: seleccionar el vostre soci de fabricació. Aquesta elecció importa més del que la majoria de compradors creuen: el mateix fitxer de disseny produeix resultats molt diferents segons qui talli, acabi i lliuri la vostra feina.
Penseu-hi d’aquesta manera: un fabricant experimentat transforma bons dissenys en senyals i panells metàl·lics excepcionals. Un fabricant mediocre redueix fins i tot conceptes brillants. Sigui que creeu senyals metàl·liques personalitzades per a una ocasió especial o senyals metàl·liques personalitzades per a l’exterior per a una visibilitat de marca duradora, la selecció del vostre soci afecta directament la qualitat, el termini i l’èxit general del projecte.
Avaluació de proveïdors de serveis de tall per làser
No tots els fabricants mereixen el vostre negoci. Aquests criteris d’avaluació us ajudaran a distingir els autèntics socis dels simples acceptadors de comandes, que podrien comprometre el vostre projecte:
- Certificacions sectorials i sistemes de qualitat: Les certificacions revelen el compromís amb una qualitat constant. Segons Xometry, la certificació ISO 9001 demostra el compliment de sistemes normalitzats de gestió de la qualitat que asseguren la traçabilitat, la documentació i l’excel·lència dels processos. Per a components metàl·lics de precisió que requereixen normes de qualitat automotriu, fabricants com Shaoyi ofereixen la certificació IATF 16949: el marc de qualitat rigorós de la indústria automotriu, que limita els defectes i redueix els residus. Busqueu tallers que puguin documentar els seus processos de qualitat, no només que en facin afirmacions.
- Temps de resposta i agilitat: Amb quina rapidesa poden pressupostar el vostre projecte? Quant de pressa lliuren les peces acabades? Segons TMCO, comprendre els temps de resposta proporciona una mesura inicial de l'eficiència i la gestió de la càrrega de treball. Els fabricants qualificats ofereixen capacitats de prototipatge ràpid en 5 dies i mantenen una comunicació transparent durant tot el procés de producció. Shaoyi, per exemple, ofereix un temps de resposta de 12 hores, cosa que demostra la rapidesa que heu d'esperar dels col·laboradors seriosos.
- Opcions de materials i inventari: El fabricant disposa dels materials que necessiteu, o la seva adquisició allargarà el vostre calendari setmanes? L'ampli ventall de materials indica profunditat en la fabricació. Verifiqueu que pugui gestionar el tipus específic de metall, el rang de gruixos i els requisits de quantitat abans de comprometre-vos.
- Capacitats d'acabat L'acabat intern agilitza la producció i manté el control de qualitat. Segons TMCO, gestionar cada pas sota un mateix sostre minimitza retards, millora la consistència i assegura la responsabilitat durant tot el procés. Pregunteu específicament si el recobriment en pols, l'anodització o el galvanoplastia es fan in situ o estan externalitzats.
- Serveis de suport al disseny: Els millors socis de fabricació ofereixen més que tallar: proporcionen anàlisi de disseny per a la fabricació (DFM) que optimitza el vostre disseny per a la producció. TMCO assenyala que els socis clau efectius no només segueixen plànols, sinó que col·laboren des del començament, oferint modelatge CAD/CAM, capacitats de prototipatge i consultories d'enginyeria per millorar el rendiment i reduir el desperdici.
- Equipament i tecnologia: Els làsers de fibra moderns, els sistemes CNC avançats i l'automatització robòtica indiquen una inversió en qualitat i eficiència. Segons TMCO, la fabricació de precisió depèn en gran mesura de l'equip adequat: la tecnologia avançada permet cicles de producció més ràpids, toleràncies més ajustades i una millor repetibilitat.
- Escalabilitat: Poden gestionar un únic prototip i posteriorment escalar a quantitats de producció? TMCO subratlla que els millors col·laboradors disposen de xarxes robustes d'abastament i una capacitat de producció flexible per satisfer demandes en evolució, tant si necessiteu una peça com milers.
- Comunicació i transparència del projecte: Una comunicació clara sovint determina l'èxit del projecte. Cerqueu gestors de projecte dedicats, actualitzacions regulars sobre l'evolució i resolució proactiva de problemes. Els fabricants que tractin el vostre projecte com una caixa negra podrien estar amagant processos incoherents.
Començar el vostre projecte de disseny metàl·lic personalitzat
Al llarg d'aquesta guia, heu construït un marc complet de presa de decisions. Així és com tot s'enllaça:
Resum del vostre marc de decisió:
- Selecció de material equilibra la resistència a la corrosió, el pes, el cost i els objectius estètics amb els requisits específics de la vostra aplicació
- Limitacions de disseny estableixen què és físicament assolible: mides mínimes de detall, amplades de pont i consideracions del tall que transformen conceptes creatius en realitat fabricable
- Millors pràctiques específiques per a l'aplicació asseguren que el vostre disseny compleixi la seva funció prevista, ja sigui comunicació de marca, protecció de privacitat o impacte arquitectònic
- Selecció d'acabats protegeix la vostra inversió durant anys o dècades, adaptat a l'exposició ambiental i a les expectatives de manteniment
- Avaluació dels col·laboradors identifica fabricants amb les certificacions, capacitats i compromís necessaris per dur a terme la vostra visió sense errors
Els vostres passos següents segons l'etapa del projecte:
Si encara esteu explorant possiblitats:
- Recopieu imatges d'inspiració que mostrin estils, materials i aplicacions que us interessin
- Definiu els requisits del vostre projecte: dimensions, entorn, rang pressupostari i cronograma
- Reviseu les taules de comparació de materials i acabinats per reduir les vostres opcions
- Considereu si necessiteu assistència professional de disseny o si podeu preparar els fitxers vosaltres mateixos
Si ja teniu un concepte de disseny preparat:
- Verifiqueu que el vostre disseny compleixi les restriccions tècniques indicades en aquesta guia
- Prepareu fitxers preparats per a la producció en format DXF amb geometria neta
- Documenteu les vostres especificacions: material, gruix, acabat i quantitat
- Identifiqueu tres a cinc fabricants potencials que coincideixin amb els requisits del vostre projecte
Si estàs preparat per sol·licitar pressupostos:
- Envoieu especificacions idèntiques a diversos fabricants per obtenir una comparació precisa
- Formuleu les preguntes d'avaluació indicades anteriorment: les respostes revelen la capacitat real
- Sol·liciteu mostres o referències de treballs previs similars
- Avaluar el valor total, no només el preu, inclosa l'assegurança de qualitat, el temps de resposta i la comunicació
- Confirmar totes les especificacions per escrit abans que comenci la producció
El vostre viatge de disseny de metall tallat amb làser no acaba amb la fabricació; allà és on comença. El senyal de metall, el panell arquitectònic o la peça decorativa que creeu avui formarà part d'edificis, marques i espais durant anys. Aplicant els coneixements d'aquesta guia, assegureu que aquesta inversió ofereixi un valor durador: precisió que honra la vostra visió de disseny, durabilitat que resisteixi condicions reals i bellesa que capti l'atenció des del primer dia fins al desè any.
El camí des del primer esbós fins a l'entrega impecable ja és clar. El vostre proper pas? Feu-lo.
Preguntes freqüents sobre dissenys de metall tallat amb làser
1. Quins materials es poden tallar amb làser per a senyals i panells metàl·lics?
El tall làser funciona excel·lentment amb alumini, acer suau, acer inoxidable, llautó i coure. L'alumini ofereix una gran resistència amb un pes reduït i una resistència natural a la corrosió, el que el fa ideal per a senyalització exterior. L'acer inoxidable proporciona una longevitat incomparable en entorns agressius. El llautó i el coure aporten una estètica càlida amb desenvolupament natural de patina, perfecte per a aplicacions decoratives. Els làsers de fibra gestionen especialment bé metalls reflectants com l'alumini i el coure, mentre que tant els làsers CO2 com els de fibra produeixen talls nets en acer. La selecció del material hauria de correspondre’s amb l'exposició ambiental del projecte, els requisits de pes i les limitacions pressupostàries.
2. Com puc trobar senyals metàl·liques tallades amb làser a prop meu?
Quan cerqueu serveis locals de tall per làser, avaluïu els fabricants segons les seves certificacions (ISO 9001 o IATF 16949 per a treballs de precisió), capacitats d'equipament (làsers de fibra vs CO2), opcions de materials i serveis de acabat. Demaneu mostres de treballs anteriors similars al vostre projecte. Els fabricants de qualitat ofereixen anàlisi DFM (Disseny per a Fabricació), comunicació transparent i terminis clars d'entrega. Per a una precisió d'automoció, fabricants com Shaoyi ofereixen qualitat certificada IATF 16949 amb respostes en 12 hores i suport complet en DFM.
3. Quina és la mida mínima de característica per a dissenys de metall tallat per làser?
Les mides mínimes de les característiques depenen del tipus de material i del gruix. En general, el diàmetre mínim del forat ha de ser igual o superior al gruix del material per obtenir resultats nets. Per a l'alumini de 1 mm, espereu característiques mínimes d'uns 0,020 polzades; per a l'acer inoxidable de 3 mm, aproximadament 0,045 polzades. Les amplades dels ponts entre els tallats han de mantenir la integritat estructural, normalment entre 0,030 i 0,080 polzades segons el calibre. L'amplada de tall (material eliminat pel làser) varia entre 0,006 i 0,040 polzades, fet que significa que qualsevol característica més petita que l'amplada de tall desapareixerà durant el procés de tallat.
4. Quant costen els senyals metàl·lics personalitzats tallats amb làser?
Els costos del tall làser depenen del tipus i gruix del material (l'alumini és més econòmic que l'acer inoxidable), la complexitat del disseny (més forats augmenten el temps de tall), la longitud total del tall, la quantitat de comanda i els requisits d'acabat. Els materials més gruixuts requereixen velocitats de tall més lentes, cosa que augmenta el temps de màquina. Les comandes en volum redueixen el cost per unitat, ja que les despeses d'instal·lació es reparteixen entre més peces. L'optimització del posicionament maximitza l'ús del material, reduint el desperdici. Els dissenys personalitzats justifiquen uns costos més elevats quan la identitat de marca exigeix elements visuals únics o la integració arquitectònica demana patrons específics.
5. Quines opcions d'acabat protegeixen el metall tallat amb làser a l'aire lliure?
El recobriment en pols ofereix una excel·lent resistència a l'abrasió i als impactes, amb opcions de color il·limitades i una durada exterior de 15-20 anys o més. L'anodització tipus 2 (només alumin) crea una superfície prima i dura, ideal per a aplicacions arquitectòniques. L'anodització dura tipus 3 proporciona una resistència excepcional al desgast en entorns amb molt trànsit o marins. La galvanització per immersió calenta protegeix l'acer amb capes gruixudes de zinc que duren entre 25 i 50 anys o més mitjançant protecció contra la corrosió sacrificant-se. En entorns costaners, combini la galvanització per immersió calenta amb un recobriment superior en pols per assolir la màxima protecció contra la boira salina.