 Majhne serije, visoki standardi. Naša storitev hitrega prototipiranja omogoča hitrejšo in enostavnejšo validacijo —

Osnovno odpravljanje težav z ostrimi robovi pri žiganju
POVZETEK
Grizlji pri žiganju so pogosta napaka, ki jo povzročajo predvsem napačne reži med bati in orodjem, obrabljeno ali toplo orodje ter neustrezni parametri prese. Odpravljanje te težave zahteva sistematičen pregled orodnega kompletu, stanja orodja in nastavitev prese. Popravljanje teh mehanskih dejavnikov in dejavnikov procesa je bistveno za doseganje čistega strižnega preloma in zagotavljanje kakovosti delov.
Razumevanje nastanka grizljev: glavni vzroki
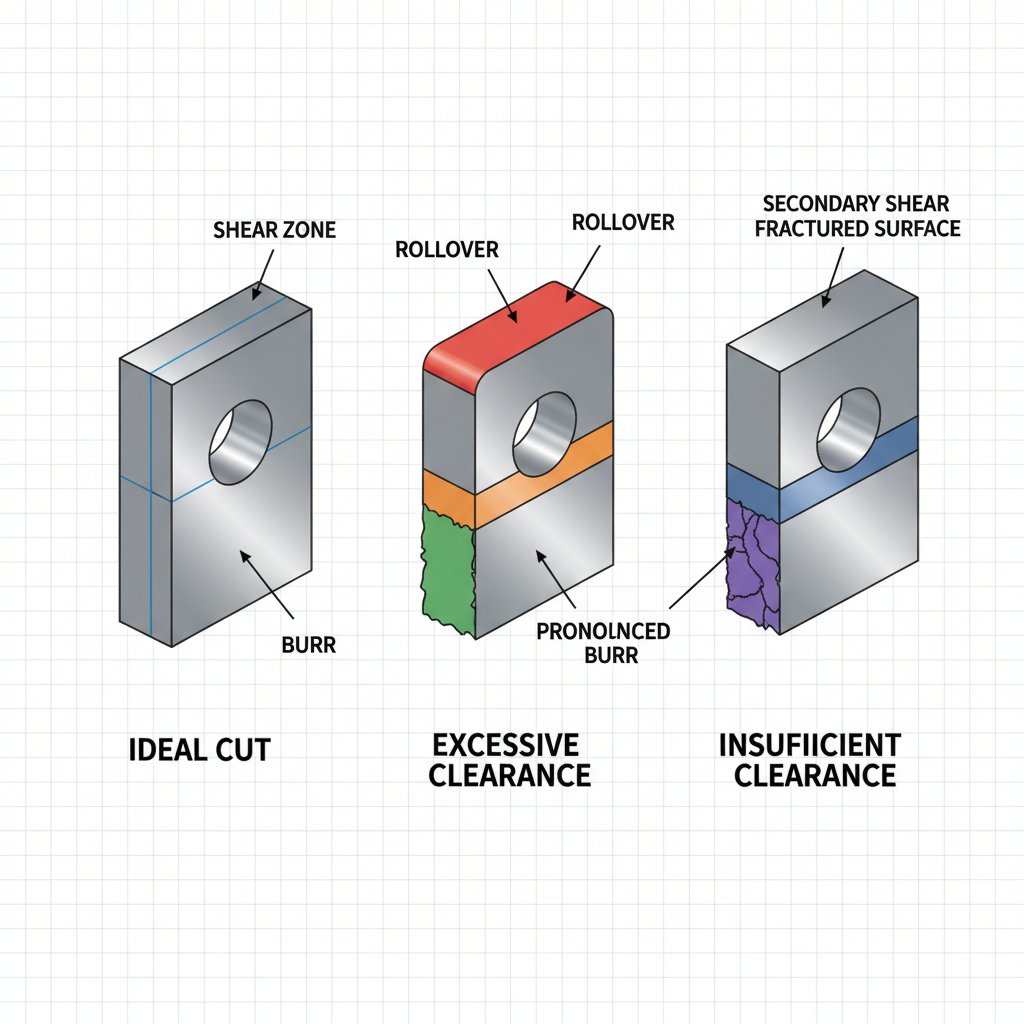
Grizlji so zarezani, dvignjeni robovi ali izbokline materiala, ki ostanejo pritrjene na polizdelek po opravilu žiganja. Glede na podrobne analize, kot so tiste od KEYENCE , ti napaki lahko povzročijo nezadostno točnost prileganja med deli in predstavljajo varnostna tveganja zaradi svojih ostrih koncev. Razumevanje njihovega nastanka je prvi korak pri preprečevanju. Idealni striženi rob sestoji iz treh različnih con: gladkega, zaobljenega roba, imenovanega zavijanje roba; sijajne, polirane površine, znane kot strižena površina; ter končno grobejše lomne površine, kjer se material loči.
Nastanek žlebov je neposreden rezultat okvare pri tem postopku striženja, ko se material ne prereže čisto, temveč se trga ali iztiska. To okvaro skoraj vedno lahko pripisujemo nekaj osnovnim mehanskim težavam. Najpomembnejši dejavnik je odmik – reža – med bati in matrico. Če je odmik prevelik, se material upogne in raztrga, kar povzroči velik prekriv in pomemben žleb. To se zgodi, ker material med udarcem batu ni ustrezno podprt.
Nasprotno, če je odmik prenizek, se lahko oblikuje sekundarna strižna površina, kar vodi do nastanka drobnih, bradavičastih žicastih grbetov in povzroča prevelik napetosti orodja. To ne vpliva le na kakovost izdelka, temveč pospešuje tudi obrabo orodja, kar vodi do olupljanja in predčasnega odpovedovanja. Splošno pravilo navaja, da je optimalen odmik med 10 % in 25 % debeline materiala, čeprav se ta vrednost razlikuje glede na natezno trdnost in duktilnost materiala.
Drugi glavni vzrok nastanka žlebkarjev je stanje orodja samega. Britva ali matrica z obrabljenimi, okrojanimi ali obrabljenimi rezili ne bodo učinkovito odrezala materiala. Namesto da bi prerezala kovino, bo obrabljeno rezilo preveč deformiralo in iztisnilo material, preden se ta prelomi, s čimer bo potisnilo žlebkar skozi režo. Kakovost orodne jeklene površine, njen termični obdelavi ter kakršnekoli površinske prevleke imajo pomembno vlogo pri tem, kako dolgo se ostra roba ohranja. Redna vzdrževalna dela in pravočasno brusenje sta nujna za nadzorovanje žlebkarjev.
Mehanski vodnik za pregled matrice, brikve in prese
Sistematični in temeljiti pregled mehanskih komponent je osnova učinkovitega odpravljanja napak pri nastanku žlebov pri žigosanju. Ta postopek zahteva več kot površinski pogled; vključevati mora natančno merjenje in analizo celotnega sistema žiganja, od samih kalupov do same prese. S sledenjem strukturiranemu kontrolnemu seznamu lahko tehniki učinkovito določijo in odpravijo korenine nastanka žlebov.
Pregled naj se začne z najpogostejšim krivcem: razmikom kalupa. Preveriti je treba, ali je razmak primeren za določeno vrsto in debelino obdelovanega materiala. To pomeni preverjanje tehničnih specifikacij kalupa ter dejansko merjenje komponent. Naslednja korak je ocena stanja orodja. Preveriti je treba rezalne robove batu in kalupa za znake obrabe, kot so zaokrožitev, olomljanje ali zalepljenje materiala. Moten rob je glavni vzrok nastanka žlebov in kaže na potrebo po brušenju. Kot opažajo strokovnjaki iz industrije pri Izdelovalec , nepravilne postopke brušenja lahko prekomerno segrejejo in poškodujejo orodno jeklo, zato je pri vzdrževanju ključnega pomena uporaba pravega kolesa in hladilnega sredstva.
Poleg zračnosti in ostrine je ključnega pomena tudi pravilna poravnava. Prebijalo mora biti popolnoma koncentrično z votlino matrice. Neporavnava dejansko ustvarja neenakomeren zračnost – pretesna na eni strani in preohlapen na drugi – kar povzroči nedosledne ostružke in prekomerno enostransko obrabo orodja. Preverite obrabo vodilnih zatičev, puš in drugih komponent za poravnavo. Nenazadnje je lahko vir težav tudi sama stiskalnica. Slaba natančnost stiskalnice, kot je velika reža v tirnicah stiskalnice ali pomanjkanje vzporednosti med drsnikom in delovno mizo, lahko povzroči, da se matrica med delovanjem premakne ali nagne, kar vodi do sprememb zračnosti in ostružkov. Celovit postopek odpravljanja težav mora vključevati oceno togosti in splošnega stanja stiskalnice.
Kontrolni seznam pregleda pri odpravljanju težav:
- Rez kalupa: Ali je razmik med brcanjem in matrico pravilen glede na debelino in vrsto materiala?
- Ostrovnost orodja: Ali so režnji roba brcanja in matrice ostri in brez lukenj ali prekomernega obraba?
- Poravnava orodja: Ali je brcanje pravilno poravnano in kocentrično z matrico? Ali so vodilni deli v dobrem stanju?
- Stanje stiskalnice: Ali je stiskalnica togotna in natančna? Ali sta drsnik in delovna površina vzporedna in brez prekomernega razhajanja?
- Maščiranje: Ali se uporablja pravi žigosni olje za zmanjšanje trenja in preprečevanje hitrega obraba orodja?
- Kakovost materiala: Ali je pločevina ravna in znotraj tolerance debeline?
Napredne strategije za preprečevanje in zmanjševanje nastanka žlebcev
Čeprav je reaktivno odpravljanje težav nujno, je najučinkovitejši in najcenejši pristop k upravljanju žlebov proaktiven preprečevanju. To pomeni premik izven rednega vzdrževanja in osredotočenje na napredna načela oblikovanja orodij ter optimizacijo procesa. Z inženirskim pristopom k procesu žigosanja, ki je od začetka bolj robusten, lahko proizvajalci znatno zmanjšajo pogostost in resnost napak, povezanih z žlebi, kar vodi do kakovostnejših delov in nižjih obratovalnih stroškov.
Ena strokovna strategija vključuje optimizacijo samega oblikovanja izrezkov. Na primer, pri obdelovanjih, izdelanih iz več delov, lahko poravnavanje sklepov zgornjih in spodnjih rezalnih delov povzroči hitrejše obrabo in erozijo, kar vodi do razpoka. Naprednejša tehnika je namerno neustrezno poravnati te ledvene linije, da se obraba bolj enakomerno razdeli. Druga napredna metoda, ki je še posebej uporabna za operacije obhodnega rezanja, kjer ena rezna jekleno drsi mimo druge, je zmanjšanje prostora za rezanje na približno tretjino normalne vrednosti posebej na točki obhodnega rezanja. To bolj strogo strpnost pomaga zmanjšati razpoke, ki se običajno tvorijo v takih scenarijih.
Za dosego te ravni natančnosti je potrebna velika strokovnost na področju strojev za izdelavo in izdelavo. Za zapletene aplikacije, zlasti v avtomobilskem sektorju, lahko sodelovanje s specializiranim proizvajalcem strojevih zagotavlja jasno prednost. Na primer, podjetje, kot je Shaoyi (Ningbo) Metal Technology Co., Ltd. ponuja napredne simulacije CAE in strokovno znanje o oblikovanju, s čimer se zagotovi, da so obloge optimizirane za minimalno nastajanje brkov že od prvega dne, kar je ključnega pomena za OEM in dobavitelje Tier 1.
Če so zaradi geometrije dela ali lastnosti materiala razkropitve neizogibne, je potreben sekundarni postopek razkropljanja. Vendar pa bi bilo treba to obravnavati kot skrajno sredstvo, saj povečuje čas in stroške proizvodnega cikla. Običajne metode razkropljanja vključujejo razkropljanje, vibrativno končanje, ščetkanje in razkropljanje s toplotno energijo. Izbira metode je odvisna od velikosti dela, materiala in zahtevane površinske obdelave. Ključni zaključek je, da je začetna naložba v napredno zasnovo in nadzor procesa skoraj vedno ekonomičnejša kot zanašanje na ponavljajoče se sekundarne operacije.
| Pristopom | Prednosti | Slabosti |
|---|---|---|
| Preprečevanje (konstrukcija in nadzor procesov) | Višja kakovost začetnega dela, nižja stopnja odpadkov, brez sekundarnih stroškov delovanja, daljša življenjska doba orodja. | Večje začetne naložbe v oblikovanje in natančno proizvodnjo. |
| Zmanjšanje (sekundarna obremenitev) | Lahko rešuje dele z neizogibnimi brblji, prilagodljiv za različne vrste delov. | Dodaja stroške in čas vsakemu delu, lahko povzroči dimenzionalne nedoslednosti, tveganje za preobdelovanje. |
Pogosta vprašanja
1. - Vprašanje: Kaj je defect?
Bors je ostri, razkošen izbok material, ki ostane na robu stampiranega dela po rezanju ali prebodanju. Dogaja se, ko se material raztrga ali deformira, namesto da bi se čistil. Velik hrup lahko ovira sestavljanje delov, zmanjša učinkovitost izdelka in predstavlja varnostno tveganje za obdelovalce.
2. Vprašanje: Katere so pogoste napake pri postopku tesnjenja?
Poleg brkov so še druge pogoste napake pri žigovanju kovin razpoke, gube, vrnitev (kjer se del deloma vrne v prvotno obliko), praske na površini in prekomerno tanjenje ali razpiranje materiala. Vsaka napaka ima različne vzroke, povezane z lastnostmi materiala, oblikovanjem obloge ali parametri procesa.
3. Vprašanje: Kaj povzroča razpoke pri stampiranju ali obdelavi?
Pri vsakem postopku rezanja, vključno s perforiranjem in obdelavo, nastanejo žlebovi, ko orodje material potisne ali pretrga namesto da bi ga čisto prerezo. Pri perforiranju so glavni vzroki napačna reža med bati in kalibrom, obrabljena ali topa rezalna roba ter nepravilna poravnava, kar vse skupaj preprečuje čisto strižno delovanje.
4. Kako žlebovi vplivajo na funkcionalnost komponent?
Žlebovi lahko hudo poslabšajo funkcionalnost komponent. Lahko preprečijo pravilno sestavljanje delov, kar vodi do težav pri sestavljanju. Pri gibljivih delih se žlebovi lahko odlomijo in onesnažujejo sisteme, kar povzroči predčasno obrabo ali okvaro. Njihovi ostri robovi lahko tudi prerežejo žice, poškodujejo tesnila ali predstavljajo tveganje za poškodbe.