 Jumlah kecil, piawai tinggi. Perkhidmatan prototaip pantas kami membuat pengesahan lebih cepat dan mudah —

Membeli Bahagian Dalaman Automotif: OEM/Pasaran Sekunder, Penggantian Atau Kit?
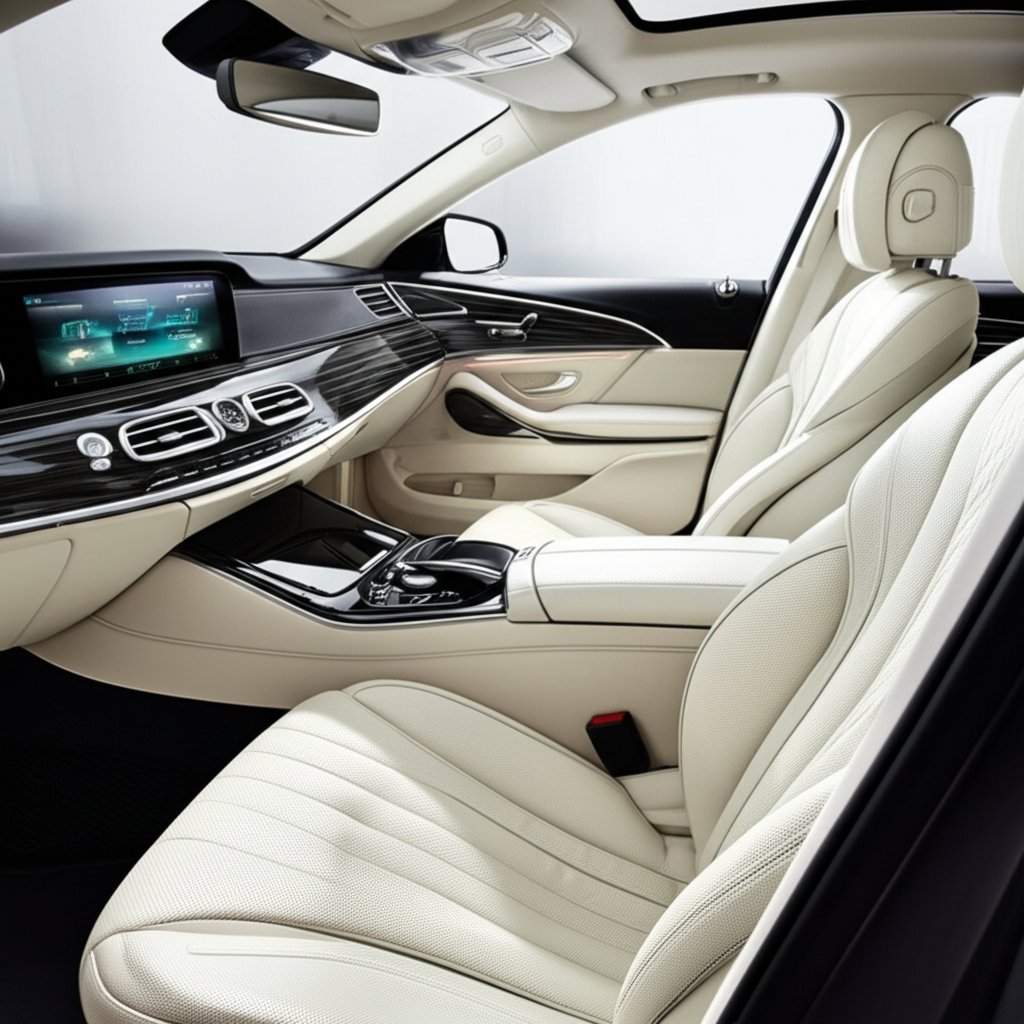
Apakah Yang Membentuk Kabin Kereta Anda?
Apakah Yang Termasuk Dalam Bahagian Dalaman Automotif
Apabila anda memasuki kenderaan, pernahkah terfikir berapa banyak komponen yang bekerjasama untuk menciptakan persekitaran yang selesa, selamat dan bergaya? Komponen dalaman kenderaan merangkumi jauh lebih daripada sekadar tempat duduk dan panel pemuka. Ia membentuk satu ekosistem yang kompleks direka untuk memberikan fungsi dan keselesaan, sambil juga melindungi anda dan penumpang. Mengetahui nama dan peranan bahagian-bahagian ini bahagian dalaman kereta adalah langkah pertama ke arah membuat keputusan peningkatan atau penggantian yang bijak.
- Sistem Tempat Duduk: Tempat duduk, sandaran kepala, pelaras tempat duduk, dan lapik
- Panel Kawalan & Papan Pemuka: Toleh, kawalan, hiburan maklumat, dan pelapik kluster
- Konsol Tengah: Ruang simpanan, pemegang cawan, tuil gear, dan rehat tangan
- Panel Pintu & Hiasan: Pemegang, kawalan tingkap, kunci, dan pembesar suara
- Pilar & Langit-langit: Lining bumbung, pilar A/B/C, dan konsol atas
- Sistem Lantai & Permaidani: Permaidani, tikar, penebat bunyi, dan rehat kaki
- Loji Keluar & Pinggir HVAC: Saluran udara, kawalan iklim, dan pemotong saluran
- Kekangan & Beg Udara: Tali pinggang keledar, beg udara, dan titik pengikat
- Penyimpanan & Pengganti: Laci sarung tangan, jaring muatan, poket belakang kerusi
- Kearah Elektrik: Butang, suis, soket kuasa, dan kawalan pencahayaan
Setiap salah satu daripadanya bahagian kereta interior memainkan peranan unik dalam membentuk pengalaman memandu anda. Sebagai contoh, panel pemuka bukan sekadar paparan—ia adalah pusat kawalan yang menggabungkan ciri keselamatan dan keselesaan.
Mengapa Bentuk Bahagian Dalaman Menentukan Keselesaan, Keselamatan, dan Nilai Jual Semula
Bayangkan pemanduan di mana setiap butang berada dalam jangkauan, kerusi memberi sokongan yang sempurna, dan kabin kekal tenang dan teratur. Itu bukan kebetulan. Komponen dalaman kereta direka bentuk untuk keselesaan, tetapi ia juga berfungsi sebagai sebahagian daripada sistem keselamatan kenderaan—fikirkan tentang beg udara, kaitan tali pinggang keledar, dan juga lapisan siling yang boleh memberi penebatan serta perlindungan hentaman. Bahagian dalaman kereta yang dikekalkan dengan baik bahagian dalaman kereta juga meningkatkan nilai jual semula kereta anda, kerana pembeli menilai kenderaan berdasarkan rupa dan perasaan di dalam kabin ( sumber ).
Pandangan utama: Banyak ciri keselesaan—seperti kerusi, sandaran kepala, dan juga dasbor—berfungsi berganda sebagai sistem keselamatan. Oleh itu, kejituan pemasangan untuk semua bahagian dalaman kereta adalah penting bagi perlindungan dan prestasi kedua-duanya.
Bagaimana Panduan Ini Membantu Anda Memilih, Membaiki, dan Mengesahkan Kejituan Pemasangan
Kedengaran rumit? Panduan ini menerangkannya secara ringkas. Anda akan menjumpai:
- Langkah pengesahan pemasangan untuk membantu anda mengelakkan pulangan yang mahal dan bahagian yang tidak serasi
- Aliran penyelesaian masalah bagi mod kegagalan biasa, seperti bunyi berderak, gegaran, atau kelengkapan haus
- Perbandingan bahan untuk membantu anda memilih kemasan yang sesuai dengan gaya hidup anda
- Label kesukaran pemasangan supaya anda tahu apa yang dijangkakan sebelum memulakan sesuatu projek
Kami menekankan penggunaan katalog bahagian OEM dan manual perkhidmatan kenderaan untuk mendapatkan nama bahagian dan spesifikasi tork yang tepat di mana-mana yang tersedia. Sebelum memesan, sentiasa semak data pembinaan kenderaan anda dan gunakan penyahkodan VIN untuk memadankan yang betul bahagian dalaman kereta dengan model khusus anda.
Sepanjang panduan ini, anda akan melihat jadual dan senarai semak yang memudahkan proses membuat keputusan—sama ada anda membandingkan bahan, menyelesaikan masalah panel berbunyi, atau mengesahkan kecocokan. Di mana nombor pengukuran atau nilai tork yang tepat disediakan dalam bahan rujukan, kami menyertakannya untuk kemudahan anda; jika tidak, kami menyediakan perbandingan berkualiti yang jelas untuk memastikan keputusan anda tepat dan berasas.
Nama, Gambar Rajah, dan Pengesahan Kecocokan Dijadikan Mudah
Nama yang Betul Mengatasi Tebakan
Pernah memesan alat ganti hanya untuk mendapati ia tidak sesuai dengan kereta anda? Mendapatkan nama bahagian dalaman kereta yang betul adalah sangat penting bagi memastikan pembaikan dan peningkatan berjalan lancar. Ramai bahagian dalam kereta mempunyai nama piawaian industri, tetapi penggunaan istilah kawasan atau jargon bengkel boleh menyebabkan kekeliruan. Sebagai contoh, apa yang seorang panggil "molding hiasan", orang lain mungkin memanggilnya "panel hiasan." Sebelum membeli, adalah bijak untuk menyemak silang nama dan lokasi bahagian tersebut dengan menggunakan manual pemilik dan katalog bahagian OEM ( sumber ).
| Nama Bahagian | Lokasi | Komponen Bersebelahan | Pemegang Biasa | Nama Samaran Biasa |
|---|---|---|---|---|
| Papan alat | Kabin depan, di belakang roda stereng | Turus stereng, pusat berkumpul | Klip, skru | Satah hadapan, dasbor |
| Konsole pusat | Di antara tempat duduk depan | Tempat duduk, tuas gear, pemegang cawan | Bolt, butang tekan | Kotak konsol |
| Panel pintu | Bahagian dalam pintu | Suis tingkap, rehat tangan | Klip, skru | Hiasan pintu |
| Hiasan tiang (A/B/C) | Sepanjang cermin depan, pintu, cermin belakang | Langit-langit dalaman, penutup pintu | Klip | Molding hiasan |
| Langit-langit dalaman | Bumbung dalaman | Hiasan tiang, visor matahari | Klip, gam | Liner bumbung |
| Ruang sarung tangan | Panel hadapan bahagian penumpang | Panel dasbor, beg udara | Skru, engsel | Kotak sarung tangan |
| Pemasangan kerusi | Lantai kabin | Rel kerusi, konsol tengah | Bolt, nat | Kerusi baldi, kerusi panjang |
| Permaidani lantai | Lantai kabin | Landasan kerusi, konsol | Velcro, butang tekan | Permaidani lantai, permaidani |
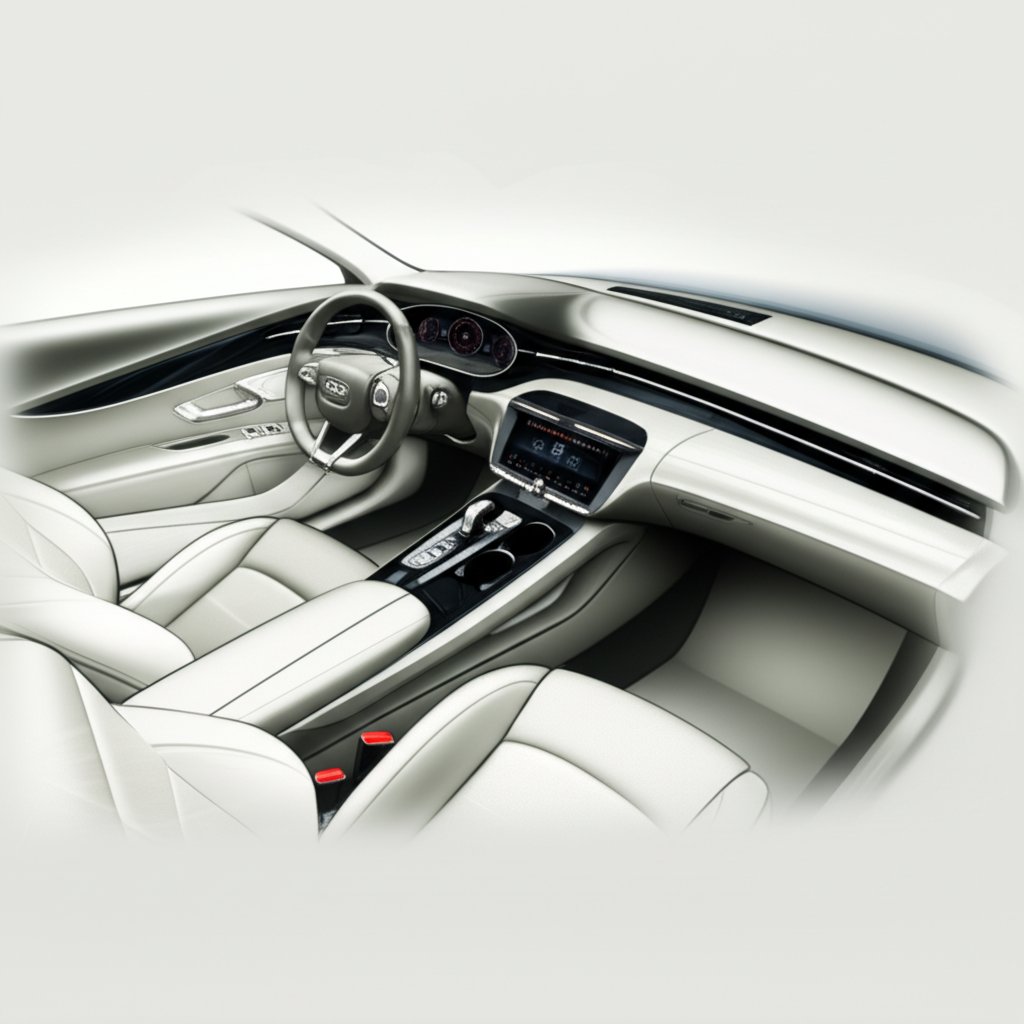
Bahagian-Bahagian Panel Hadapan: Nama dan Kedudukan
Apabila datang kepada nama bahagian panel hadapan kereta , kejelasan adalah penting bagi kedua-dua pesanan dan pemasangan. Berikut adalah rujukan pantas:
| Seksyen | Lokasi | Nama Samaran Biasa |
|---|---|---|
| Penebat Atas | Permukaan atas panel hadapan | Pad dashboard |
| Bingkai Kluster | Di sekeliling meter kawalan | Bingkai meter, hiasan kluster |
| Stack Pusat | Dashboard tengah, memegang kawalan | Bingkai radio, panel HVAC |
| Pintu Kotak Sarung Tangan | Bahagian depan kotak sarung tangan | Penutup kotak sarung tangan |
| Penopang Lutut Bawah | Di bawah tiang stereng | Penutup lutut |
Cara Membaca Label Bahagian dan Mengesahkan Kesesuaian
Kebanyakan bahagian dalaman kereta mempunyai nombor atau kod pengenalan yang diukir, dijenis, atau dilekatkan pada bahagian belakangnya. Semak di belakang panel, di dalam kotak sarung tangan, atau di bawah tempat duduk untuk label ini. Nombor-nombor ini adalah alat terbaik untuk mencocokkan bahagian pengganti—terutamanya apabila memesan secara dalam talian atau membuat rujukan silang dalam katalog.
Untuk mengelakkan pesanan yang salah, gunakan senarai semak kesesuaian ini sebelum membeli:
- Sahkan VIN (Nombor Pengenalan Kenderaan) dan nyahkodnya untuk tahun model, versi, dan pilihan
- Semak gaya badan dan konfigurasi tempat duduk (contohnya, dua pintu berbanding empat pintu, tempat duduk berkumpulan berbanding tempat duduk berasingan)
- Cocokkan kod warna dalaman (biasanya terdapat pada pelekat pembinaan di bahagian hujung pintu atau kotak sarung tangan)
- Sahkan pilihan audio, HVAC, dan beg udara (kerana pendawaian/penyambung mungkin berbeza)
- Kira penyambung pendawaian dan semak sebarang pengekodan atau bentuk unik
Kesalahan Pengenalan Biasa dan Tips Pra-Pasang
- Memanggil trim tiang sebagai "penutup ambang pintu"
- Mengelirukan bezel tumpuk tengah dengan panel trim radio
- Memesan pad dash apabila anda memerlukan bezel cluster
- Mengelirukan permaidani lantai dengan permaidani lantai yang boleh dikeluarkan
Jika manual perkhidmatan atau gambarajah bahagian anda menyenaraikan corak lubang pemegang atau kiraan klip, sentiasa bandingkan ini dengan bahagian sedia ada. Jika tidak, cari titik pemasangan biasa—seperti skru tersembunyi di belakang penutup trim atau klip plastik di sepanjang tepi panel. Pemeriksaan pra-pasang yang teliti membantu mengelakkan kekecewaan dan memastikan penggantian anda sepadan dengan lancar bersama bahagian lain dari bahagian dalam kereta .
Untuk keputusan yang paling boleh dipercayai, sentiasa menyemak dengan katalog OEM dan manual perkhidmatan kenderaan anda. Langkah ini sangat penting apabila berurusan dengan perbezaan halus dalam nama bahagian dalaman kereta merentasi jenama atau tahun model.
Seterusnya, kita akan meneroka pilihan bahan dan trim—supaya anda boleh memilih komponen dalaman yang tahan lasak terhadap gaya hidup anda dan kelihatan hebat untuk tahun-tahun mendatang.
Bahan dan Hiasan yang Tahan Lama dan Lebih Menarik
Plastik, Komposit, dan Filem Sentuhan Lembut
Pernah terfikir mengapa sesetengah hiasan Dalaman Kenderaan kelihatan baru untuk jangka masa yang panjang, manakala yang lain pudar atau retak? Jawapannya seringkali terletak pada bahan yang digunakan. Kebanyakan hiasan dalaman kereta dan panel diperbuat daripada plastik kejuruteraan, seperti ABS, polipropilena, atau TPO. Bahan-bahan komponen plastik kereta ini dipilih kerana keseimbangan antara ketahanan, kos, dan fleksibiliti reka bentuk. Filem sentuhan lembut dan buih PU digunakan pada kawasan yang kerap disentuh untuk keselesaan tambahan dan rasa berkualiti tinggi.
| Bahan | Ketahanan garisan | Ketahanan UV | Ketahanan bau | Kaedah pembersihan | Kebolehcetakan |
|---|---|---|---|---|---|
| Perut plastik | Tinggi | Baik | Rendah | Pembersih pH-neutral, microfiber | Baik |
| Polipropilena | Tinggi | Baik | Rendah | Pembersih pH-neutral | Cemerlang |
| TPO (Thermoplastic Polyolefin) | Tinggi | Cemerlang | Sangat Rendah | Pembersih plastik selamat khusus | Baik |
| Pu busa | Rendah | Sederhana | Sederhana | Sabun lembut, kain lembap | Buruk |
| Kulit | Tinggi | Sederhana | Rendah | Pembersih dan pelembap kulit | Buruk |
| Kain (Nilon/Polister) | Sederhana | Baik | Tinggi jika kotor | Detergen lembut, vakum | BERBEZA |
| Vinyl | Tinggi | Baik | Rendah | Kain lembap, pembersih vinil | Sederhana |
Tip: TPO berurat biasanya menyembunyikan calar dan kesan jari dengan lebih baik berbanding ABS berkilat, tetapi mungkin memerlukan pembersih khusus plastik untuk mengelakkan pembentukan sisa.
Kain, Kulit, dan Sistem Gelembung
Apabila memilih hiasan dalaman kereta untuk tempat duduk, panel pintu atau siling dalam kereta anda, gaya hidup adalah keutamaan. Kain adalah murah, tahan lama, dan rintang perubahan suhu, tetapi mudah berkesan dan menyerap bau, terutamanya untuk keluarga atau pemilik haiwan peliharaan ( sumber ). Kulit menawarkan kemewahan dan senang dilap bersih, tetapi memerlukan pengemapan secara berkala dan mudah terjejas oleh haba dan sejuk. Vinil mengisi jurang ini—mudah dibersihkan dan tiada bahan berasaskan haiwan, tetapi kurang tahan terhadap koyakan dan boleh berasa panas atau sejuk apabila disentuh.
-
Kain (Nilon/Polister):
-
Kelebihan
Berpatutan, selesa, tidak terlalu panas/sejuk -
Keburukan
Mudah berkesan, menyerap bau, dan boleh kelihatan uzur dari masa ke masa
-
-
Kulit:
-
Kelebihan
Sentuhan premium, mudah dibersihkan, nilai jual semula tinggi -
Keburukan
Perlu dikemaskan secara berkala, mahal, sensitif terhadap cahaya matahari dan suhu
-
-
Vinil:
-
Kelebihan
Mudah dibersihkan, berpatutan, pilihan vegan tersedia -
Keburukan
Lebih mudah koyak berbanding kulit, boleh berasa melekit atau panas/sejuk
-
Bahan-bahan Manakah Yang Sesuai Dengan Gaya Hidup Anda?
Bayangkan anda adalah pemilik haiwan peliharaan atau mempunyai anak kecil—bahan yang mudah dibersihkan, tahan calar auto parts plastic dan kain yang tahan kesan tompokan mungkin adalah pilihan terbaik untuk anda. Pemandu-pemandu off-roader atau pemandu kongsi perjalanan mungkin lebih memilih vinyl kerana ketahanan dan pembersihan yang cepat. Penggemar pemulihan dan pemilik kereta eksklusif biasanya mencari kulit asli atau rekaan dalaman berkala yang tepat, manakala mereka yang berminat car interior upgrades mungkin memilih filem berkualiti lembut atau Alcantara untuk memberi kesan kemewahan.
- Pemilik haiwan peliharaan: Pilih panel TPO atau polipropilena dan tempat duduk berbalut vinyl untuk memudahkan pengeluaran rambut dan pembersihan.
- Keluarga dengan anak-anak: Kain tahan kesan tompokan atau bahagian kereta berplastik yang tahan lasak di kawasan yang kerap digunakan.
- Pengemudi jalan berliku: Plastik yang kuat, bertekstur dan vinil yang mudah dilap.
- Pemulih/pemilik kereta pameran: Kulit asli atau corak kain klasik.
- Pemandu perkongsian perjalanan: Bahan yang tahan lama, rintang bau untuk pembersihan kerap.
Untuk pembersihan, sentiasa rujuk manual servis kenderaan anda atau notis jagaan OEM untuk produk yang diluluskan. Jika tiada spesifikasi, gunakan pembersih interior berkelainan pH neutral dan kain microfiber lembut untuk mengelakkan calar atau kekusaman hiasan dalaman kereta . Jangan guna bahan kimia keras pada mana-mana permukaan hiasan dalaman —ini boleh mempercepatkan luntur atau retak.
Apabila kerosakan berlaku, pengimpalan plastik boleh membaiki beberapa panel yang retak, tetapi patahan yang teruk mungkin memerlukan penggantian. Bagi tempat duduk, penambahan buih semula adalah lebih berkesan berbanding hanya menambahkan penutup, terutamanya jika keselesaan atau sokongan terjejas ( sumber ).
Seterusnya, kami akan menangani cara mengatasi masalah biasa pada bahagian dalaman—supaya kabin anda sentiasa senyap, selesa, dan kelihatan terbaik.
Mengatasi Bunyi Berdentum, Berkerisik, dan Mengendur pada Bahagian Dalaman
Menjadikan Panel Pintu Kedap Suara
Pernahkah anda merasa terganggu dengan bunyi berdentum yang tidak henti setiap kali melalui jalan berbumpa? Anda tidak keseorangan. Bunyi berdentum pada panel pintu merupakan antara masalah paling biasa yang menjejaskan komponen dalaman kenderaan, tetapi dengan pendekatan yang sistematik, anda boleh mengatasinya selama-lamanya. Berikut adalah alur penyelesaian masalah yang boleh anda ikuti:
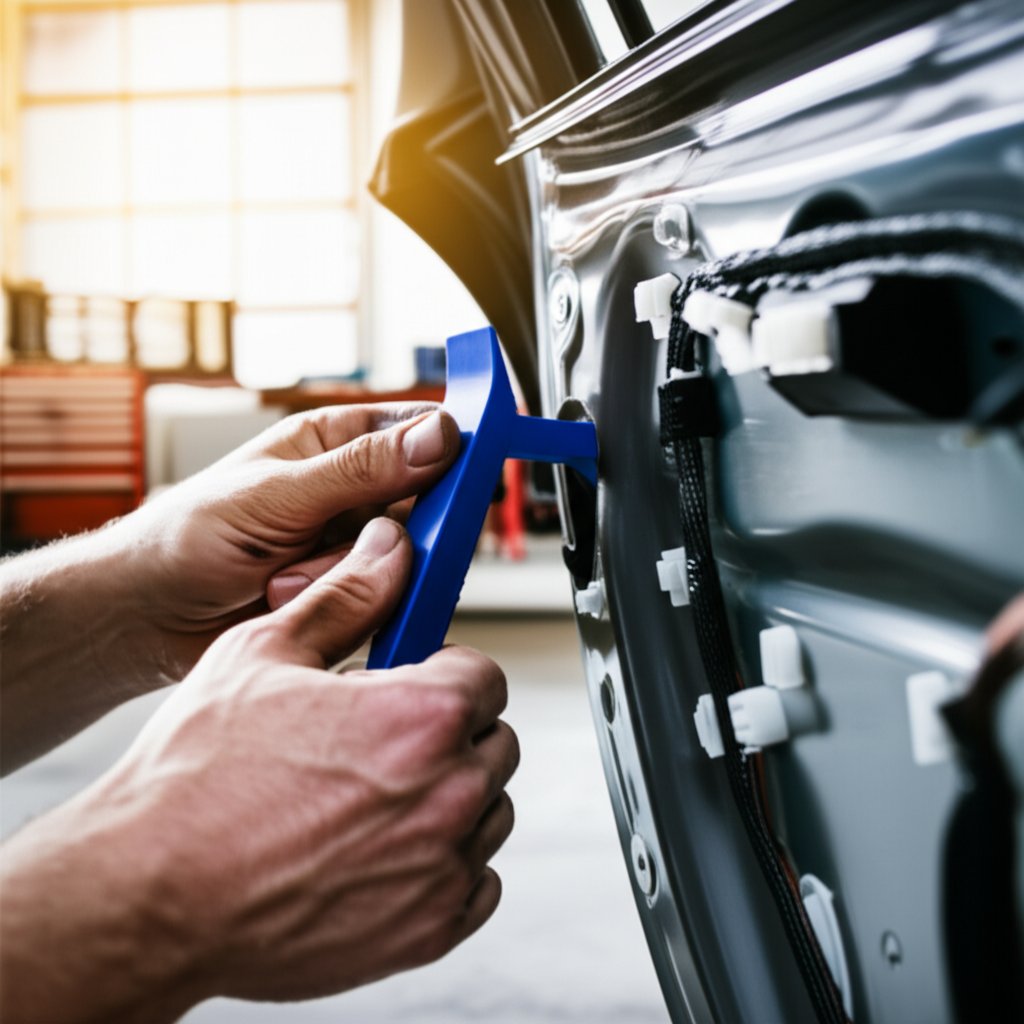
- Keluarkan panel hiasan dengan berhati-hati: Gunakan alat plastik untuk mengelakkan calar atau retak pada panel. Simpan semua skru dan klip di dalam bekas berlabel.
- Periksa sama ada klip rosak, skru longgar, atau pemegang speaker: Cari klip yang hilang atau rapuh—kitaran suhu boleh menjadikan klip plastik rapuh dari semasa ke semasa. Jika anda menjumpai klip yang telah lapuk, gantikannya dan jangan digunakan semula.
- Tambahkan pita beludru atau pemisah berbuih pada titik sentuhan: Gunakan bahan lembut pada mana-mana kawasan di mana plastik bersentuhan dengan logam atau permukaan keras yang lain. Ini menyerap getaran dan menghilangkan kebanyakan bunyi berderit dan berdentum ( sumber ).
- Torkan semula semua pengikat mengikut manual servis anda: Jika spesifikasi tork tidak disenaraikan, ketatkan secara sekata dan elakkan mengikut terlalu ketat, terutamanya pada tiang plastik.
- Ujian jalan raya: Bawakan kereta berpusing dan dengarkan sebarang bisingan yang tinggal. Jika bunyi berdentum berterusan, ulangi proses tersebut dan periksa semula titik sentuhan yang mungkin terlepas atau barangan yang longgar di dalam poket pintu.
Membaiki Langit-Langit yang Menggelembung
Langit-langit yang menggelembung atau berkesan boleh menjadikan kabin kelihatan usang dan malah menghalang penglihatan. Pembaikan langit-langit automotif aTAU penggantian bumbung dalaman kereta adalah kerja DIY yang boleh diuruskan jika anda mengikuti langkah-langkah yang betul. Inilah cara anda boleh menghadapinya:
- Periksa kegagalan gam, kehancuran buih, atau kebocoran air: Punca biasa termasuk haba, kelembapan, dan kebocoran saluran bumbung. Periksa semua tepi dan penjuru untuk tanda-tanda kelembapan.
- Tentukan sama ada untuk membalut semula atau mengganti sepenuhnya: Jika hanya kawasan kecil yang menggelembung, anda mungkin boleh menampal semula kain tersebut. Untuk penggelembungan yang meluas atau bau lapuk, penggantian penebat bumbung kenderaan adalah pilihan yang lebih baik.
- Keluarkan hiasan dan papan kepala: Gunakan obeng dan alat hiasan untuk melepaskan visor, lampu kubah, dan pemegang. Kemas dan susun semua perkakas yang dikeluarkan.
- Bersihkan dan sediakan papan: Keluarkan semua gam dan buih lama, kemudian berus atau vakum permukaan sebelum memasang bahan baru.
- Pasang fabrik penutup siling baru: Gunakan gam sembur bermutu automotif dan ratakan fabrik dari tengah ke tepi untuk mengelakkan gelembung atau kedutan. Potong bahagian berlebihan dan pasang semula.
- Alat panel (alat plastik untuk mencabik)
- Rivet plastik dan klip pelbagai jenis
- Pita belud atau penyerap buih
- Gam sembur (untuk penutup siling)
- Pencuci yang selamat untuk trim
- Pisau serbaguna atau gunting fabrik
Nota keselamatan: Sentiasa nyahaktifkan sistem SRS (beg udara) dan tunggu jangka masa yang disyorkan sebelum bekerja berhampiran panel atau roda stereng berkelengkapan beg udara. Rujuk manual servis kenderaan anda untuk arahan khusus.
Menghentikan Bunyi Berderak dan Klip Melekat
Bunyi berderak serta klip yang melekap atau rapuh biasanya disebabkan oleh perubahan suhu yang berulang dan plastik yang semakin tua. Untuk kereta baiki dalaman kerja, jangan gunakan paksaan pada klip yang tersekat—angkat dengan lembut dan gantikan mana-mana klip yang berasa rapuh. Penggunaan semula klip lama boleh menyebabkan masalah berulang. Semasa pemasangan semula, ikuti urutan yang dapat mengagihkan tekanan secara sekata dan mengelakkan panel daripada berpintal. Sekiranya manual anda menyenaraikan jumlah klip atau nilai kilasan tertentu, ikutinya. Jika tidak, gunakan prinsip pengetatan sekata dan elakkan kilasan berlebihan pada penyokong plastik.
Selepas pemasangan semula, uji untuk sebarang bunyi baru sebelum memandu. Ketuk dan lenturkan panel secara perlahan untuk memeriksa pergerakan atau bunyi berderak—mengesan masalah pada peringkat ini dapat menjimatkan masa dan tenaga kemudian hari.
Sama ada anda menangani bunyi berderak yang ringkas atau kerja yang lengkap kemaskini kekabu kenderaan , alat yang sesuai dan pendekatan berperingkat yang sabar adalah kunci untuk keputusan profesional yang tahan lama.
Seterusnya, kami akan menetapkan jangkaan untuk kesukaran pemasangan, julat masa, dan senarai semak kemasan yang penting bagi menjadikan setiap penggantian dalaman kenderaan projek pengalaman yang lebih lancar.
Kesukaran Pemasangan, Julat Masa, dan Senarai Semak Kemasan
Label Kesukaran Pemasangan Yang Boleh Dipercayai
Memikirkan untuk mengendalikan satu penggantian dalaman kenderaan atau hanya menukar beberapa panel dalaman kereta ? Sebelum anda terjun sepenuhnya, adalah lebih baik mengetahui dengan tepat apa yang bakal anda lakukan. Tidak semua kerjaan dalaman dicipta sama—ada yang boleh disiapkan dalam masa sebelah petang, manakala yang lain memerlukan kemahiran tingkat lanjut, alat khas, dan tangan yang teliti. Jadual di bawah merinci kerja dalaman lazim mengikut tahap kesukaran, anggaran masa, kemahiran utama, dan masalah biasa, supaya anda boleh menetapkan jangkaan yang realistik dan mengelakkan kejutan di tengah projek.
| Tugas | Kesukaran | Anggaran Masa | Kemahiran Diperlukan | Masalah Lazim |
|---|---|---|---|---|
| Mengganti Panel Pintu | Pemula | Pendek (30-60 min/pintu) | Memisahkan dengan berhati-hati, mengeluarkan skru | Skru tersembunyi, kancing rapuh |
| Mengganti Konsol Tengah | Peringkat pertengahan | Sederhana (1-2 jam) | Pelepas sambungan elektrik, penyingkiran trim | Panjang harness pendawaian, pendakap tidak selari |
| Memasang Trim Dashboard | Peringkat pertengahan | Sederhana (1-2 jam) | Penjajaran panel, urutan tork | Klip tersembunyi, kehampiran beg udara |
| Menukar Landasan Tempat Duduk | Maju | Diperpanjangkan (2-4 jam) | Tork bolt, sambungan elektrik, pengendalian kawat keselamatan | Bolt terkunci, sensor beg udara |
| Memasang Permaidani | Peringkat pertengahan | Diperpanjangkan (2-4 jam) | Keluarkan trim, potongan tepat, pasang semula | Penjajaran lubang pemasangan, pengangker tali pinggang keledar |
Untuk mereka yang mempertimbangkan penuh penggantian interior kereta atau menggunakan kit interior automatif , jangkakan kombinasi tugas-tugas ini—biasanya dengan sedikit pemotongan dan pelarasan sepanjang proses. Jika anda meningkatkan bahagian dasbor automatif atau memasang baru permaidani dasbor kereta , ingat bahawa persiapan yang teliti dan kesabaran akan memberi hasil akhir yang kemas dan profesional.
Alatan dan Kemahiran untuk Membongkar dengan Kemas
Bayangkan menarik panel hanya untuk memecahkan klip tersembunyi atau kehilangan skru yang jatuh jauh di bawah tempat duduk. Untuk mengelakkan masalah, sediakan alatan yang betul sebelum bermula. Berikut adalah apa yang anda perlukan untuk kebanyakan kerja bahagian dalam:
- Alatan pelepasan trim plastik (untuk menyelongkar tanpa menyekik)
- Pemutar skru Phillips dan kepala rata
- Set soket dan tali ratchet (untuk skru tempat duduk dan konsol)
- Playar dan cincin Hog-ring (untuk kemasan tempat duduk)
- Gam kemasan (untuk permaidani atau siling dalam kereta)
- Pisau serba guna atau gunting tajam (untuk memotong permaidani/buih)
- Beg atau bekas berlabel (untuk mengemas gerek kerja)
Tip Pro: Ambil foto semasa anda melakukannya, terutamanya apabila membuang penyambung wayar atau pemasangan yang kompleks. Imej-imej ini menjadikan pemasangan semula lebih lancar dan membantu memastikan setiap panel dalaman kereta muat seperti sepatutnya.
Pemeriksaan Kepasangan Sebelum Anda Memulakan
Tiada apa yang menghentikan sebuah penggantian dalaman kenderaan lebih cepat daripada mengetahui bahawa suatu bahagian tidak muat selepas anda mula membongkar perkara-perkara. Sebelum pemasangan, gunakan senarai semak pra-kepasangan ini untuk menjimatkan masa dan mengelakkan kesilapan yang mahal:
- Sahkan nombor bahagian berbanding VIN dan tahap trim anda
- Periksa kod warna yang sepadan pada semua panel dan fabrik
- Jajaran titik pemasangan dan uji-pasang panel dengan pita pelindung sebelum pemasangan akhir
- Kira penyambung wayar dan sahkan penentukuran (terutamanya untuk tempat duduk, konsol, dan komponen dasbor)
- Periksa kehadiran beg udara—jika bekerja berhampiran sistem SRS, rujuk sentiasa manual servis kenderaan anda dan ikuti semua prosedur untuk mematikan kuasa
Bagi komponen yang bersentuhan dengan tali pinggang keledar, beg udara, atau sistem sekatan keselamatan lain, jangan sekali-kali langkau langkah keselamatan. Sentiasa putuskan bateri dan beri masa menunggu yang disyorkan sebelum memutuskan sebarang sambungan SRS. Jika manual anda menyediakan corak lubang pemasangan atau spesifikasi kilasan, ikutinya dengan teliti; jika tidak, uji pasang semua komponen dan gunakan pita selak untuk melindungi permukaan siap semasa ujian penyelarasan.
Akhir sekali, simpan semua perkakasan yang dikeluarkan dalam beg atau bekas yang dilabelkan dengan jelas. Kebiasaan mudah ini akan mempercepatkan proses pemasangan semula, terutamanya bagi projek yang lebih besar kit interior automatif atau pelbagai langkah penggantian interior kereta projek ( sumber ).
Dengan persediaan, alat, dan semakan kemasan yang betul, peningkatan dalaman seterusnya akan berjalan lancar. Seterusnya, kami akan meneroka pilihan penyimpanan pintar dan pengedalaman yang menjadikan kabin baharu anda bebas daripada kekacauan dan praktikal.
Pemilihan Sistem Penyimpanan dan Pengedalaman Pintar Mengikut Kes Penggunaan
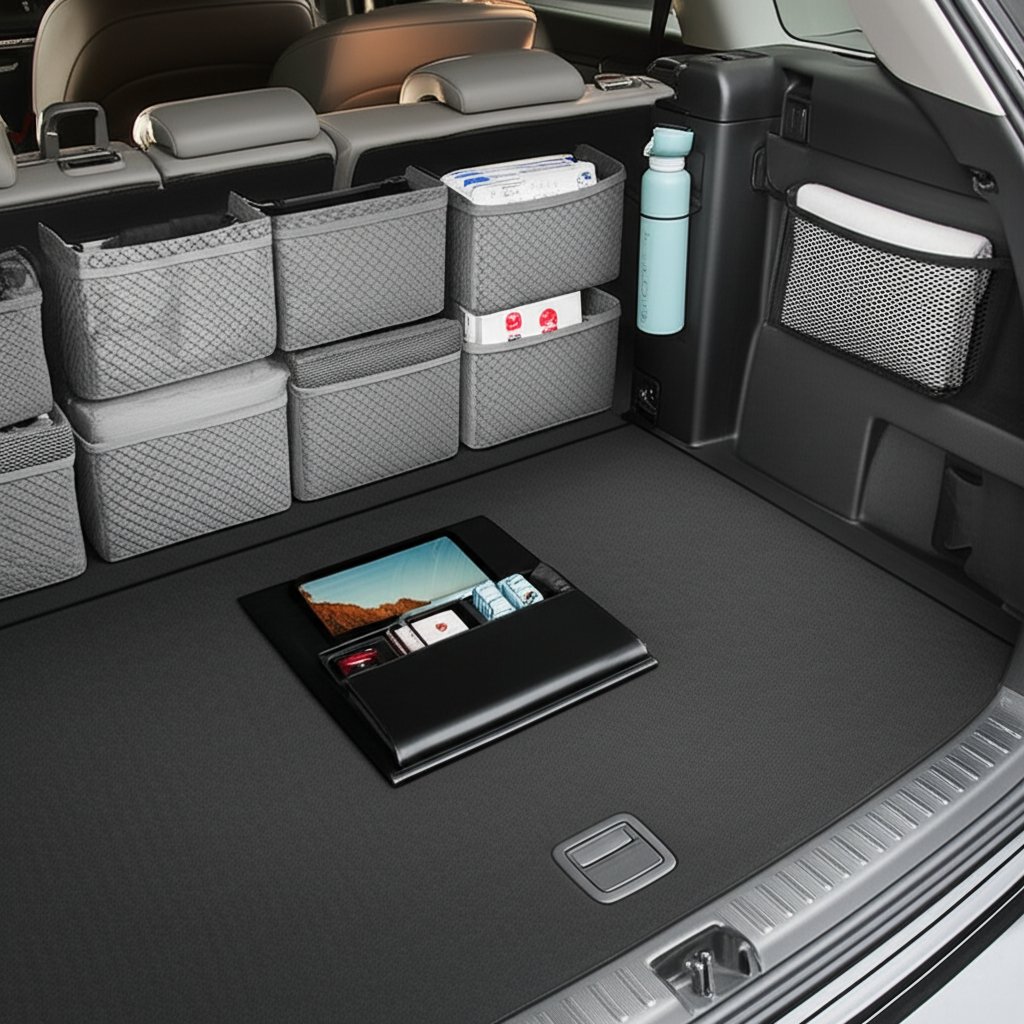
Kemas Kini Bahagian Boot dan Kawasan Kargo Anda
Pernahkah anda membuka boot kereta dan mendapati barangan keperluan harian bergolek tidak terkawal atau alat tertimbus di bawah timbunan barang? Penggunaan pemegang boot yang sesuai boleh mengubah kekacauan kepada keteraturan, menjadikan setiap perjalanan lebih selamat dan efisien. Namun dengan pelbagai pilihan yang ada--kotak berkemas tetap, beg lipat, dan peti modular--bagaimanakah anda memilih yang pengatur trak kereta untuk Keperluan Anda?
- Kotak berkemas tetap: Sesuai untuk menyimpan alat berat, kelengkapan kecemasan, atau peralatan sukan. Dindingnya yang keras mengelakkan isinya terhancur dan memastikan barang kekal terkemas walaupun semasa pusingan tajam ( sumber ).
- Pemegang jenis lembut yang boleh dilipat: Sesuai digunakan untuk penyimpanan harian, memegang beg boleh guna semula, atau menyimpan peralatan pembersih. Pemegang jenis ini boleh dilipat rata apabila tidak digunakan, memaksimumkan ruang boot.
- Pemegang modular: Sesuai untuk memisahkan barangan seperti makanan, elektronik, atau peralatan luar rumah--terutamanya berguna dalam sesebuah pengelola kargo suv susunan.
- Penyelesaian belakang tempat duduk dan menggantung: Menyelamatkan ruang boot dengan menyimpan barangan kecil di bahagian belakang tempat duduk, sesuai untuk kotak pertolongan cemas atau payung.
Cari ciri-ciri seperti tapak tidak bergerak, jahitan berlapis dan kait pelepas pantas untuk mengelakkan peralihan semasa brek. Bagi pemilik haiwan peliharaan atau keluarga, lapisan kedap air memudahkan kerja pembersihan, manakala sangkar lipat rata memberi fleksibiliti untuk projek DIY atau mengangkut barangan yang lebih besar.
| Kes Penggunaan | Pengelola yang Disyorkan | Bahan |
|---|---|---|
| Peralatan/alat berat | Bak sisi keras | Plastik berlapis atau komposit terbentuk |
| Barangan dapur/guna harian | Pengelola lembut boleh lipat | Kain tahan air, kanvas |
| Peralatan sukan | Kotak pembahagi modular | Plastik, panel jaring |
| Pengangkutan haiwan peliharaan | Bakul lapisan tahan air | PVC, nilon bersalut |
| Barangan DIY | Kotak keras boleh lipat rata | Plastik Berat |
| Barang kanak-kanak | Pengelola belakang tempat duduk | Kain dengan poket |
Kawalan Barangan Kecil Dalam Jangkauan Tangan
Sungkatan hilang, pen berguling, dan kabel pengecasan yang tidak jumpa—kedengaran biasa? Pilihan yang tepat penganjur tempat duduk kereta aTAU penganjur kompartmen sarung tangan boleh mengekalkan barangan penting dalam jangkauan dan mengurangkan gangguan di lantai. Berikut adalah pilihan pintar untuk setiap bahagian kabin:
- Penganjur tempat duduk kereta: Digantung pada tempat duduk hadapan atau belakang, menyediakan poket untuk makanan ringan, tablet, pengecas, dan mainan. Sesuai untuk keluarga atau pemandu perkongsian perjalanan yang memerlukan akses cepat kepada barangan ( sumber ).
- Penganjur kompartmen sarung tangan: Menggunakan poket berasingan atau dulang nipis untuk mengisih dokumen, barangan pertolongan cemas, dan alat kecemasan. Pilih reka bentuk yang sesuai dengan dimensi kotak sarung tangan kereta anda.
- Pengekalkan visor kereta: Sempurna untuk menyimpan cermin gelap, laluan tol, atau dokumen kecil—menyimpannya kelihatan tetapi tidak mengganggu.
- Kotak konsol dan di bawah tempat duduk: Untuk barang berharga atau barangan yang tidak digunakan setiap kali keluar, kotak ini menyembunyikan kekacauan tetapi mudah diakses.
Pilih pengekalkan dengan jahitan berlapis dan tali atau kancing yang kukuh. Untuk keselamatan, elakkan membebankan pengekalkan di belakang tempat duduk atau di visor secara berlebihan—ia tidak boleh menghalang beg udara atau garis penglihatan anda.
Pilihan Terbaik untuk Keluarga, Haiwan Peliharaan, dan Projek Hujung Minggu
Setiap gaya hidup membawa keperluan penyimpanan yang unik. Begini cara untuk memadankan komponen dalaman kenderaan dengan rutin harian anda:
- Keluarga dengan anak-anak: Pengekalkan tempat duduk belakang dengan poket lutsinar untuk permainan, makanan ringan, dan tisu basah. Cari fabrik yang boleh dibasuh dan bahagian yang mudah dijangkau.
- Pemilik haiwan peliharaan: Liner jubur dan bekas berkotak keras untuk tali kekang, mangkuk, dan kelengkapan pembersihan. Tapak bukan gelongsor membantu mengekalkan peralatan pada tempatnya semasa hentian mengejut.
- Penggemar DIY dan peminat aktiviti luar: Kotak lipat-rata dan penyekat modular untuk alat, kelengkapan mendaki, atau peralatan sukan. Reka bentuk bertindih memaksimumkan ruang dalam pengelolaa jubur kereta SUV .
- Pemandu ulang-alik kerap: Pengelola kompartmen sarung tangan dan visor untuk dokumen, pengecas, dan kelengkapan harian.
- Ukur lebar dan kedalaman jubur untuk memastikan pengelola yang dipilih sesuai dipasang.
- Sahkan kelegaan kunci dan engsel—pengelola tidak boleh menghalang operasi jubur atau penutupnya.
- Semak mekanisme pelipat tempat duduk belakang jika anda perlu memperluaskan ruang kargo.
- Pastikan pengelola anda serasi dengan pengikat kargo atau cincin-D untuk keselamatan tambahan.
Tip keselamatan: Sentiasa letakkan barangan berat di bahagian bawah dan sejauh mungkin ke hadapan di kawasan kargo. Ini mengurangkan risiko barang bergerak ketika pemberhentian mengejut dan membantu mengekalkan keseimbangan kenderaan.
Apabila spesifikasi peruncit menyenaraikan dimensi atau penarafan berat, gunakan ia sebagai panduan untuk memilih. Jika tidak, ukur kawasan kargo anda dan bandingkannya dengan dimensi produk sebelum membeli. Penyelesaian penyimpanan yang sesuai tidak sahaja menjaga kekemasan anda komponen dalaman kenderaan tetapi juga melindungi pelaburan anda—menjadikan setiap pemanduan lebih menyenangkan dan bebas tekanan.
Seterusnya, kita akan meneroka bagaimana kualiti pengeluaran dan kepersisan pemasangan memberi kesan kepada prestasi jangka panjang dan keselesaan senyap pada bahagian dalaman kenderaan anda.
Bagaimana Kepersisan Mempengaruhi Kesuaian, Penyelesaian, dan Ketenangan
Mengapa Acuan Penempaan Penting untuk Klip Dalaman dan Pengukuhan
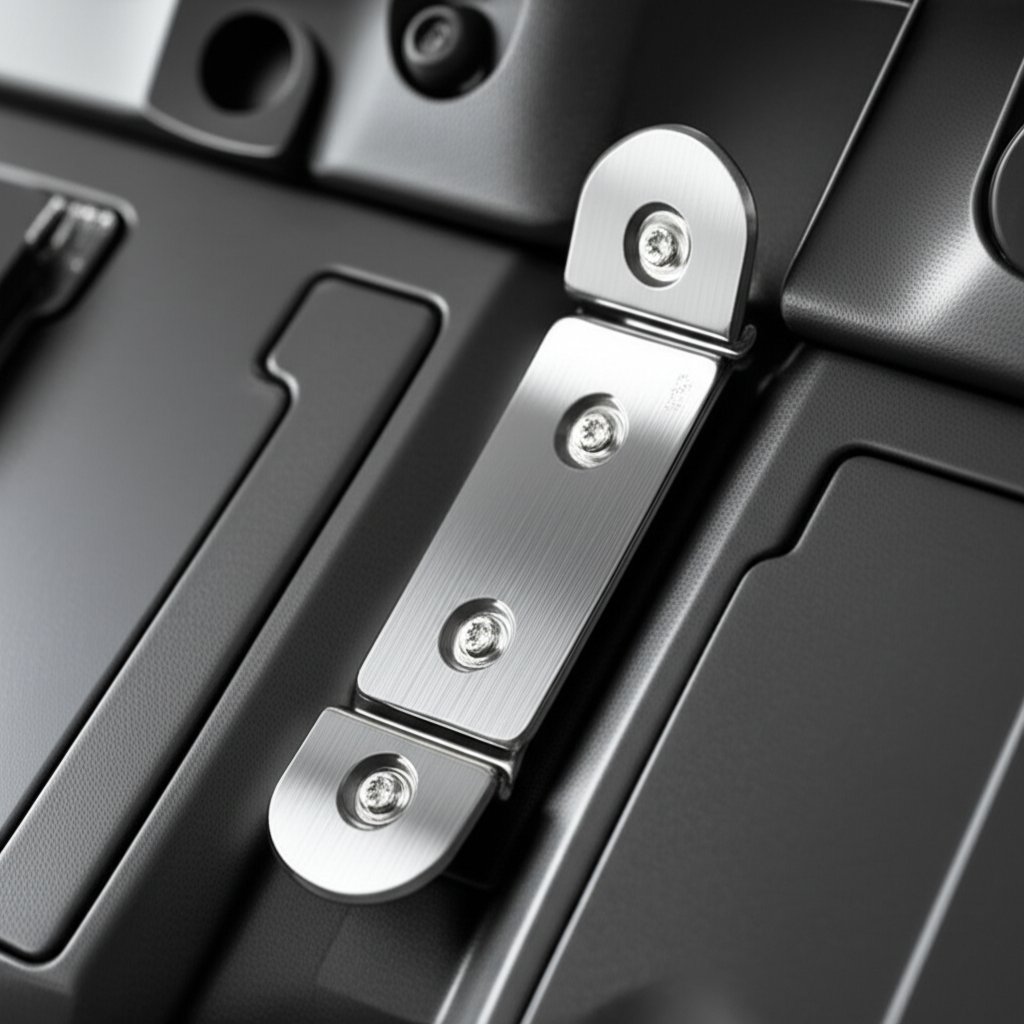
Pernah terfikir mengapa sesetengah panel dalaman automotif muat dengan sempurna, manakala yang lain berbunyi 'klik' atau bergema dengan setiap hentakan? Jawapannya sering kali terletak jauh di dalam proses pengeluaran—khususnya, pada kepersisan acuan penempaan yang digunakan untuk mencipta struktur logam di bawah kelihatan bahagian hiasan automotif . Bayangkan penggantung yang tersembunyi yang menyokong panel pemuka anda, pengukuhan kerangka kerusi, atau lengan logam di dalam saluran penghawa dingin—semuanya dibentuk oleh acuan penempaan yang mesti memberikan ukuran yang tepat, berulang kali.
Penempaan logam berkepersisan tinggi di sebalik bahagian automotif plastik adalah kunci untuk mengurangkan bunyi dengung, bunyi 'klik', dan bunyi berderak. Sekalipun hanya berbeza pecahan milimeter sahaja dalam dimensi, ia boleh menyebabkan jurang kelihatan atau bising yang tidak diingini pada panel dalaman kenderaan anda.
Kaedah CAE dan Lean Yang Mengurangkan Kerja Semula
Jadi, apakah yang membezakan pembekal kelas pertama dengan yang lain? Pengeluar berteknologi tinggi kini menggunakan Kejuruteraan Berbantuan Komputer (CAE) dan prinsip pengeluaran lean untuk mengoptimumkan rekabentuk dan pengeluaran kelengkungan dalaman kereta dan sokongan logamnya. Sebagai contoh, Shaoyi mengintegrasikan analisis CAE tingkat tinggi dengan aliran kerja lean untuk menghasilkan acuan penekan dan komponen yang ditekan mengikut piawaian ketat dari segi kepadanan dan kemasan—yang bermaksud kurang gangguan pengeluaran, pembangunan lebih cepat, dan keputusan lebih konsisten. Pendekatan ini sangat penting untuk bahagian kompleks dalam Kenderaan perakitan, di mana setiap pemegang, penggantungan, dan pengukuhan mesti selari dengan sempurna bersama komponen plastik dan fabrik.
| Pendekatan Pengeluaran | Kekonsistenan Dimensi | Masa Pembangunan | Kesesuaian jilatan tinggi |
|---|---|---|---|
| CAE + Lean (contoh, Shaoyi) | Cemerlang (toleransi ketat, boleh diulang) | Paling Singkat (kitaran dioptimumkan, kurang lelaran) | Ideal (boleh skala secara efisien, kadar kecacatan rendah) |
| Peralatan Konvensional | Baik (bergantung kepada persediaan manual) | Sederhana (persediaan lebih lama, banyak percubaan/kesilapan) | Baik (mungkin memerlukan lebih banyak semakan QA) |
| Automasi Asas | Berubah-ubah (bergantung kepada kawalan proses) | Sederhana hingga Panjang (masa persediaan automasi) | Sederhana (mungkin menghadapi masalah dengan geometri yang kompleks) |
Dengan menggunakan pengoptimuman berasaskan CAE, pengeluar boleh mensimulasi titik tekanan dan kepadanan sebelum acuan dibuat, secara ketara mengurangkan risiko salah selarian atau kerja semula yang mahal. Kaedah Lean seterusnya mengurangkan pembaziran dan mempiawaikan kualiti, menjadikannya sangat bernilai untuk pengeluar komponen plastik automotif yang perlu menghantar keputusan yang konsisten dalam jadual yang ketat.
Menilai Pembekal untuk Toleransi yang Konsisten
Apabila berbelanja untuk komponen dalaman kenderaan , jangan hanya memberi tumpuan pada bahan yang kelihatan—tanya tentang pendekatan pengeluaran di belakang tabir. Inilah yang perlu anda cari dalam pembekal:
- Simulasi dan prototaip maju: Memastikan rekabentuk dalaman automotif niat kekal terpelihara dari CAD ke realiti.
- Sijil Kualiti: Cari pematuhan terhadap piawaian industri seperti IATF 16949 atau FMVSS untuk keselamatan dan kebolehpercayaan ( sumber ).
- Pemeriksaan dan dokumentasi automatik: Menjamin setiap lot bahagian automotif plastik memenuhi spesifikasi dimensi yang ketat.
- Rekod prestasi yang terbukti: Penghantaran yang konsisten tanpa kecacatan panel interior auto dan pengukuhan, disokong oleh rujukan pelanggan.
Dengan memberi keutamaan kepada pembekal yang menggabungkan CAE, kaedah lean, dan kawalan kualiti yang ketat, anda akan dapati kurang masalah pemasangan serta interior yang lebih tahan lama dan senyap. Perhatian terhadap butiran ini bukan sahaja meningkatkan penampilan dan rasa kabin anda, tetapi juga menyokong keselamatan dan ketahanan kenderaan untuk tahun-tahun mendatang.
Seterusnya, kami akan menggabungkan semuanya dengan senarai semak pembelian dan pemasangan—supaya anda boleh dengan yakin memilih, mengesahkan, dan memasang komponen dalaman kenderaan yang muat tepat pada kali pertama.
Senarai Semak Pembelian dan Cadangan Akhir
Senarai Semak Kesesuaian Prapembelian
Pernah tertanya mengapa sesetengah bahagian interior kenderaan muat dengan sempurna, manakala yang lain meninggalkan jurang atau langsung tidak boleh dipasang? Ia jarang berlaku secara kebetulan—kesesuaian bermula dengan persediaan yang teliti. Sebelum memesan sebarang komponen kereta interior, jalankan semakan melalui senarai ini untuk menjimatkan masa, wang, dan kekecewaan:
- Sahkan VIN dan data pembinaan anda. Gunakan nombor pengenalan kenderaan (VIN) penuh anda untuk menyahkod model, tahun, varian dan pilihan kilang yang tepat—ini adalah penting untuk memadankan semua bahagian dalaman.
- Semak tahap varian dan konfigurasi tempat duduk. Model dua-pintu dan empat-pintu (atau tempat duduk bench berbanding bucket) biasanya menggunakan aksesori dalaman dan titik pemautan yang berbeza.
- Padankan kod warna dan bahan dalaman. Kod ini biasanya terdapat pada pelekat di bahagian kerangka pintu atau kotak sarung tangan. Memilih nuansa dan kemasan yang betul memastikan penggantian bahagian dalaman kenderaan anda sebati dengan sempurna.
- Sahkan pilihan sistem audio, HVAC, dan beg udara. Harnes pendawaian, jenis penyambung, dan penunjuk pemautan mungkin berbeza bergantung kepada ciri-ciri ini.
- Kira dan periksa penyambung dan pengikat. Periksa pengekodan unik, jarak penunjuk, atau gaya klip khas pada aksesori dalaman asal kenderaan anda.
- Ukur titik pemautan utama. Jika boleh, bandingkan bahagian lama dan baru bersebelahan sebelum memasang, terutamanya untuk panel, konsol, dan perhimpunan kerusi.
| Kategori Bahagian | Pengukuran atau Label yang Harus Diverifikasi |
|---|---|
| Panel pintu | Gaya klip, bilangan pengikat, pemutus tingkap |
| Konsole pusat | Perpindahan tab pemasangan, penyesuai penyambung |
| Pemasangan kerusi | Lebar landasan kerusi, corak bolt, plugs sensor beg udara |
| Dash Trim | Jarak tab, saiz bukaan ventilasi, kod warna |
| Permaidani/Mat Lantai | Lokasi titik jangkar, lubang pemasangan kerusi |
Mengukur dua kali, memesan sekali. Beberapa minit tambahan yang dihabiskan untuk memeriksa spesifikasi boleh mengelakkan kerja ulang berjam-jam dan pulangan mahal.
Audit Kesediaan Pemasangan Pantas
Sedia untuk menggantikan bahagian dalaman yang haus? Sebelum mengambil alat, luangkan sejenak untuk menjalankan audit pantas ini:
- Susun bahagian baru dan lama bersebelahan. Semak klip, lubang, dan jenis penyambung yang sepadan.
- Uji pasang panel secara kering (tanpa pengikat) untuk mengesahkan keselarian—lindungi lis dengan pita cat semasa ujian pasang.
- Susun semua perkakas yang dikeluarkan dalam beg berlabel untuk pemasangan semula yang cepat.
- Rujuk manual servis kenderaan atau katalog bahagian OEM untuk sebarang spesifikasi kilasan atau nota pemasangan khas.
- Untuk panel berhampiran beg udara atau jangkot tali pinggang keledar, sentiasa ikut prosedur keselamatan pengeluar—putuskan bateri dan tunggu jangka masa yang diperlukan sebelum memulakan kerja.
Bilakah perlu berbincang dengan pembekal pakar
Bayangkan anda telah melakukan segala-galanya dengan betul, tetapi penggantian masih tidak muat, atau anda menghadapi pemasangan yang kompleks seperti kerangka kerusi atau struktur dasbor. Pada masa inilah ia berbaloi untuk berbincang dengan pakar—terutamanya untuk komponen logam kejuruteraan yang menyokong aksesori dalaman anda. Bagi projek di mana kepersisan berulang dan ketepatan dimensi adalah kritikal, bekerjasama dengan pembekal seperti Shaoyi boleh mengelakkan masalah yang membazirkan. Pakar mereka dalam acuan tekanan presisi tinggi dan pengeluaran berpandukan CAE memastikan bahagian dalaman anda dihasilkan mengikut spesifikasi tepat, mengurangkan risiko salah jajaran atau masalah pemasangan.
Sentiasa sahkan ukuran dan nombor bahagian dengan manual perkhidmatan OEM atau katalog bahagian yang dipercayai. Jika pembekal menyediakan dimensi atau lukisan teknikal yang tepat, gunakan untuk menyemak semula sebelum memesan. Jika spesifikasi terperinci tidak tersedia, fokus pada kesesuaian kualitatif—padankan ciri utama, sahkan titik pemasangan, dan gunakan ujian kesesuaian untuk mengesahkan keserasian sebelum membuat penggantian penuh interior kenderaan.
- Lakukan: Uji pasang secara kering sebelum pemasangan akhir, lindungi trim yang kelihatan, dan kemas kini perkakasan.
- Jangan: Gunakan kekuatan pada panel yang tidak selari, langkau langkah keselamatan berhampiran sistem SRS, atau andaikan semua bahagian interior boleh saling dipertukarkan antara trim atau tahun.
Dengan langkah-langkah ini, anda akan memudahkan proses peningkatan atau penggantian aksesori interior kereta seterusnya—memastikan hasil kerja profesional dan kabin yang kelihatan dan terasa seperti baru.
Soalan Lazim Mengenai Bahagian Interior Automotif
1. Apakah komponen utama yang terdapat dalam bahagian interior automotif?
Bahagian dalaman automotif merangkumi tempat duduk, panel hadapan, konsol tengah, panel pintu, siling, sistem lantai, saluran HVAC, beg udara, kompartmen penyimpanan, dan peralatan suis elektrik. Setiap bahagian menyumbang kepada keselesaan, keselamatan, dan keseluruhan kefungsian kabin kenderaan.
2. Bagaimanakah saya boleh memastikan bahagian dalaman pengganti akan sesuai dengan kereta saya?
Untuk memastikan kepersisan, sentiasa sahkan VIN kenderaan anda, tahap trim, kod warna dalaman, dan konfigurasi sebelum membuat pesanan. Semak nombor bahagian menggunakan katalog OEM, periksa label bahagian pada komponen asal, dan bandingkan titik pemasangan atau jenis penyambung sebelum pemasangan.
3. Apakah bahan yang biasa digunakan untuk bahagian dalaman kereta dan yang manakah terbaik untuk ketahanan?
Bahan biasa merangkumi ABS, polipropilena, TPO, buih PU, kulit, kain, dan vinil. Untuk ketahanan dan pembersihan yang mudah, plastik bertekstur seperti TPO atau vinil diperkukuh biasanya disyorkan, terutamanya untuk kawasan lalu lintas tinggi atau keluarga dengan haiwan peliharaan dan kanak-kanak.
4. Apa yang perlu saya lakukan jika panel dalaman kereta berdentum atau siling dalaman kereta menggelebeh?
Untuk panel yang berdentum, alaikan trim secara bersistem, periksa dan gantikan klip yang rosak, serta gunakan pita beludru pada titik sentuhan. Untuk siling dalaman yang menggelebeh, semak kegagalan gam atau kebocoran air, dan putuskan sama ada untuk melapisi semula atau menggantikan penebat sepenuhnya. Sentiasa ikut prosedur keselamatan apabila bekerja berhampiran beg udara.
5. Mengapakah kualiti pengeluaran penting untuk bahagian dalaman automotif?
Kualiti pengeluaran yang tinggi memastikan kepersisan pemasangan dan mengurangkan masalah bising. Pembekal yang menggunakan CAE dan pengeluaran lean yang maju, seperti Shaoyi, menghasilkan bahagian dalaman yang tepat secara konsisten, meminimumkan masalah pemasangan serta meningkatkan keselesaan dan jangka hayat kabin.