 Jumlah kecil, piawai tinggi. Perkhidmatan prototaip pantas kami membuat pengesahan lebih cepat dan mudah —

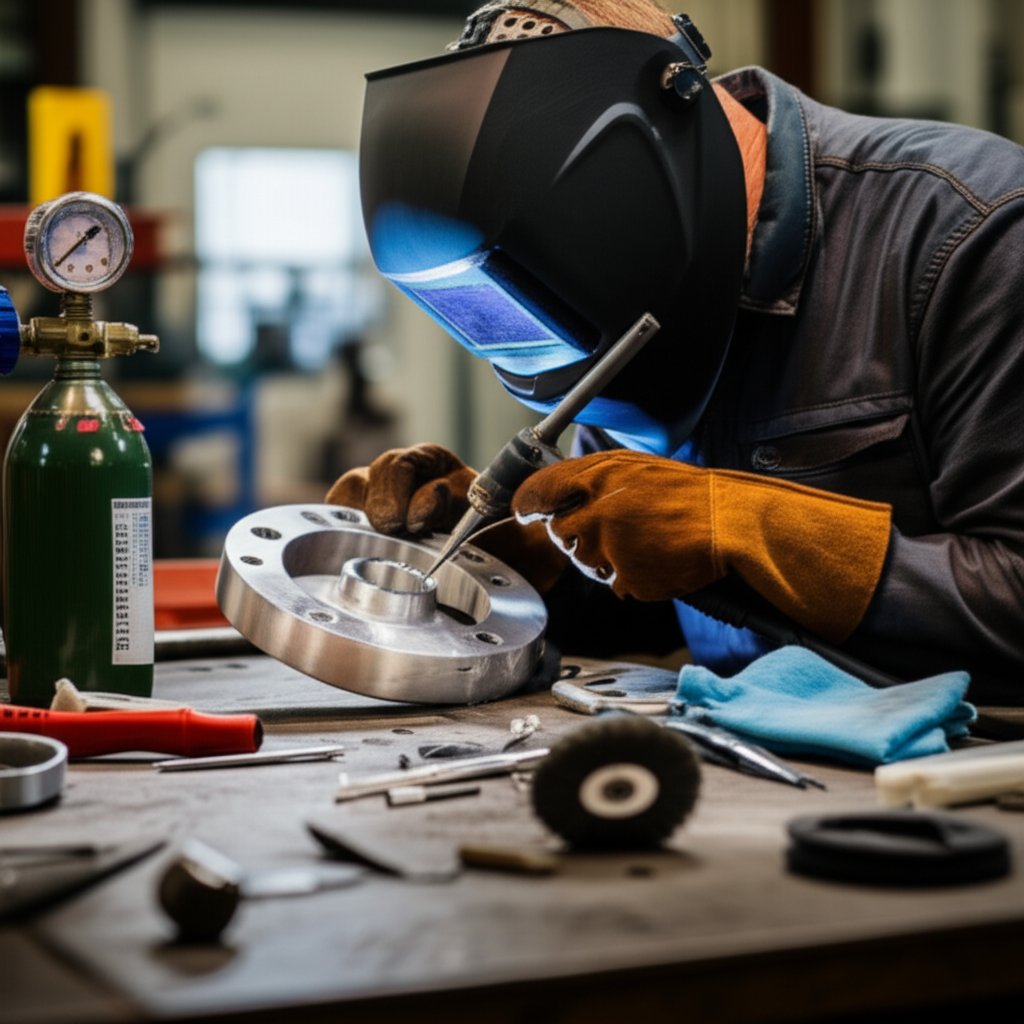
Penyelesaian Masalah Pengimpal Aluminium TIG: Penyelesaian Pantas Yang Berkesan
Apa Yang Membuatkan GTAW Berbeza untuk Aluminium
Pernah terfikir mengapa kimpalan TIG menjadi kaedah pilihan untuk menyambung aluminium, terutamanya apabila anda memerlukan hasil yang bersih dan tepat? Jika anda pernah mencuba mengimpal aluminium dengan kaedah lain dan menghadapi masalah tembusan, kurang kawalan, atau kesudahan yang tidak kemas, anda tidak keseorangan. Mari kita lihat dengan lebih mendalam mengapa kaedah seorang kimpalan aluminium TIG persediaan adalah unik, dan mengapa Gas Tungsten Arc Welding (GTAW) menjadi pilihan pakar untuk logam yang sukar ini.
Apakah GTAW untuk Aluminium?
GTAW—yang biasanya dipanggil sebagai pengimpalan TIG—menggunakan elektrod tungsten bukan habis pakai untuk menghasilkan arka elektrik antara torc dan benda kerja anda. Arka ini meleburkan aluminium, manakala gas perlindungan lengai (seperti argon) melindungi kawasan kimpalan daripada kontaminasi atmosfera. Berbeza dengan proses lain, anda menambah logam pengisi secara berasingan, memberi anda kawalan penuh ke atas saiz dan pengukuhan kimpalan. Tetapi inilah masalahnya: aluminium membentuk lapisan oksida yang liat yang melebur pada suhu yang jauh lebih tinggi daripada logam asas. Ini bermakna anda mesti mengeluarkan oksida ini sebelum mengimpal dan bergantung pada tindakan pembersihan arka untuk mengekalkan keaslian sambungan semasa pengimpalan.
Kawalan input haba adalah sangat penting—kekonduksian haba tinggi aluminium dan takat leburnya yang rendah menjadikannya mudah terlebih panas atau tidak lengkap lebur. Itulah sebabnya kebanyakan pengimpal TIG aluminium menggunakan arus ulang-alik (AU) untuk menyeimbangkan penembusan dan pembersihan oksida, dan mengapa setiap langkah persediaan dan persetupan begitu penting (Red-D-Arc) .
Mengapa Memilih TIG Berbanding MIG?
Jadi, mengapa tidak menggunakan sahaja mesin kimpal MIG? Walaupun MIG lebih cepat dan mudah untuk sambungan yang lebih tebal dan kurang kritikal, kimpalan TIG menonjol kerana kawalan halus dan kemasan yang lebih baik. Anda akan mendapat:
- Pengurusan haba yang tepat—sesuai untuk kepingan nipis, tiub, dan pemasangan yang halus
- Bercak yang minimum dan leher yang bersih serta menarik (tiada penggilapan selepas kimpal diperlukan)
- Kawalan penuh secara manual ke atas bahan pengisi, membolehkan anda menyesuaikan pengukuhan mengikut keperluan sambungan
- Kebolehan untuk mengimpal dengan atau tanpa bahan pengisi bagi sambungan tepi dan kimpal autonom
Bayangkan membaiki panel kenderaan, membina bingkai suka rela, atau memasang peti elektronik—TIG adalah proses yang memberikan kelahian dan penampilan yang diperlukan oleh kerja-kerja ini.
Pemboleh Ubah Utama Yang Anda Kawal
Kejayaan dengan mesin kimpal aluminium bergantung kepada penyesuaian pemboleh ubah yang betul. Inilah yang akan anda laraskan pada mesin biasa pengelas tig ac dc persediaan apabila anda mengelas aluminium TIG:
- Jenis arus: Sentiasa guna AC untuk aluminium (guna DC untuk logam lain)
- Kuaran Amper: Menetapkan input haba—terlalu tinggi risiko terbakar, terlalu rendah menyebabkan kegagalan kimpalan
- Keseimbangan AC: Mengawal kebersihan berbanding kepenetrasi
- Frekuensi AC: Menyempit atau melebarkan lengkungan untuk kesesuaian sambungan
- Aliran gas perlindungan: Memastikan kestabilan arka dan mencegah pencemaran
- Sudut obor dan kelajuan perjalanan: Menyelaraskan bentuk titisan dan kemesraan
Komponen penting untuk kerja mengimpal aluminium TIG termasuk:
- Sumber kuasa (pengimpal TIG berkeupayaan AU)
- Obor dan elektrod tungsten (disediakan dengan betul)
- Gas perisai argon kelainan tinggi
- Rod pengisi aluminium (sepadan dengan aloi asas)
- Peralatan Pelindung Peribadi (PPE)
Aplikasi TIG aluminium yang biasa:
- Panel dan kerja badan kenderaan
- Rangka basikal dan mesin
- Ekskavasi seni bina atau industri
- Kes dan penutup elektronik
Kejayaan TIG aluminium bergantung kepada kawalan oksida, persediaan sambungan, dan parameter arka yang stabil lebih daripada amperan mentah.
Jika anda menggunakan mesin kimpal TIG untuk aluminium untuk kali pertama, ingat: persediaan adalah segalanya. Bersihkan oksida, sesuaikan logam pengisi dan logam asas anda, dan uji tetapan pada bahan buangan sebelum memulakan kerja sebenar. Jika anda memerlukan tetapan tepat atau kriteria penerimaan, sentiasa rujuk kepada mesin kimpal aluminium manual pengeluar atau rujuk kepada garis panduan AWS untuk model dan aplikasi khusus anda.
Dalam bab-bab akan datang, anda akan memperoleh peta jalan praktikal untuk memilih aloi dan bahan pengisi, menetapkan bentuk gelombang AU, memilih barangan habis pakai, menguasai prosedur sambungan, memeriksa kimpalan anda, dan menyelesaikan masalah dengan cepat. Bersedia untuk menjadikan setiap kimpalan kimpal aluminium TIG jaya? Mari kita mulakan.
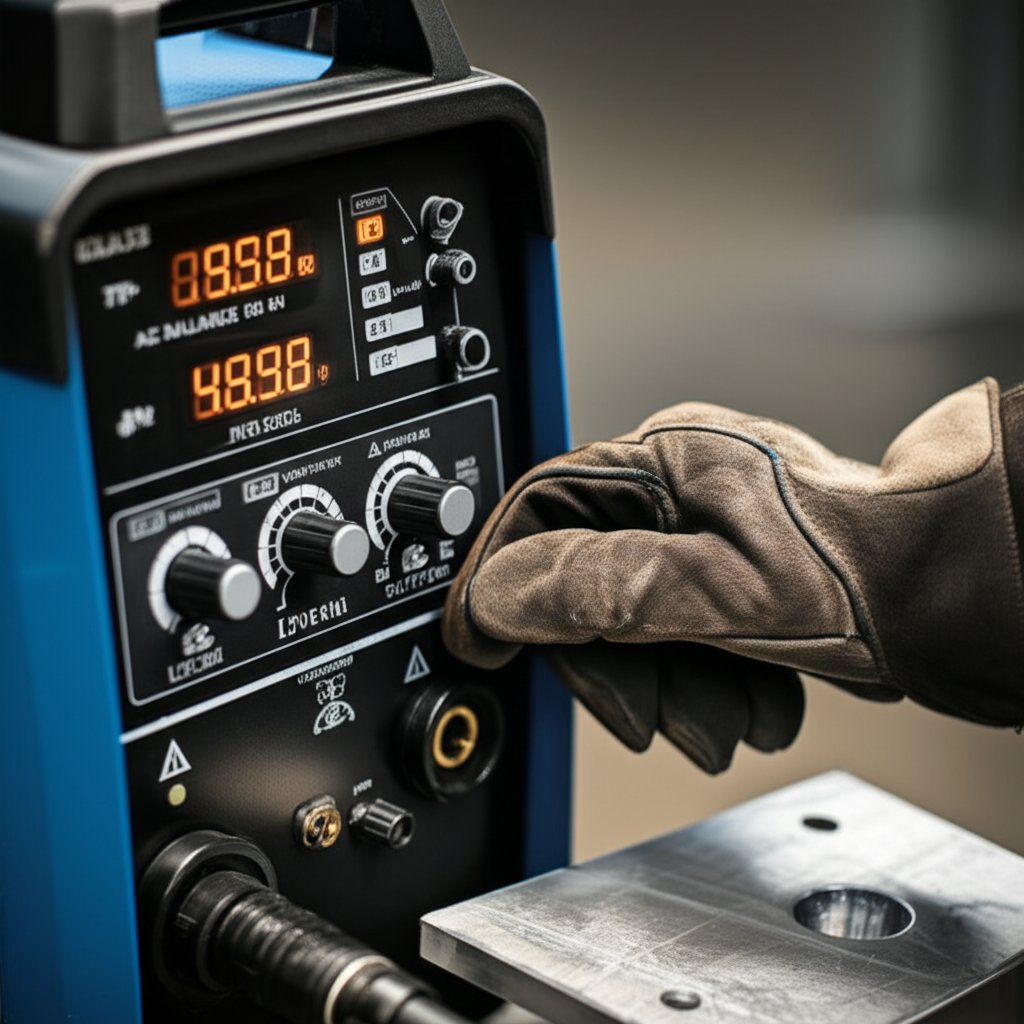
Menguasai Pengimpalan AC TIG
Pernah tertanya-tanya mengapa kimpalan aluminium kadangkala kelihatan kabur, berbutir, atau tidak seolah-olah bercantum seperti yang sepatutnya? Rahsianya sering terletak pada cara anda menetapkan kawalan AC anda. Jika anda pernah memandang pengimpal TIG AC dan berasa kewalahan dengan semua butang, marilah kita huraikan apa yang benar-benar penting untuk pengimpalan TIG aluminium—tanpa jargon.
Keseimbangan AC Dijelaskan
Apabila anda menggunakan pengimpalan TIG AC untuk aluminium, mesin anda bertukar antara dua fasa utama: Elektrod Negatif (EN) dan Elektrod Positif (EP). Fikirkan EN sebagai kuasa yang melebur dan menembusi logam asas, manakala EP sebagai pasukan pembersihan, menghancurkan lapisan oksida yang degil yang terbentuk secara serta-merta di permukaan aluminium. Kelihatan rumit? Inilah triknya: keseimbangan antara dua fasa ini boleh dilaraskan pada kebanyakan mesin pengimpal TIG AC/DC unit.
- Lebih EP (Pembersihan): Meningkatkan tindakan pembersihan, membuang lebih banyak oksida, tetapi juga menambahkan haba tambahan pada tungsten anda. Anda akan perasan satu zon 'etesan' yang lebih lebar dan putih di sekeliling kimpalan dan hujung tungsten yang lebih bulat, yang boleh menyebabkan arka kurang tumpu.
- Lebih EN (Penetrasi): Memfokuskan haba ke dalam bahan kerja, memberi anda penetrasi yang lebih dalam dan kimpalan yang lebih sempit. Tetapi jika pembersihan tidak mencukupi (EP terlalu sedikit), oksida boleh masuk ke dalam kimpalan, menyebabkan kecacatan seperti 'bintik-bintik' atau kimpalan yang pudar dan berkabus.
Bayangkan kimpalan pada bot aluminium yang kotor dan haus berbanding dengan panel yang baru dimesin. Yang pertama memerlukan lebih banyak EP (pembersihan lebih), manakala yang kedua membolehkan anda gunakan lebih banyak EN (penetrasi lebih). Apa matlamat anda? Laraskan sehingga anda nampak satu garisan etesan yang nipis dan berterusanan betul-betul di hadapan kolam kimpalan - tidak lebih dan tidak kurang.
Frekuensi dan Fokus Ark
Sekarang, marilah kita bercakap tentang frekuensi. Pada kebanyakan pengimpal tig ac/dc untuk aluminium mesin, anda boleh menetapkan berapa kali sesaat kutubnya bertukar. Mengapa ini penting? Frekuensi arus ulang-alik (AC) yang lebih tinggi (fikirkan 120 Hz dan ke atas) mengetatkan lengkungan, menjadikannya lebih mudah untuk mengimpal sambungan atau tepi yang nipis dan ketat. Anda akan perasan kon lengkungan yang tajam dan sempit—sangat sesuai untuk kerja yang memerlukan ketepatan. Frekuensi yang lebih rendah (60–90 Hz) menghasilkan lengkungan yang lembut dan lebih luas, yang membantu apabila anda mahukan kimpal yang lebih lebar pada bahan yang tebal atau pada sudut luaran (The Fabricator) .
- Kekerapan Tinggi: Lengkungan sempit dan terarah untuk sambungan ketat atau rumit
- Frekuensi Rendah: Lengkungan lembut dan luas untuk kimpal yang luas dan plat berat
Bayangkan mengimpal sambungan ketat pada rangka basikal—tingkatkan frekuensi. Bekerja pada permukaan landasan treler yang tebal? Kurangkan frekuensi untuk liputan yang lebih luas
Apabila DCEN Masih Penting
Anda mungkin bertanya, "Bukankah saya boleh menggunakan arus terus (AT) seperti yang saya lakukan untuk keluli?" Bagi aluminium, arus ulang-alik (AU) adalah piawaian—ATEN (Arus Terus Elektrod Negatif) biasanya dikhaskan untuk logam bukan aluminium. Walau bagaimanapun, sesetengah kerja aluminium yang sangat khusus, telah bersedia (kerap kali dengan campuran helium dan permukaan ultra-bersih) mungkin menggunakan ATEN, tetapi ini adalah pengecualian dan sentiasa mengikut nota pengeluar. Bagi hampir kesemua kerja TIG pada aluminium, gunakan AU pada mesin TIG AU anda.
Alur Kerja Penalaan AU Secara Praktikal
Sedia untuk menetapkan tetapan anda? Berikut adalah alur kerja langkah-demi-langkah yang boleh anda gunakan pada mana-mana mesin TIG AU/AT untuk kerja aluminium:
- Mulakan dengan AU seimbang (tetapan kilang biasanya sekitar 70%-80% EN / 25% EP).
- Lakukan penalaan halus pada keseimbangan: Tingkatkan EP jika anda melihat butiran logam kecil pada sambungan atau kelabu oksida; tingkatkan EN jika elektrod tungsten membentuk bebola atau lengkung elektrik tidak stabil.
- Laraskan frekuensi: Gunakan frekuensi tinggi untuk sambungan nipis dan sempit; frekuensi rendah untuk kimpalan tebal dan luas.
- Tetapkan amperan dan kelajuan gerakan mengikut ketebalan bahan dan geometri sambungan.
- Uji pada keluli—cari zon etching yang nipis dan berterusan betul-betul di hadapan kolam. Jika terlalu lebar, kurangkan pembersihan; jika tiada atau bintik-bintik, tambahkan lagi.
Laras keseimbangan AC untuk menunjukkan zon etching yang nipis dan berterusan betul-betul di hadapan kolam; kemudian gunakan frekuensi untuk menyelaraskan fokus arka dengan sambungan.
Pelarasan ini, bersama dengan persediaan yang baik daripada bahagian sebelumnya, adalah kunci kepada kualiti kimpalan TIG aluminium yang konsisten dan tinggi. Seterusnya, kami akan meneroka bagaimana pemilihan aloi aluminium dan logam pemateri anda boleh menjadikan atau merosakkan keputusan—supaya anda boleh memilih kombinasi yang sesuai untuk setiap kerja.
Pemilihan Aloi Aluminium dan Logam Pemateri untuk Kejayaan Kimpalan TIG
Apabila anda berdiri di hadapan pengimpal aluminium TIG , pilihan yang anda buat mengenai aloi dan logam pengisi boleh menjadikan atau memusnahkan kimpalan anda. Apakah aloi aluminium yang anda gunakan? Bagaimana anda memilih rod pengisi yang sesuai untuk kekuatan, rintangan retak, atau sekadar padanan warna? Marilah kita jelaskan kekeliruan ini supaya anda boleh mendapatkan keputusan yang konsisten dan berkualiti tinggi setiap kali anda kimpal tig aluminium .
keluarga 5xxx berbanding 6xxx: Apa Perbezaannya?
Kebanyakan kerja TIG aluminium—sama ada kerangka kenderaan, bahagian maritim, atau pengeluaran am—menggunakan aloi dari keluarga 5xxx (mengandungi magnesium) atau 6xxx (magnesium-silikon). Mengapa ini penting? Aloi 5xxx (seperti 5052, 5083, 5086) dikenali dengan kebolehlasan yang sangat baik, kekuatan tinggi, dan rintangan korosi yang baik. Ia kurang cenderung mengalami kegagalan panas, menjadikannya pilihan popular untuk bahagian struktur dan apa-apa yang terdedah kepada persekitaran yang keras. Sebaliknya, aloi 6xxx (seperti 6061, 6063) boleh dikeraskan melalui rawatan haba, bermaksud ia boleh diperkuatkan selepas pengimpalan. Tetapi aloi ini juga lebih sensitif terhadap kegagalan retak dan memerlukan kawalan yang teliti terhadap input haba dan persediaan sambungan (Lincoln Electric) .
Alur Kerja Pemilihan Pengisi: 4043 berbanding 5356 dan Lain-lain
Pernah tertanya aloi pengisi yang mana patut anda gunakan untuk projek pengimpalan aluminium tig seterusnya? Berikut adalah laluan keputusan praktikal, berdasarkan panduan industri dan carta pengisi AWS:
| Logam Pengisi | Terbaik Untuk | Kelebihan | Keburukan |
|---|---|---|---|
| 4043 | aloi 6xxx (6061, 6063), pengeluaran am | Ketahanan retak yang baik, benang kemasan licin, kurang sensitif terhadap teknik kimpalan | Kekuatan lebih rendah, tidak sesuai untuk suhu perkhidmatan tinggi, ketidakpadanan warna selepas pengoksidaan |
| 5356 | aloi 5xxx, menyambung 5xxx ke 6xxx, kerja maritim dan struktur | Kekuatan lebih tinggi, kebolehtelapan baik, warna sepadan selepas pengoksidaan, tidak disyorkan untuk digunakan di atas 65°C/150°F | Lebih sensitif terhadap retakan pada sesetengah aloi 6xxx, kurang membolehkan kesalahan pada penyambungan yang tidak tepat |
Untuk kebanyakan kerja aloi 6xxx (seperti 6061), 4043 adalah pilihan yang selamat dan serba boleh—terutamanya jika anda ingin meminimumkan retakan dan mendapatkan benang yang licin serta mudah dikawal. Jika anda memerlukan kekuatan yang lebih tinggi atau padanan warna selepas pengoksidaan, 5356 adalah pilihan utama, terutamanya untuk aloi 5xxx atau apabila menyambung 5xxx ke 6xxx. Sentiasa rujuk carta atau helaian data pengisi untuk aloi dan aplikasi tertentu—inilah di mana pengguna " pengimam tig aluminium terbaik " mendapat kelebihan mereka.
Pertimbungan Kekerasan dan Ketebalan
Bilamana anda kimpal aluminium TIG , temperan aloi (lembut atau kekerasan daripada rawatan haba) dan ketebalan memainkan peranan besar dalam pemasangan anda. Alloy yang boleh dirawat haba (seperti 6061-T6) kehilangan kekuatan di zon yang terjejas haba, jadi:
- Fitting harus ketatgap meningkatkan risiko retak
- Menggunakan penahan (penyambung, lekapan) untuk mengawal penyimpangan
- Bersihkan antara laluan (pembersihan antara laluan) untuk membuang oksida segar
- Sesuaikan amperage dan kelajuan perjalanan untuk mengelakkan input haba yang berlebihan
Berikut adalah panduan ringkas untuk sendi yang paling berkesan dengan setiap keluarga, ditambah dengan petua untuk berjaya:
- 5xxx aloi: Kesatuan but, filet, dan pelukan; penggoresan rendah; sangat baik untuk aplikasi marin / struktur
- 6xxx aloi: Kesatuan butt dan filet; sensitif terhadap penyimpangan dan retakanfit-up dan pembersihan adalah kritikal
Sentiasa merujuk AWS D1.2 atau lembar data aloi anda untuk maklumat keserasian dan prestasi selepas kimpalan. Dan ingat: tidak kira aloi yang digunakan, penyingkiran oksida, pengendalian pengisi yang bersih, dan penalaan AC yang betul adalah wajib. Itulah yang membezakan hasil kimpalan bagi tig welders aluminum pengguna yang bertujuan menghasilkan kimpalan berkualiti tinggi.
Sekarang anda telah memilih aloi dan pengisi yang sesuai, marilah kita teruskan dengan pengoptimuman barangan habis pakai dan persediaan permukaan—kerana walaupun seting yang terbaik sekalipun tidak dapat mengatasi logam yang kotor atau tungsten yang tidak sesuai.
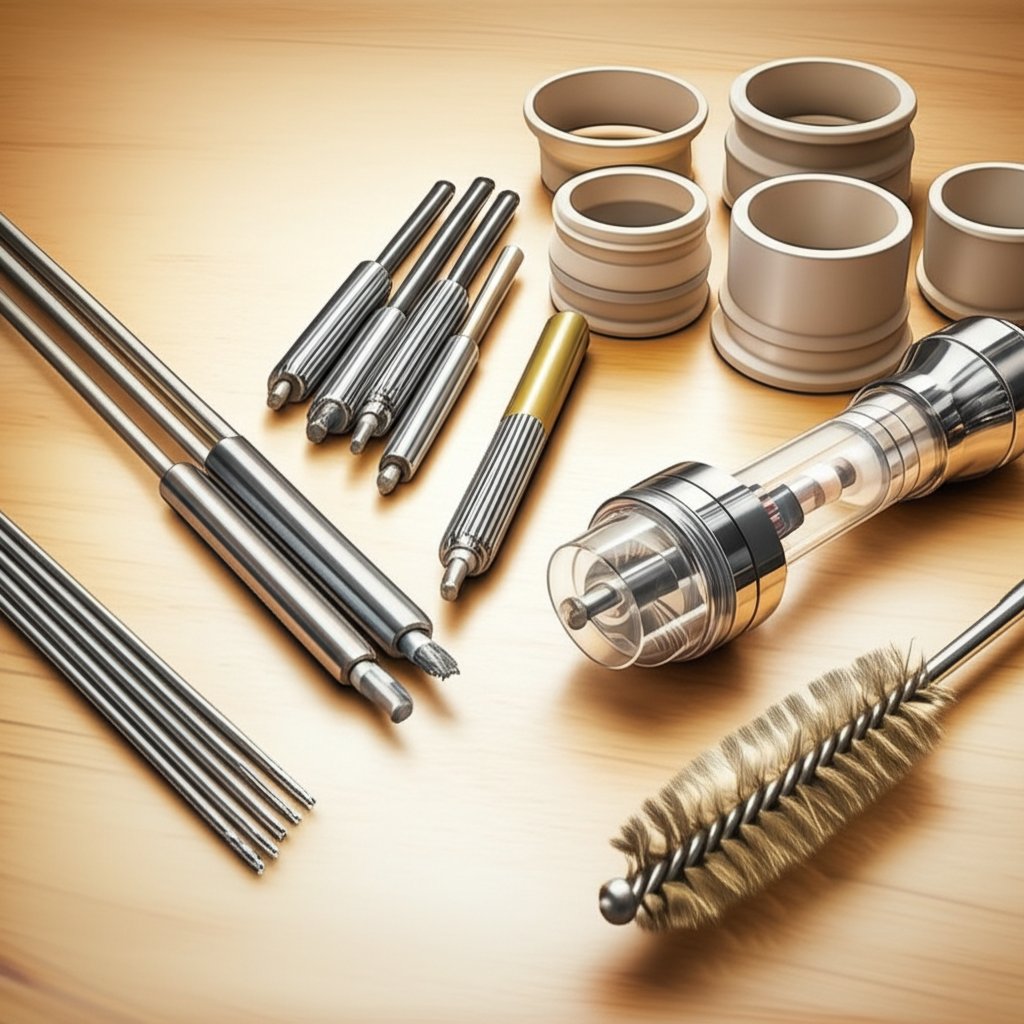
Persediaan Barangan Habis Pakai dan Permukaan
Pernahkah anda memulakan kimpalan dan tertanya-tanya mengapa arka berpercikan atau bead kelihatan kotor, walaupun setelah membuat persediaan dengan teliti? Jawapannya seringkali terletak pada barangan habis pakai dan prosedur persediaan anda. Apabila anda bekerja dengan rig tig atau mana-mana mesin kimpal tig moden sistem, pilihan yang tepat dalam tungsten, gas perisai, dan pembersihan permukaan membuat perbezaan antara kimpalan sempurna dan kekacauan yang menjengkelkan. Mari kita lihat apa yang anda perlukan untuk hasil TIG aluminium yang boleh dipercayai dan berkualiti tinggi.
Jenis dan Hujung Tungsten: Menetapkan Tahap untuk Kestabilan Arka
Fikirkan elektrod tungsten anda sebagai jantung peralatan kimpalan gas lembam tungsten . Untuk kimpalan aluminium arus ulang-alik (AC), terdapat jenis tungsten tertentu yang lebih unggul. Berdasarkan amalan terbaik industri dan pengeluar terkemuka, tungsten berzirkonium merupakan pilihan utama untuk kerja arus ulang-alik pada aluminium, berkat kestabilan arka yang kuat dan rintangan terhadap pencemaran. Tungsten berlanthanum juga digunakan secara meluas untuk arus ulang-alik (AC) dan arus terus (DC), menawarkan permulaan arka dan kestabilan yang sangat baik—selain itu, ia tidak radioaktif, menjadikannya lebih selamat untuk kegunaan harian.
Tetapi bagaimana pula dengan bentuk hujung elektrod? Untuk pengimpalan AC, hujung elektrod yang sedikit berbentuk bulat atau berbola adalah lebih disukai. Ini membantu arka kekal stabil dan mengurangkan risiko inklusi tungsten pada pengimpalan anda. Hujung yang tajam atau terpenggal lebih lazim digunakan dalam TIG AT tetapi kadangkala boleh digunakan dalam pengimpalan AU untuk arka yang lebih ketat, bergantung kepada mesin dan persetan anda. Jika anda perasan arka tidak stabil atau berpindah-pindah, semak bentuk tungsten terlebih dahulu—ini seringkali menjadi punca sebenar.
Gas Pelindung dan Cawan: Keliputan Adalah Segalanya
Pernahkah pengimpalan anda menjadi berbutir atau meninggalkan jelaga hitam? Ini biasanya disebabkan oleh masalah gas pelindung. Argon berkualiti tinggi adalah piawaian emas untuk pengimpalan TIG pada aluminium. Sistem penghantaran gas anda—termasuk cawan atau nozel—memainkan peranan besar dalam keliputan. Saiz cawan diberi nombor (daripada #3 untuk torus mikro sehingga #24 untuk keliputan yang besar), dan saiz yang sesuai bergantung kepada sambungan dan capaian anda.
Mahukan keputusan yang lebih baik? Naik taraf kepada kanta gas . Berbeza dengan cawan piawai, kanta gas menyebarkan argon, menciptakan aliran yang lembut dan berlapis-lapis yang meliputi kawasan kimpalan. Ini bermaksud perlindungan yang lebih konsisten, terutamanya pada sambungan yang sukar atau apabila anda memerlukan jarak tungsten yang lebih panjang. Anda akan melihat kurang kecacatan dan kesan yang lebih berkilat—penting bagi sesiapa sahaja yang melabur dalam kualiti aksesori pengehatan tig (Akademi HP) .
Membersihkan Lapisan Oksida: Tiada Jalan Pintas Dibenarkan
Lapisan oksida pada aluminium melebur pada suhu yang jauh lebih tinggi berbanding logam asas, jadi walaupun peralatan kimpal GTAW terbaik sekalipun tidak dapat mengatasi permukaan yang kotor. Berikut adalah rutin persediaan yang perlu dilakukan:
- Kilatkan dahulu : Gunakan pelarut yang sah seperti aseton atau larutan alkali lemah untuk menghilangkan minyak, gris, dan wap air.
- Berus kemudian : Gunakan berus dawai keluli tahan karat yang hanya digunakan untuk aluminium. Sentiasa menggosok sebelum mengimpal untuk mengelakkan pembentukan oksida baru.
- Elakkan kontaminasi silang : Jangan gunakan berus yang pernah menyentuh keluli atau logam lain—ini memperkenalkan kontaminan yang memusnahkan kualiti arka.
Ingat: logam yang bersih, kering, dan bebas oksida adalah perkara mesti untuk kimpalan yang berkualiti.
Barangan Habis Pakai dan Peranan Mereka: Jadual Rujukan Pantas
| Boleh Habis | Tujuan | Petunjuk Visual |
|---|---|---|
| Jenis Tungsten (Zirkoniated/Lantanated) | Kestabilan arka dan rintangan kontaminasi | Ark yang konsisten dan terarah; inklusi tungsten yang minima |
| Bentuk Hujung (Berbola/Bulat) | Pencapaian dan bentuk arka | Lengkung stabil, tiada terumbang-ambing |
| Saiz Cawan & Kanta Gas | Liputan gas pelindung | Bead sekata, berkilat tanpa jelaga atau kebopongan |
| Diameter Pengisi | Mengawal kemasukan haba dan saiz bead | Bead sepadan dengan sambungan, tiada pengukuhan berlebihan |
| Berus Keluli Stainless/Pelarut | Penyingkiran oksida dan bendasing | Kemasan cerah, tidak berkilat pada logam asas |
Senarai Semak Persediaan Sebelum Mengimpal
Sebelum anda memulakan arka, jalankan senarai semak cepat ini untuk memastikan anda bersedia untuk berjaya:
- Simpan rod pengisi di tempat yang bersih dan kering
- Lap semua bahagian dan bahan pengisi dengan pelarut yang telah diluluskan
- Berus kawasan sambungan segera sebelum mengimpal menggunakan berus keluli tahan karat yang khusus
- Periksa sambungan gas untuk kebocoran dan kekonsistenan aliran
- Uji arka anda pada sekeping logam aloi yang sama dan ketebalan sebelum memulakan kerja sebenar
Menetapkan penggunaan bahan habis pakai dan rutin persediaan bukan sekadar mengikut peraturan—ini adalah tentang membina keputusan yang boleh diulang setiap kali anda menggunakan kelengkapan pengimpalan TIG anda. Apabila anda menguasai asas-asas ini, anda akan mendapati berlakunya kurang gangguan arka, jahitan yang lebih bersih, dan kurang kerja ulangan. Seterusnya, kami akan membimbing anda melalui prosedur langkah demi langkah untuk sambungan aluminium yang biasa, supaya anda boleh mengaplikasikan asas-asas ini secara langsung pada projek sebenar anda yang seterusnya.
Prosedur Pengimpalan TIG Langkah demi Langkah untuk Sambungan Aluminium yang Biasa
Pernah terfikir mengapa kimpalan yang sempurna pada satu sambungan aluminium bertukar menjadi masalah pada sambungan lain? Jika anda menghadapi masalah mengawal kebakaran pada kepingan nipis, atau dapati kimpalan tepi anda tidak cukup lebur, anda tidak keseorangan. Setiap jenis sambungan—samada kimpalan hujung, bertindih, tepi, atau paip—membawa cabaran tersendiri. Mari kita lihat alur kerja yang praktikal dan boleh diulang supaya anda dapat menjalankan sebarang projek TIG pada aluminium dengan keyakinan, sama ada anda menggunakan mesin tig welder untuk aluminium atau pilihan terbaik tig untuk aluminium di pasaran.
Sambungan Hujung pada Kepingan Nipis: K Kawalan dan Kebersihan
- Persiapan Tepi: Buang tatal dan bersihkan kedua-dua tepi dengan lengkap. Gunakan berus keluli tahan karat dan pelarut khas untuk menghilangkan oksida.
- Persediaan Sambungan: Pastikan sambungan rapat tanpa kelegaan. Gunakan pengapit dengan kukuh untuk mengurangkan rintangan—aluminium bergerak pantas apabila terdedah kepada haba.
- Penambatan Awal: Letakkan penambatan kecil pada jarak sekata. Ulang lebur penambatan (double-dip) untuk mengurangkan kebarangkalian retak dan memastikan kesinambungan ( Kimpalan dengan Lebih Sikit ).
- Penalaan AC: Tetapkan pengelas AC tig untuk aluminium kepada gelombang AC yang seimbang. Laraskan untuk mendapatkan zon etak sempit dan berterusan sedikit di hadapan kolam leburan.
- Rentak Torc dan Pemateri: Kekalkan sudut torc 10–15°, pastikan arka pendek dan stabil. Berhenti seketika untuk membenarkan kolam leburan terbentuk, kemudian tambah pemateri di bahagian hadapan. Bergerak dengan lancar untuk mengelakkan keterlebihan haba dan terbakar.
Sambungan Tirus dan Sambungan Kelim: Sudut dan Masa Penting
- Persediaan Sambungan: Bersihkan semua permukaan dan pastikan kesesuaian rapat—kelegaan meningkatkan risiko kegagalan kimpal.
- Sudut Torc: Favorkan anggota yang lebih tebal dengan mengarahkan obor sedikit ke arahnya (kira-kira 70–80° dari permukaan). Ini membantu menyeimbangkan haba dan meningkatkan kemesraan.
- Panjang Lengkok: Kekalkan lengkok yang sedikit lebih panjang berbanding untuk sambungan hujung. Ini membantu mengelakkan sejuk tepi dan memastikan penembusan sekata.
- Celupan Wayar: Gunakan teknik celupan berselang-seli (bukan berterusan). Tambahkan pengisi apabila leburan membasahi kedua-dua anggota, kemudian gerakkan ke hadapan sebelum berlakunya panas berlebihan.
- Kelajuan Perjalanan: Kekalkan kelajuan yang sekata—kelajuan yang terlalu perlahan berisiko menyebabkan penghakis berlebihan dan lebar kimpal; kelajuan yang terlalu pantas mungkin menyebabkan kekurangan isian.
Plat Tebal: Pengurusan Haba dan Strategi Multi-Lapisan
- Prapemanasan (Jika Diperlukan): Untuk plat melebihi 1/4", prapemanasan boleh membantu taburkan haba dan meminimumkan ralah. Rujuk lembaran data aloi anda atau panduan yang dipercayai—hanya panaskan jika disyorkan.
- Penyusunan Berbilang Laluan: Gunakan jahitan tali pinggang berbanding anyaman yang lebar. Bersihkan di antara laluan untuk membuang oksida baharu dan memeriksa kecacatan.
- Kawalan Penyimpangan: Susun jahitan secara berzig-zag dan klemkan bahan kerja dengan kukuh. Benarkan penyejukan di antara laluan untuk mengelakkan ralah.
- Tetapan AC: Gunakan arus yang lebih tinggi dan laraskan kelajuan gerak untuk bahagian yang lebih tebal. Perhatikan zon etak berterusan dan laraskan keseimbangan jika perlu.
Tiub dan Paip: Penyelarian dan Putaran Adalah Penting
- Penyelarian Sambungan: Uji pas tanpa leleng dan tandakan orientasi tiub sebelum mengimpal. Keseragaman dalam persambungan memastikan keterhubungan sekata di sekeliling lilitan.
- Jarak Torc ke Bahan Kerja: Kekalkan arka yang stabil dan pendek—terutamanya penting untuk permukaan bulat di mana arka boleh menyimpang.
- Penetapan Berputar: Buat penetapan pada kedudukan 3, 6, 9, dan 12. Ini membantu mengekalkan jajaran semasa pengimpalan dan mengurangkan rintangan.
- Urutan Pengimpalan: Impal dalam bahagian yang pendek dan bertindih, sambil memutarkan tiub tersebut. Ini mengekalkan kestabilan kolam leburan dan mengelakkan peningkatan haba.
Kesilapan Lazim yang Perlu Dielakkan
- Tiada keterbentukan pada akar (selalunya disebabkan oleh pemasangan yang tidak kemas atau sudut torj yang tidak betul)
- Zon luluh berlebihan (tindakan pembersihan terlalu tinggi—laraskan keseimbangan AC)
- Kekurangan pengisian atau benang cekung (kelajuan perjalanan terlalu tinggi atau pengisi tidak mencukupi)
- Kebakaran pada kepingan nipis (haba berlebihan atau kelajuan perjalanan terlalu perlahan)
- Kembara arka (tungsten kotor atau jarak torch tidak konsisten)
Pada aluminium, berhenti sebentar untuk membiarkan kolam 'melekat' sebelum menambahkan pengisi; kemudian gerakkan secara tegas untuk mengekalkan bentuk kolam dan mengelakkan panas berlebihan.
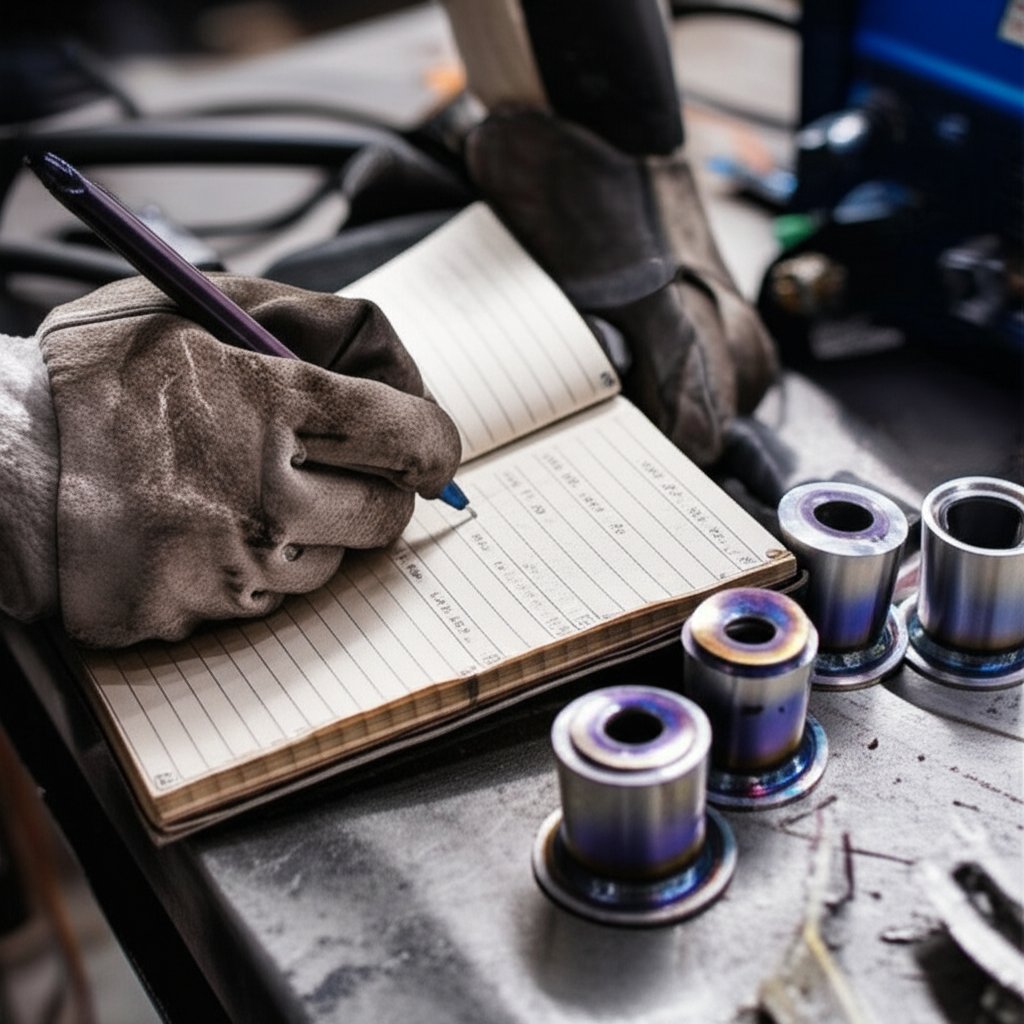
Bayangkan anda sedang bekerja pada sebuah pengelas aluminium tig dan ingin menetapkan proses anda untuk satu set tiub tig sambungan. Catatkan tetapan anda, perhatikan petunjuk visual (zom cecair, bentuk bead), dan rekodkan sebarang pelarasan yang anda buat sepanjang proses. Dengan masa, ini akan membina pangkalan data peribadi yang akan membantu anda dengan cepat menyesuaikan diri dengan projek dan bahan baru.
Dengan alur kerja langkah demi langkah ini, anda akan bersedia untuk menghadapi sebarang sambungan TIG aluminium dengan keyakinan. Seterusnya, kami akan tunjukkan cara untuk memeriksa secara visual kualiti kimpalan anda dan memastikannya memenuhi piawaian—supaya setiap projek lulus ujian, bukan hanya dilihat sahaja.
Apa yang Perlu Diperhatikan dalam Kimpalan TIG Aluminium
Pernahkah anda selesai membuat satu pengimpalan dan terfikir, "Adakah ini cukup baik untuk lulus pemeriksaan - atau saya perlu mengulanginya semula?" Jika anda pernah memandang satu leher yang berkilat dan masih berasa tidak pasti, anda tidak keseorangan. Walaupun dengan penyediaan kelas pertama pengimpal tig aluminium mengetahui cara mengenal pasti kualiti (dan mengesan masalah lebih awal) adalah penting. Inilah caranya untuk menjadikan pemeriksaan visual sebagai alat yang berkuasa bagi setiap projek TIG aluminium.
Apakah Yang Ditunjukkan oleh Leher TIG Aluminium yang Baik
Bayangkan anda sedang memeriksa satu sambungan yang baru diimpal. Apakah yang sepatutnya anda lihat? Pengimpalan TIG aluminium berkualiti tinggi - sama ada secara manual atau menggunakan jentera pengimpal tig aluminium - mempunyai beberapa petunjuk visual yang jelas:
- Profil riak sekata: Leher pengimpalan sepatutnya mempunyai riak yang sekata dan berkala tanpa perubahan mengejut pada lebar atau ketinggian.
- Kesatuan pada hujung: Kedua-dua hujung bead (bahagian "jari") harus bercampur lancar ke dalam logam asas, tanpa undercut atau kawasan yang tidak terisi.
- Zon etching yang konsisten: Cari satu garisan etched yang nipis dan berterusanan di hadapan bead—ini menunjukkan tindakan pembersihan arka berfungsi.
- Tiada smut atau kebopongan: Permukaan harus cerah, tanpa jelaga hitam, lubang jarum, atau gelembung yang kelihatan.
Jika anda menggunakan penukar tig untuk aluminium dalam industri yang dikawal kod (seperti aeroangkasa atau automotif), sentiasa semak spesifikasi projek anda atau AWS D1.2 untuk butiran penerimaan—dokumen ini menerangkan apa yang dianggap lulus atau gagal untuk aplikasi anda.
Ketidaksempurnaan Biasa dan Punca-punca
Tidak semua kimpalan menghasilkan kesempurnaan. Mari kita kupas ketidaksempurnaan TIG aluminium yang paling kerap berlaku, apa yang menyebabkannya, dan cara mengenalpasti dengan segera:
- Kekosongan: Lubang-lubang kecil atau lubang jarum di dalam atau sedikit di bawah bead, biasanya disebabkan oleh gas perlindungan yang tidak mencukupi, permukaan kotor, atau rod pengisi yang lembap. (Pengimpalan dan Pekerja Pengimpal) .
- Kekurangan keterlasan: Jalur mengimpal berada di permukaan atau gagal bercantum ke dalam satu atau kedua-dua sisi sambungan—biasanya disebabkan oleh arus yang terlalu rendah, kelajuan pengimpalan terlalu tinggi, atau sudut torc yang tidak sesuai.
- Kekurangan penahanan (Undercut): Alur di sepanjang tepi pengimpalan, disebabkan oleh haba berlebihan, kelajuan pengimpalan tinggi, atau sudut torc yang salah.
- Sisipan oksida: Tompok-tompok pudar, berkabur atau seperti 'berbintik-bintik' pada jalur pengimpal—biasanya disebabkan oleh pembersihan yang tidak mencukupi atau keseimbangan AC yang tidak sesuai.
- Penguatan berlebihan: Jalur pengimpal terlalu tinggi atau lebar, menunjukkan bahawa terlalu banyak bahan pengisi digunakan atau kelajuan pengimpalan terlalu perlahan.
- Kebengkakan retak: Kebocoran kecil pada hujung kimpalan, disebabkan oleh tarikan yang terlalu cepat atau tidak mengisi kawah apabila arka berakhir.
Kesuaian dan Kawalan Penyimpangan: Mengapa Persediaan Penting
Pernah perasan sambungan yang berpintal atau butir yang seolah-olah "terlepas" dari satu tepi? Kesuaian yang buruk, kekurangan pengepit, atau kemasukan haba yang tidak terkawal boleh menyebabkan penyimpangan dan kimpalan yang lemah. Inilah yang perlu diperhatikan:
- Persediaan Sambungan: Kesuaian yang ketat dan bersih mengurangkan risiko kegagalan kimpal dan meminimumkan penyimpangan.
- Penambatan Awal: Pengepit yang diatur secara sekata mengekalkan keselarian komponen dan menghalang pergerakan semasa anda mengimpal.
- Urutan kemasukan haba: Rancang susunan kimpalan anda dan biarkan komponen menyejuk di antara laluan untuk mengelakkan pemanjangan berlebihan, terutamanya pada aluminium yang nipis.
Matriks Penyelesaian Masalah: Isu Kimpalan TIG Aluminium Biasa
| Gejala | Punca Berkemungkinan | Penyelesaian Segera | Pencegahan |
|---|---|---|---|
| Keporosan (lubang jarum) | Bahan asas/bahan pengisi terkontaminasi, perlindungan gas kurang baik, rod lembap | Berhenti, berus dawai, keringkan rod, semak aliran gas | Persiapan bersih, simpan di tempat kering, sahkan gas, lindungi daripada angin |
| Kekurangan kemesraan | Arus rendah, kelajuan tinggi, sudut torius kurang sesuai | Tingkatkan arus, perlahankan kelajuan, laraskan sudut | Padankan arus dengan ketebalan, kelajuan sekata, latih kawalan torius |
| Kekurangan bawah | Haba tinggi, kelajuan tinggi, sudut torius terlalu curam | Kurangkan arus, perlahankan pergerakan, ratakan sudut | Tetapan yang betul, sudut yang konsisten, pantau bentuk lekapan |
| Sisipan oksida | Pembersihan tidak mencukupi, keseimbangan AC salah | Berhenti, bersihkan semula, laraskan keseimbangan AC | Berus sebelum mengimpal, laraskan tindakan pembersihan |
| Kebuk retak | Menarik terlalu cepat, tidak mengisi kebuk | Isi semula dengan bahan pengisi, gunakan kecerunan menurun jika ada | Kurangkan arus secara beransur-ansur, isi kebuk sebelum berhenti |
Kebersihan, liputan dan kawalan adalah tiga faktor utama yang menentukan kualiti kimpalan TIG aluminium.
Apabila ragu, bandingkan kimpalan anda dengan kriteria penerimaan dalam spesifikasi projek anda atau AWS D1.2. Jika anda menghadapi masalah yang berulang, gunakan matriks ini untuk mendiagnosis dan membetulkannya sebelum meneruskan kerja. Seterusnya, kita akan membincangkan penyelesaian masalah dengan segera—supaya anda dapat memperbaiki masalah dengan serta-merta dan teruskan projek anda.
Gejala Masalah dan Penyelesaian Segera
Pernahkah anda melihat kolam kimpal aluminium anda berkelakuan tidak menentu—berpercikan, bergerak tidak menentu, atau tiba-tiba runtuh—dan bertanya, "Apakah yang berlaku?" Sama ada anda menggunakan mesin kimpal dc ac tig welder atau sistem TIG konvensional, mengetahui apa yang perlu diperiksa terlebih dahulu boleh menjimatkan berjam-jam kerja ulang. Berikut adalah panduan pantas untuk diagnois dan mengelakkan masalah biasa pada sebarang kelengkapan tig aTAU komponen kimpalan tig .
Tindakan Segera: Apa Yang Perlu Diperiksa Apabila Kimpalan Bermasalah
Bayangkan anda sedang membuat pengimpalan dan kolam pengimpalan menjadi keruh, arka mula bergerak-gerak atau anda melihat jelaga hitam. Jangan panik—kebanyakan masalah pengimpalan TIG pada aluminium disebabkan oleh beberapa faktor utama. Tanya diri anda sendiri:
- Adakah gas untuk pengimpalan TIG mengalir? Periksa regulator, hos, dan cawan gas untuk kebocoran atau sekatan. Perubahan angin atau hos terlanggar boleh mematikan perlindungan serta-merta, menyebabkan keberangusan atau jelaga hitam.
- Adakah tungsten yang digunakan telah terkontaminasi? Jika anda secara tidak sengaja mencelupkan tungsten ke dalam kolam leburan, hentikan kerja dan asah semula tungsten tersebut. Tungsten yang terkontaminasi menyebabkan ketidakkstabilan arka dan kualiti pengimpalan yang berbutir.
- Adakah permukaan bahan telah bersedia dengan betul? Walaupun hanya sedikit sahaja sisa oksida, minyak, atau kelembapan, ia boleh menyebabkan keberangusan atau tingkah laku kolam leburan yang tidak menentu. Lap dan berus semula sambungan tersebut dengan berus keluli tahan karat khusus untuk aluminium.
- Adakah keseimbangan arus ulang-alik (AC) terlalu condong ke arah fungsi pembersihan? Tindakan pembersihan yang berlebihan (terlalu banyak Elektrod Positif) boleh menyebabkan penghakis berlebihan, melebarkan leburan, atau membuatkan hujung tungsten menjadi sfera, seterusnya menyebabkan ketidakkstabilan arka.
- Adakah sudut toras terlalu curam? Sudut yang curam mendedahkan kimpalan kepada udara, mengurangkan selimut gas dan menyebabkan kekotoran atau keporosan. Kekalkan torc pada 10–15° dari pugak untuk hasil terbaik.
Dengan memeriksa asas-asas ini, anda dapat menyelesaikan kebanyakan masalah kawah TIG sebelum menjadi kecacatan utama.
Langkah Pencegahan: Halang Masalah Daripada Bermula
Mahukan mengelakkan kejutan di tengah kimpalan? Berikut adalah amalan-amalan terbukti yang mengekalkan keadaan senapang tig dan komponen kimpalan tig berjalan lancar:
- Penyelenggaraan barangan habis pakai: Periksa dan gantikan collet, cawan, dan penutup belakang secara berkala. Bersihkan badan torc untuk mengelakkan penambahan sisa.
- Pengendalian rod pengisi: Simpan rod dalam bekas kering dan tertutup. Lap dengan pelarut sebelum digunakan untuk membuang kelembapan dan minyak.
- Persediaan sambungan: Sambungan yang ketat dan sekata mengurangkan risiko kegagalan keterpiuhan dan meminimumkan penyimpangan. Kepit dan las titik dengan lengkap.
-
Senarai semak sebelum melas:
- Periksa aliran gas dan sambungan
- Bersihkan semua permukaan, termasuk bahan pengisi
- Periksa bentuk dan kebersihan hujung tungsten
- Lorong ujian pada serpihan aloi yang sama/ketebalan
Penyelenggaraan yang kerap dan senarai semak mudah membantu mencegah masalah, terutamanya apabila beralih antara pengelasan kayu aluminium dan satu setup TIG.
Jadual Gejala: Diagnosis dan Pembetulan Cepat
| Gejala | Punca Berkemungkinan | Penyelesaian Pantas |
|---|---|---|
| Jelaga hitam / sisa hitam | Selimut gas kurang baik, sudut torc terlalu curam, permukaan tercemar | Periksa gas untuk kimpalan TIG, laraskan sudut torc, bersihkan semula sambungan |
| Arus elektrik tidak menentu | Tungsten tercemar atau berbentuk tidak sesuai, pembumian kurang baik | Asah semula tungsten, periksa klip pembumian, bersihkan kawasan sambungan |
| Tepi runtuh (keping nipis) | Haba terlalu tinggi, kelajuan perlahan, tindakan pembersihan AC berlebihan | Kurangkan arus, tingkatkan kelajuan perjalanan, kurangkan tindakan pembersihan |
| Penampilan berbutir | Rod pengisi yang salah, logam asas/pengisi terkontaminasi, perlindungan gas tidak mencukupi | Sahkan jenis pengisi, bersihkan semula, semak aliran gas dan saiz cawan |
| Liang jarum / keporosan | Kebasahan, minyak, atau oksida pada logam asas/pengisi, kebocoran gas | Berhenti, gunakan berus dawai, gunakan rod kering, baiki kebocoran |
Amalan Tidak Digalakkan: Tabiat yang Perlu Dihindari
- Menghela rod pengisi yang kotor melalui aliran gas—sentiasa lap rod sehingga bersih
- Menggunakan berus yang tidak khusus pada aluminium—risiko kontaminasi silang
- Menghakis berlebihan dengan keseimbangan AC berlebihan—menyebabkan leher kimpal yang lebar dan lemah serta kerosakan tungsten
- Mengabaikan kebocoran atau aliran di sekeliling senjata TIG anda—lindungi kawasan gas perisai anda
- Mengimpal di atas permukaan yang tidak dibersihkan atau basah—keporosan hampir pasti berlaku
Mendokumentasikan setiap pembaikan—apa yang anda lihat, apa yang anda ubah, dan keputusannya—membantu anda dan pasukan anda membina panduan menyelesaikan masalah. Dengan cara ini, apabila perkara yang sama berlaku lagi pada dc ac tig welder berlaku masalah, anda akan tahu dengan tepat di mana untuk mencari dan bagaimana untuk bertindak.
Apabila mengimpal aluminium dengan kaedah TIG, pembaikan terpantas hampir sentiasa berkaitan dengan persediaan, liputan gas, dan teknik yang bersih—bukan sekadar meningkatkan ampere.
Sedia untuk mengaplikasikan pembaikan pantas ini pada projek sebenar? Seterusnya, kami akan menghubungkan pengetahuan menyelesaikan masalah ini dengan reka bentuk dan sumberkan ekstrusi aluminium berkualiti tinggi—supaya kimpalan anda bermula dengan asas yang terbaik.
Mereka Bentuk dan Mencari Sumberkan Ekstrusi Boleh Kimpal untuk Pematerian TIG Aluminium yang Boleh Dipercayai
Pernah menghadapi kesukaran untuk mendapatkan kimpalan yang boleh diulang dan bersih pada gandingan aluminium—tidak kira betapa telitinya anda memasang rig TIG anda? Kadangkala, rahsianya bukan sahaja pada mesin kimpal atau teknik anda, tetapi pada kualiti dan rekabentuk bahagian yang diekstrusi yang anda sedang menyambungkannya. Mari kita kupas bagaimana rekabentuk bahagian yang bijak dan strategi pemindahan bekalan dapat menyediakan setiap kimpalan aluminium TIG projek untuk kejayaan, terutamanya dalam kerja-kerja automotif dan pembinaan.
Mereka Bentuk untuk Kekimpalan TIG: Buat Setiap Sambungan Boleh Dicapai dan Konsisten
Bayangkan anda diberikan sekumpulan ekstrusi aluminium untuk kerangka atau enklosur. Perbezaan antara mudah dan sukar sering bergantung kepada geometri. Kedengaran biasa? Berikut adalah yang perlu diutamakan apabila mereka bentuk atau menentukan spesifikasi bahagian untuk kimpalan TIG:
- Geometri sambungan yang boleh dicapai: Pilih sudut terbuka, larian lurus, dan kawasan kimpal yang mudah dicapai. Elakkan saluran dalam atau sudut sempit yang menghalang obor anda atau mengurangkan kawasan gas.
- Bukaan akar yang mencukupi: Jurang yang konsisten dan sederhana memudahkan pencapaian keterlanjuran penuh tanpa terbakar—terutamanya pada keratan nipis.
- Ketebalan dinding sekata: Perubahan ketebalan yang mengejut menyebabkan input haba tidak sekata dan berlakunya rintangan. Reka peralihan secara beransur-ansur sekiranya boleh.
- Jejari sudut dan panjang flens yang terancang: Sudut yang berbentuk bulat (berbanding tepi 90° yang tajam) membantu gas perlindungan meliputi keseluruhan kimpalan, mengurangkan risiko kebolehporian. Flens yang terlalu panjang atau terlalu pendek boleh menghadkan capaian torc atau menyebabkan liputan tidak lengkap.
Apabila anda mengoptimumkan ciri-ciri ini, anda menjadikan kehidupan lebih mudah untuk setiap pengimpal aluminium —sama ada anda membina prototaip atau menjalankan talian pengeluaran dengan mesin mesin kimpal untuk aluminium .
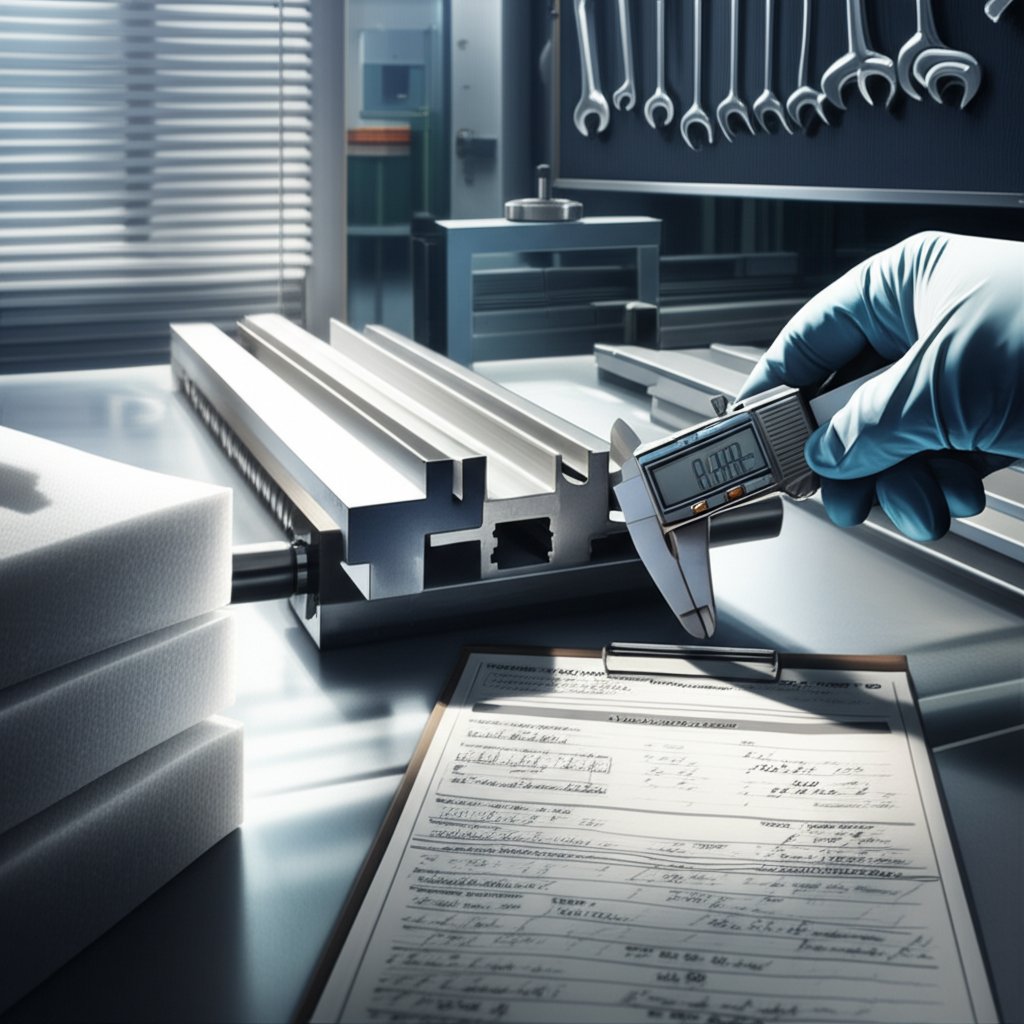
Membekal Ekstrusi Berkualiti: Asas Kepada Kimpalan yang Bersih dan Boleh Ulang
Bahkan seting TIG terbaik sekalipun tidak dapat mengatasi bahan berkualiti rendah. Jika anda pernah menghadapi masalah dengan bahan yang bengkok, berminyak, atau tidak sekata, anda pasti tahu berapa banyak masa dan kualiti yang terpaksa dibuang untuk kerja ulang. Berikut adalah cara memilih pembekal dan bahan yang dapat memastikan kejayaan kimpalan anda:
- Aloi dan rawatan yang boleh dikesan: Sentiasa sahkan dokumen untuk aloi (contoh, 6061, 6063) dan rawatan (contoh, T5, T6). Kebolehkesanan memastikan kebolehlasakan dan sifat mekanikal yang konsisten.
- Permukaan yang bersih dan tidak rosak: Ekstrusi yang dikemas dengan baik harus tiba dalam keadaan bebas minyak, kotoran, dan calar. Kontaminasi permukaan secara langsung menyebabkan kebolehtelapan dan kelakuan arka yang tidak menentu semasa kimpalan TIG.
- Dimensi dan toleransi yang konsisten: Toleransi yang ketat mengurangkan masalah kesesuaian, jurang, dan penyimpangan—menjadikan lebih mudah untuk menggunakan mesin kimpal aluminium dengan cekap.
- Pembungkusan Pelindung: Cari bungkusan yang tertutup dan berasingan untuk mengelakkan kontaminasi dan kerosakan fizikal semasa pengangkutan.
Berikut adalah senarai semak praktikal untuk pembelian dan penerimaan:
- Sahkan dokumen aloi dan ketegangan
- Periksa untuk kelurusan, kilasan, atau kebengkokan
- Semak kemasan permukaan untuk kesan calar, filem, atau pengoksidaan
- Sahkan dimensi dan ketebalan dinding pada beberapa titik
- Tinjau pembungkusan untuk kebersihan dan pencegahan kerosakan
Untuk projek di mana kualiti kimpalan dan kebolehulangan adalah penting, pertimbangkan untuk bekerjasama dengan pembekal bersepadu seperti Pembekal Komponen Logam Shaoyi . Proses satu-satu tempat mereka yang bersijil IATF 16949 memastikan pengeluaran anda tidak sahaja tepat dari segi dimensi tetapi juga dioptimumkan untuk kebolehkimpaan—mengurangkan masa persediaan anda dan meminimumkan risiko kebopongan. Apabila kerja seterusnya memerlukan bahagian dikeluarkan, sumberkan pengeluaran yang tinggi konsistennya bahagian pengekstrusi aluminium dari Shaoyi untuk memberi pengimpal anda untuk aluminium titik permulaan yang terbaik.
Membandingkan Saluran Pembekalan: Apa yang Paling Penting?
| Pembekal | Pengesanan | Kebersihan Permukaan | Sokongan Tolak |
|---|---|---|---|
| Pembekal Komponen Logam Shaoyi | Penuh (bersijil IATF 16949, boleh dikesan mengikut lot) | Pembungkusan berkemban, permukaan bersih disahkan oleh QC | Sokongan toleransi ketat tingkat tinggi untuk komponen automotif dan presisi |
| Pengedar tempatan am | Seksyen (mungkin tiada penjejakan pada tahap lot) | Berubah-ubah; risiko kontaminasi semasa penyimpanan | Toleransi piawai, kurang sokongan untuk bentuk kompleks |
| Penjual dalam talian yang tidak disahkan | Terhad atau tidak diketahui | Tidak menentu; keadaan permukaan mungkin berbeza-beza | Julat toleransi yang besar, dokumen minimum |
Ekstrusi yang stabil dan bersih dari sumber yang dipercayai mengurangkan masa persediaan, meminimumkan risiko kebopongan, dan membolehkan pengimpal aluminium anda menghasilkan sambungan TIG yang konsisten dan berkualiti tinggi.
Dengan memberi tumpuan kepada reka bentuk yang mesra pengimpalan dan mendapatkan bekalan daripada pembekal yang telah terbukti, anda memberi kejayaan kepada setiap projek TIG aluminium—tidak kira seberapa mencabar aplikasinya. Seterusnya, kami akan menamatkan dengan ringkasan tindakan dan pelan langkah demi langkah untuk memastikan pengimpalan anda kuat, bersih, dan mematuhi kod dari arka pertama hingga pemeriksaan akhir.
Ringkasan Utama dan Langkah Seterusnya untuk Pengimpalan Aluminium TIG yang Konsisten
Pelan Tindakan untuk Pengimpalan Seterusnya
Apabila anda berdiri di meja kerja dengan torc TIG di tangan, adakah anda pernah tertanya, "Apakah satu perkara yang akan membuatkan impalan ini sempurna?" Hakikatnya, tiada satu trik sahaja—kejayaan dengan TIG aluminium datang daripada pendekatan yang boleh diulang dan disiplin. Sama ada anda menggunakan peralatan berkualiti tinggi atau pengelas TIG atau tukang kimpal tig yang lebih berpatutan , asasnya tidak pernah berubah. Berikut adalah senarai semak yang cepat untuk memastikan anda berada di landasan yang betul:
- Persiapan lengkap: Bersihkan logam asas dan rod pengisi, serta buang semua oksida dengan berus keluli tahan karat khusus.
- Tetapkan keseimbangan dan frekuensi AT: Sasarkan zon etak yang nipis dan berterusan hanya di hadapan kolam kimpal—ini adalah petunjuk visual anda untuk tetapan yang optimum.
- Pilih pengisi yang sesuai: Padankan rod pengisi dengan keluarga aloi asas dan keperluan perkhidmatan (kekuatan, rintangan retak, padanan warna).
- Ikuti prosedur sambungan yang telah terbukti: Gunakan sudut obor, kelajuan perjalanan, dan urutan tacking yang betul untuk setiap jenis sambungan.
- Audit keputusan anda: Periksa kimpalan secara visual untuk riak sekata, pencantuman yang betul, dan ketiadaan keporosan atau kotoran.
- Log parameter anda: Rekodkan tetapan dan keputusan dalam buku nota untuk rujukan masa depan—kekonsistenan adalah kunci.
Pembersihan logam, perlindungan stabil, dan kawalan haba yang terancang adalah asas bagi setiap kimpalan TIG aluminium yang baik.
Perkongsian dan Pembelian: Dapatkan Bahan yang Betul Sejak Awal
Pernah terasa seperti telah melakukan segala-galanya dengan betul, tetapi masih menghadapi masalah kesesuaian atau keporosan? Kadangkala, jawapannya terletak pada bahan itu sendiri. Bagi pasukan yang membuat pemasangan struktur atau kosmetik—terutamanya yang melibatkan aluminium dikeluarkan melalui proses ekstrusi—adalah berbaloi untuk bekerjasama lebih awal dengan pembekal yang dipercayai. Membeli bahan ekstrusi berkualiti tinggi yang sedia untuk dikimpal memastikan mesin mesin kimpal TIG dan proses boleh memberikan hasil yang terbaik.
- Bekerjasama dengan pembekal yang menawarkan aloi yang boleh dikesan dan ketekalan yang konsisten.
- Utamakan ekstrusi yang bersih, bebas kerosakan, dan toleransi yang ketat untuk meminimumkan persediaan dan kerja semula.
- Untuk projek automotif atau projek berketepatan tinggi, pertimbangkan satu penyedia satu henti seperti Pembekal Komponen Logam Shaoyi —kawalan kualiti terkamir dan sokongan kejuruteraan tingkat tinggi mereka membantu memastikan setiap pengimpalan bermula dengan asas yang betul.
Ingat, walaupun pengimpal tig terbaik aTAU mesin las TIG tidak dapat menggantikan bahan yang tidak berkualiti. Melabur dalam sumber yang boleh dipercayai memberi pulangan dalam produktiviti dan kualiti produk akhir.
Bina Playbook Bengkel Anda: Peningkatan Berterusan untuk Kejayaan TIG
Bayangkan mempunyai playbook bengkel yang mencatatkan setiap pelajaran, parameter, dan penyelesaian masalah—menjimatkan masa dan tekanan pada setiap projek baru. Inilah cara untuk terus meningkatkan prestasi:
- Simpan panduan ini untuk rujukan cepat—kemaskini dengan nota dan tetapan anda sendiri.
- Bina logbook parameter: rekodkan bahan, jenis sambungan, tetapan, dan keputusan visual untuk setiap kerja.
- Selaraskan kriteria pemeriksaan dan penerimaan anda dengan standard AWS atau piawaian khusus projek untuk kerja yang diperbadankan.
- Kongsi amalan terbaik dengan pasukan anda untuk meningkatkan keseluruhan standard bengkel.
Dengan menjadikan peningkatan berterusan sebagai sebahagian daripada rutin anda, anda akan cepat mengesan corak, mengelakkan kesilapan berulang, dan mendapat lebih hasil daripada setiap tukang kimpal TIG yang baik untuk aluminium —tidak kira tahap pengalaman anda.
Sedia untuk meningkatkan kemahiran kimpalan TIG aluminium anda? Bermula dengan melaksanakan pelan tindakan di atas, bekerjasama dengan rakan bahan yang berpengalaman, dan teruskan membina asas pengetahuan TIG bengkel anda. Bagi mereka yang mencari pengeluaran profil aluminium, jangan lupa untuk melawat Bahagian ekstrusi aluminium Shaoyi untuk memastikan stok yang sedia dikimpal dan mengurangkan kerja semula pada proses seterusnya. Dengan persediaan, peralatan, dan rakan kongsi yang sesuai, kimpalan TIG aluminium seterusnya boleh menjadi yang terbaik buat masa ini.
Soalan Lazim Mengenai Kimpalan TIG Aluminium
1. Apakah yang membuatkan kimpalan TIG menjadi pilihan terbaik untuk aluminium berbanding kimpalan MIG atau stick?
Pengelasan TIG memberikan kawalan haba yang tepat dan kesudahan yang bersih serta menarik, yang sangat penting untuk kepingan aluminium nipis, tiub, dan pemasangan. Berbeza dengan pengelasan MIG atau stick, TIG membenarkan penambahan pengisi secara berasingan, meminimumkan percikan dan penyimpangan sambil menghasilkan pengelasan berkualiti tinggi dan menarik secara visual—terutamanya penting dalam kerja automotif, pembinaan, dan elektronik.
2. Bagaimana tetapan keseimbangan AU dan frekuensi mempengaruhi kualiti pengelasan TIG pada aluminium?
Keseimbangan AU mengawal nisbah pembersihan (penyingkiran oksida) kepada penembusan, manakala frekuensi mengubah fokus arka. Tetapan pembersihan yang tinggi akan menyingkirkan lebih banyak oksida tetapi boleh memanaskan terlalu banyak tungsten, manakala peningkatan frekuensi merapatkan arka untuk sambungan yang ketat. Penyesuaian kedua-duanya membantu mencapai zon etching yang berterusan dan pengelasan yang stabil serta bebas kecacatan.
3. Apakah langkah utama untuk menyediakan aluminium sebelum pengelasan TIG?
Persiapan yang rapi merangkumi proses penyingkiran gris dengan pelarut yang diluluskan, menggosok sambungan dengan berus keluli tahan karat khusus, dan memastikan semua permukaan dan rod pengisi dalam keadaan bersih dan kering. Ini mengelakkan pencemaran, mengurangkan kebopongan, serta memastikan kimpalan yang kuat dan boleh dipercayai.
4. Bagaimanakah cara memilih logam pengisi yang sesuai untuk kimpalan TIG aluminium?
Pilih rod pengisi berdasarkan keserasian aloi, kekuatan, rintangan retak, dan kesesuaian warna selepas proses anodisasi. Jenis 4043 adalah ideal untuk aloi siri 6xxx dan kerja am, manakala 5356 memberikan kekuatan lebih tinggi dan padanan warna yang lebih baik untuk aplikasi siri 5xxx dan marin. Sentiasa rujuk lembaran data aloi dan rod pengisi untuk keputusan yang optimum.
5. Mengapakah pentingnya mendapatkan ekstrusi aluminium berkualiti tinggi untuk kimpalan TIG?
Ekstrusi yang konsisten dan bersih dengan aloi yang boleh dikesan dan had toleransi yang ketat memastikan kepadanan yang lebih baik, mengurangkan masa persediaan, dan meminimumkan kecacatan seperti keberangkasan. Bergabung usaha dengan pembekal yang boleh dipercayai, seperti Shaoyi Metal Parts Supplier, membantu memastikan bahan sedia kimpal, membawa kepada kimpalan TIG yang lebih kuat dan boleh diulang dengan lebih baik.