 Petits tirages, hauts standards. Notre service de prototypage rapide rend la validation plus rapide et facile —

Pièces de Climatisation Automobile : Diagnostiquez, Choisissez, Installez Rapidement
Comprendre l'écosystème des pièces de climatisation automobile
Comment la climatisation du véhicule transforme la chaleur en confort
Vous êtes-vous déjà demandé pourquoi entrer dans votre voiture par une journée chaude pouvait passer de l'étouffant à la fraîcheur en quelques minutes ? C'est là la magie du système de climatisation fermé de votre véhicule. En son cœur, le système de climatisation automobile est conçu pour évacuer la chaleur hors de l'habitacle et la remplacer par de l'air frais et sec, rendant votre conduite confortable, quel que soit le temps extérieur. Mais comment ce processus fonctionne-t-il exactement ?
Pensez-y comme à un cycle : le frigorigène circule à travers une série de composants de climatisation automobile , passant d'un gaz à un liquide et vice-versa. Cette transformation permet au système d'absorber la chaleur à l'intérieur de l'habitacle et de la relâcher à l'extérieur. Le résultat ? Un air frais et revigorant pour vous et vos passagers.
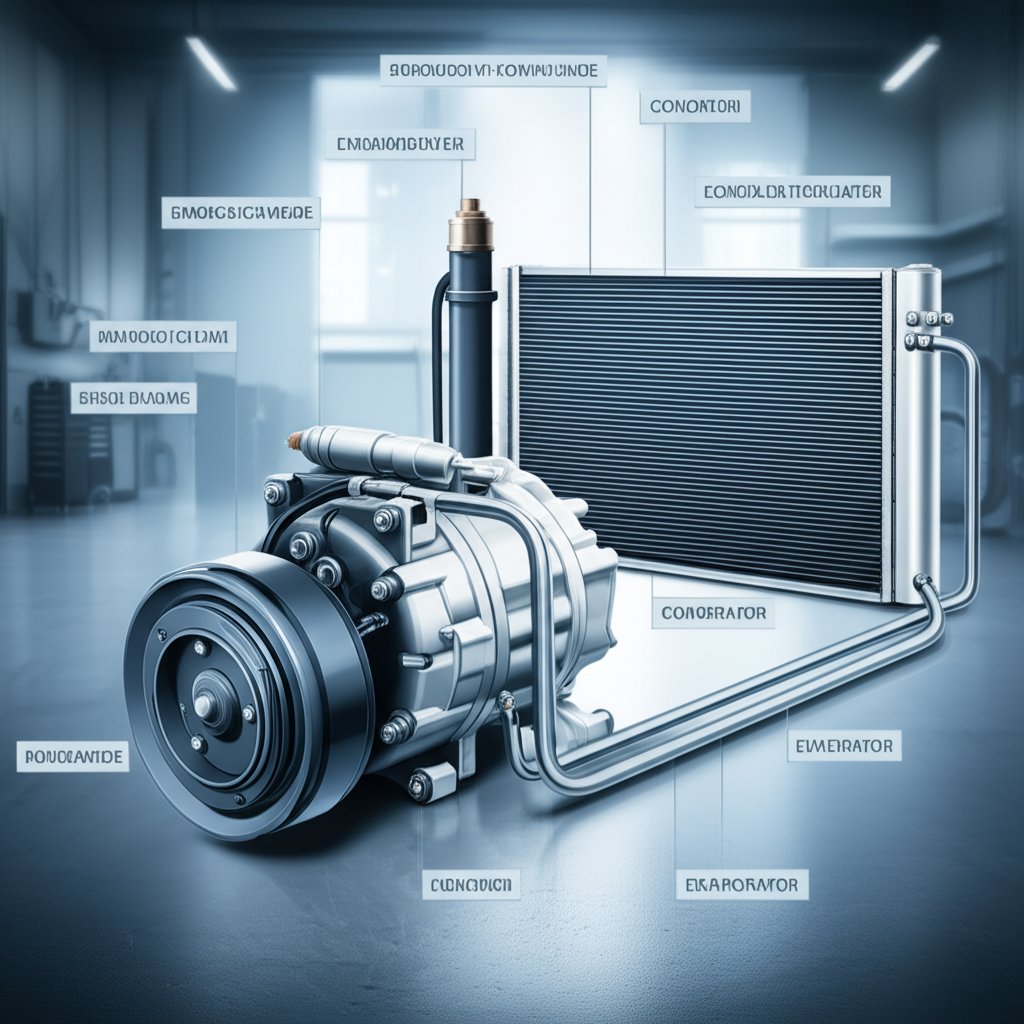
Les composants essentiels à connaître
Décortiquons les éléments principaux pièces de climatisation automobile que vous trouverez sous le capot et derrière le tableau de bord. Chaque pièce a une fonction spécifique et une localisation précise, travaillant ensemble pour assurer la circulation de l'air frais :
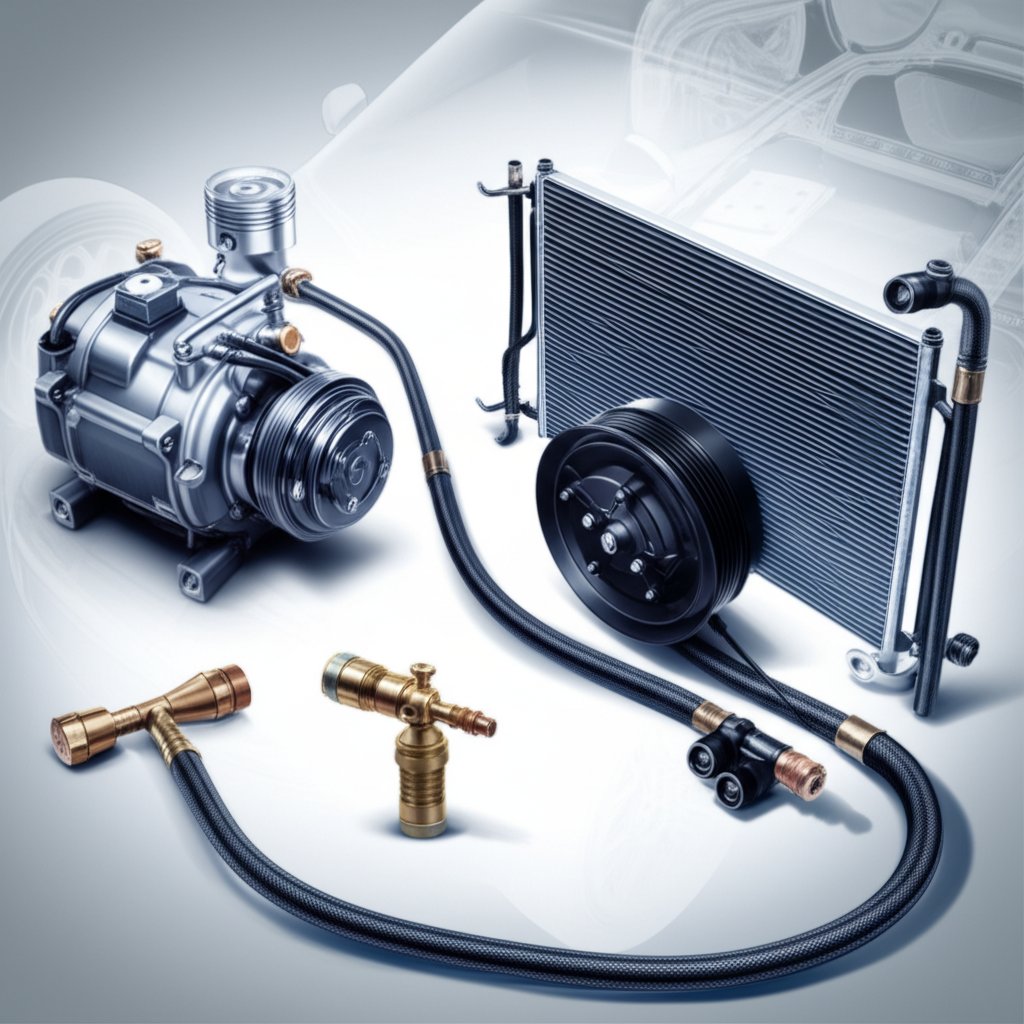
- Compresseur : Le cœur du système, généralement fixé au moteur. Il augmente la pression du fluide frigorigène et le pousse à travers l'ensemble du système. Cherchez une unité entraînée par courroie, avec des tuyaux raccordés.
- Condenseur : Situé à l'avant du véhicule, derrière la calandre. Il refroidit le gaz de fluide frigorigène chaud et sous pression, le transformant en liquide en évacuant la chaleur vers l'air extérieur.
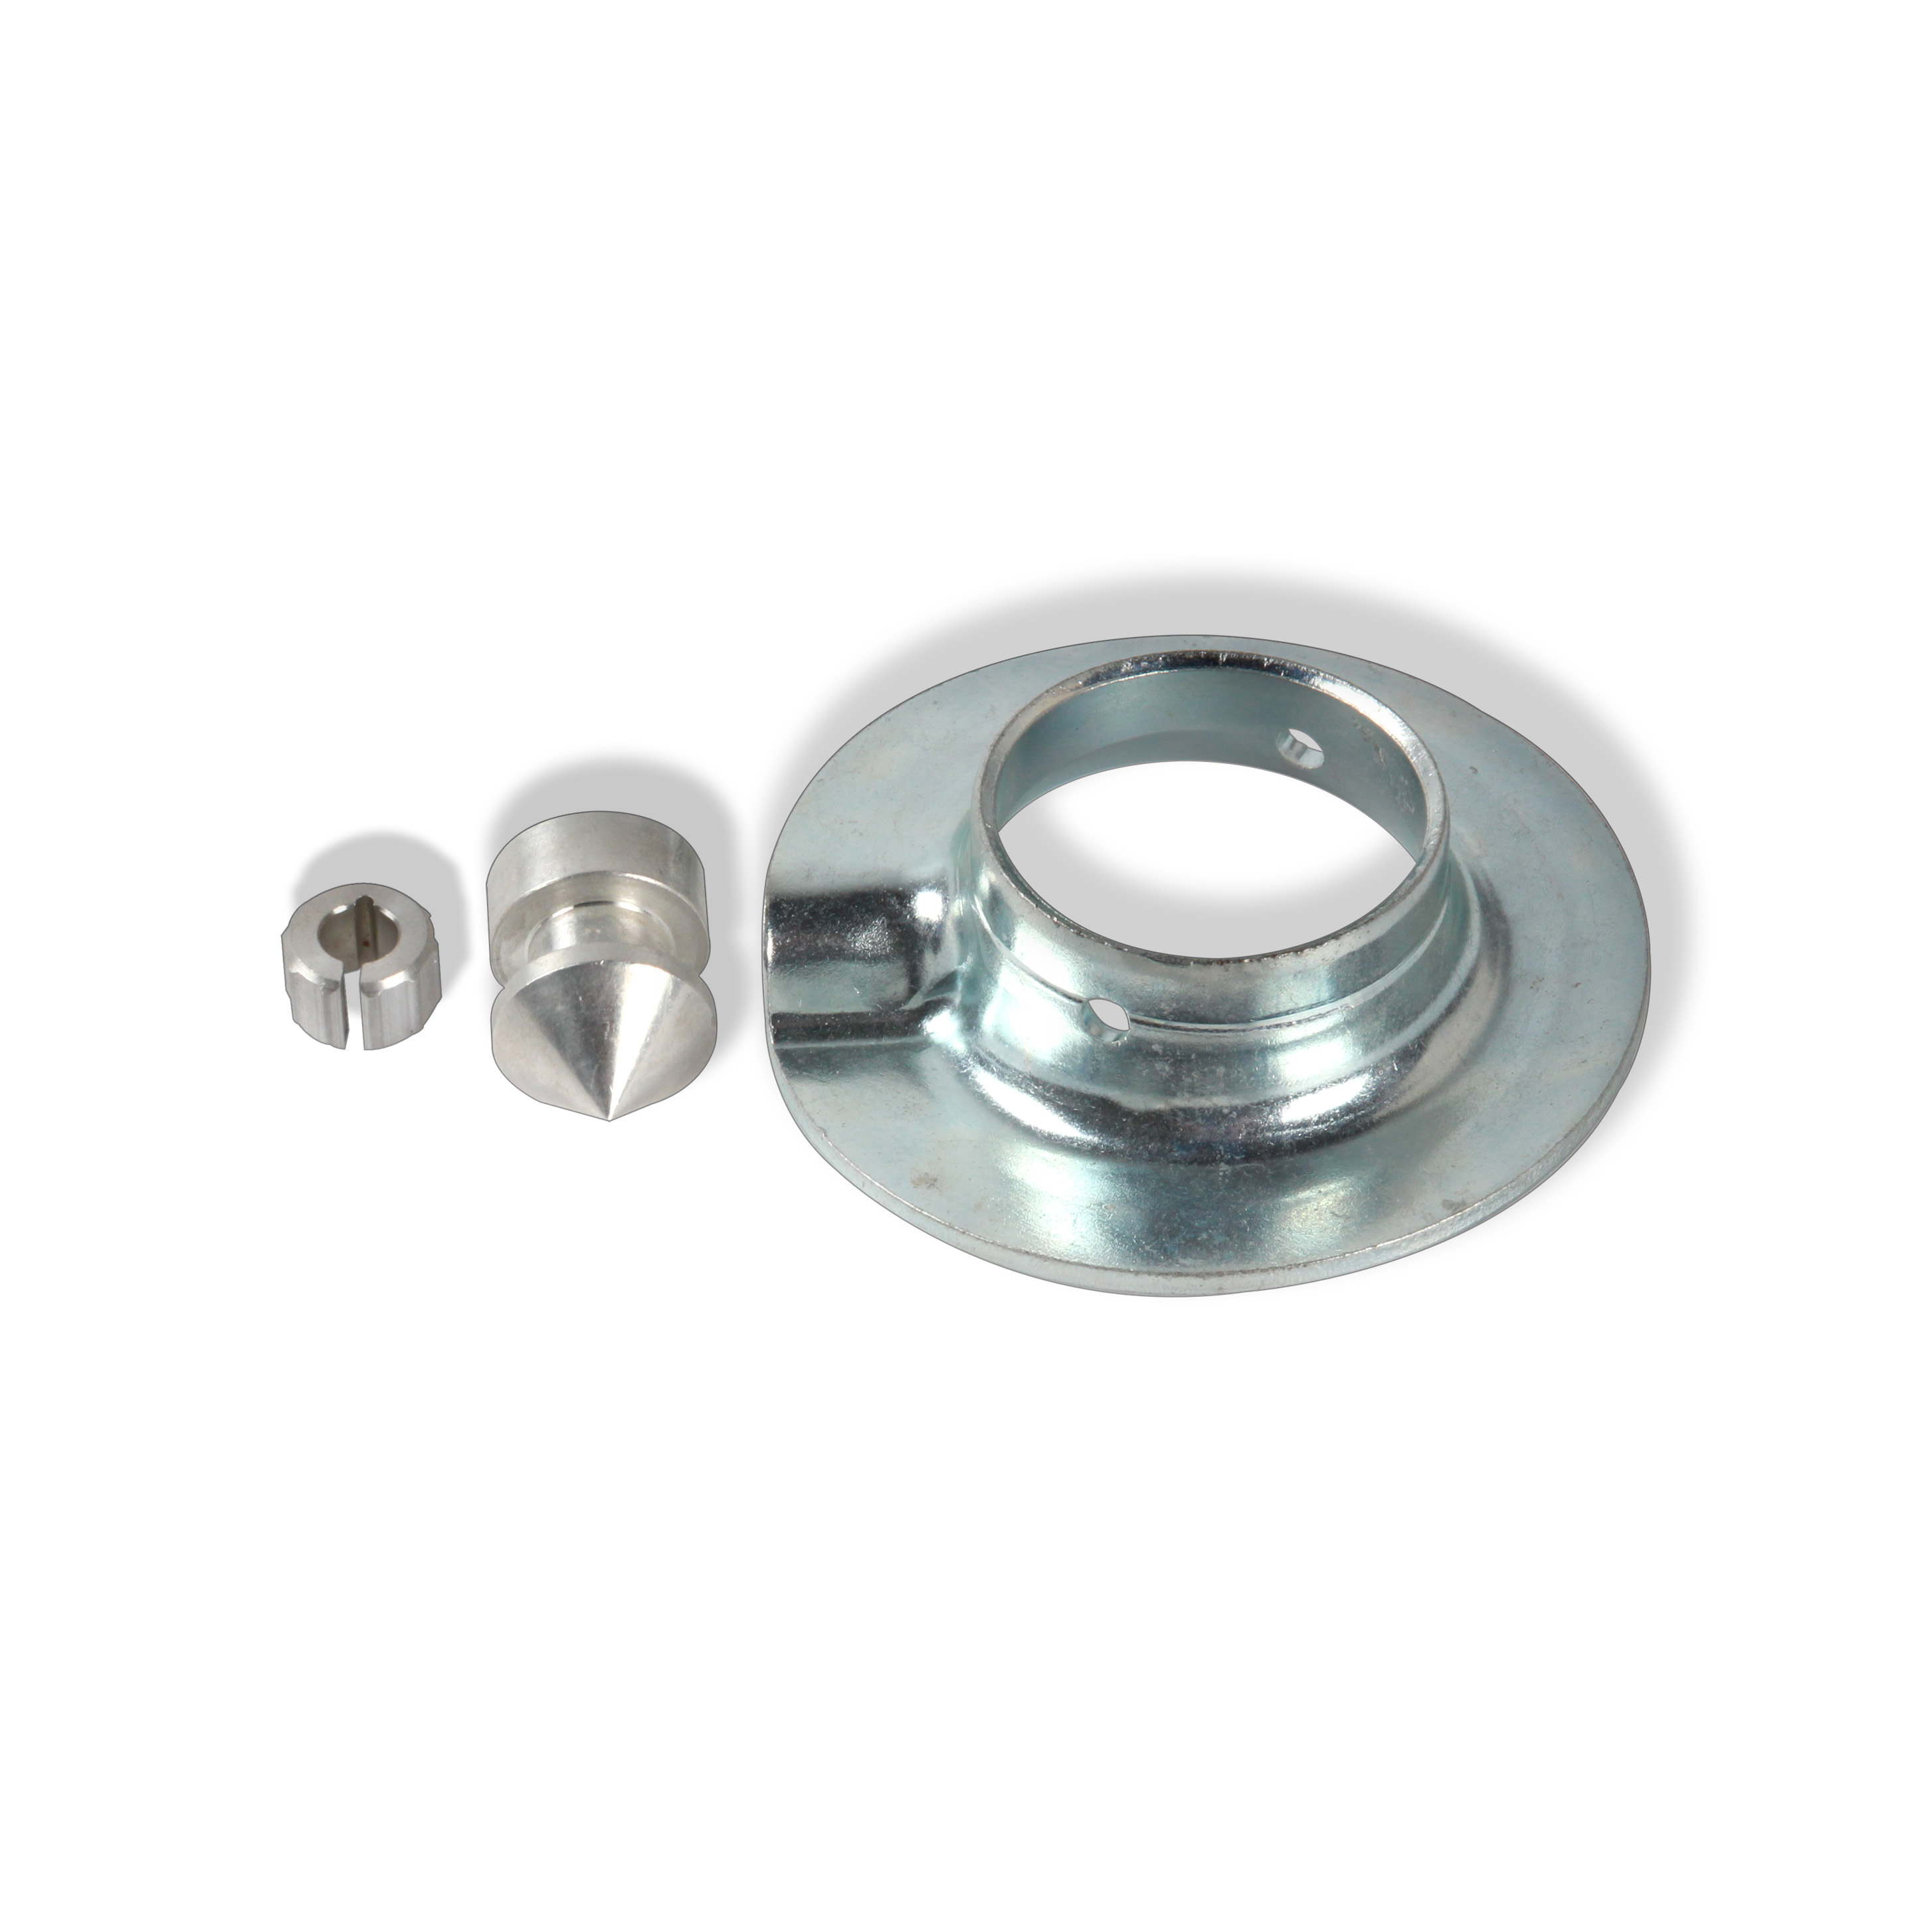
- Récepteur/séchoir ou accumulateur : Généralement placé près du condenseur ou du pare-feu. Il élimine l'humidité et les impuretés présentes dans le fluide frigorigène.
- Vanne d'expansion ou Tube orifice : Montée entre le condenseur et l'évaporateur, souvent dissimulée dans les canalisations. Elle dose le débit du fluide frigorigène, lui permettant de se détendre et de refroidir avant d'atteindre l'évaporateur.
- Évaporateur : Situé à l'intérieur du tableau de bord. C'est ici que le fluide frigorigène absorbe la chaleur de l'air intérieur, le refroidissant et l'asséchant avant de le souffler à l'intérieur du véhicule.
| CompoNent | Fonction | Emplacement typique | Symptôme courant en cas de défaillance |
|---|---|---|---|
| Compresseur | Met sous pression et fait circuler le fluide frigorigène | Coffre moteur, entraîné par courroie | Pas d'air froid, bruits forts ou système ne s'allumant pas |
| Condenseur | Évacue la chaleur du fluide frigorigène | Avant du véhicule, derrière la calandre | Air chaud, refroidissement réduit, débris visibles |
| Récepteur/séchoir ou accumulateur | Filtre l'humidité et les débris | Près du condenseur ou du mur de feu | Refroidissement insuffisant, contamination du système |
| Vanne d'expansion/Tube orifice | Régule le débit du frigorigène | Dans les tuyauteries entre le condenseur et l'évaporateur | Givre sur les tuyauteries, refroidissement irrégulier |
| Évaporateur | Absorbe la chaleur de l'air intérieur | À l'intérieur du tableau de bord | Débit d'air faible, odeur moisie, fuites d'eau |
Points de défaillance courants et signes rapides
Cela semble complexe ? C’est plus facile pour identifier un problème si vous savez ce que chaque pièce fait. Par exemple, si votre pièces de climatisation pour voiture soufflent de l'air chaud, cela peut indiquer une fuite, un compresseur défectueux ou un condenseur bouché. Si vous remarquez un faible débit d'air, l'évaporateur ou le filtre d'habitacle pourrait être en cause. Des fuites autour des tuyaux ou une trace d'huile près des pièces de climatisation de véhicule indiquent souvent des joints ou des connecteurs usés. Ces indices vous aident à identifier précisément les bonnes pièces de climatiseur de voiture lorsque vous diagnostiquez un problème ou que vous achetez des pièces de rechange.
Diagnostiquer l'ensemble du système, et non seulement une pièce, permet d'économiser du temps et d'éviter les pannes répétées. Cherchez toujours la cause profonde, et non seulement le symptôme.
En comprenant ces pièces de climatisation automobile , vous serez mieux équipé pour identifier ce qu'il y a sous le capot, communiquer avec des techniciens ou rechercher en toute confiance dans les manuels et catalogues les bonnes pièces de climatisation automobile pour votre véhicule.
Prêt à approfondir ? Dans la prochaine section, nous expliquerons le fonctionnement de chaque composant et les points à surveiller lors de réparations ou mises à niveau.
Principaux composants expliqués pour des réparations intelligentes
Types de compresseurs de climatisation et bases de l’embrayage
Lorsque la climatisation de votre voiture cesse de souffler de l’air froid, le compresseur de climatisation est souvent la première pièce à laquelle on pense. Mais qu’est-ce qu’il fait exactement ? Imaginez le compresseur comme la pompe qui maintient le fluide frigorigène – le carburant essentiel de votre pièces de climatisation automobile – en mouvement. Il aspire un gaz sous basse pression, le compresse en un état haute pression, puis l’envoie à travers la ligne de clim vers le condenseur. La plupart des compresseurs sont entraînés par courroie et disposent d’un embrayage électromagnétique qui s’active uniquement lorsque le refroidissement est nécessaire, permettant ainsi d’économiser de l’énergie et de réduire l’usure. Vous trouverez également différents modèles de compresseurs, tels que les modèles à piston (style piston), rotatifs, à spirale et à déplacement variable, chacun offrant des avantages spécifiques en termes d’efficacité et de maîtrise du bruit. En savoir plus sur les types de compresseurs de climatisation et leur entretien .
- Indices sonores : Des bruits de cliquetis, de vibration ou de grincement peuvent indiquer des problèmes d’embrayage ou de roulements.
- Contamination : Un résidu noir ou des copeaux métalliques présents dans le système peuvent indiquer une défaillance interne du compresseur.
- Pièces associées : Vérifiez toujours ou remplacez le désiccateur ou le récepteur/séchoir lors de l'installation d'un nouveau compresseur afin d'éviter la recirculation des débris.
Condenseur vs Évaporateur : tout simplement expliqué
Une fois que le frigorigène quitte le compresseur, il se dirige vers le condensateur de climatisation condenseur situé à l'avant du véhicule. Là, le gaz chaud et sous pression évacue sa chaleur vers l'air extérieur et se condense à nouveau en liquide. L'efficacité du condenseur dépend de l'absence d'obstacles dans les ailettes et d'un bon flux d'air : des ailettes endommagées ou un radiateur obstrué peuvent rapidement réduire le refroidissement. Après le condenseur, le frigorigène circule à travers le ligne de clim tube d'expansion vers l'évaporateur.
À l'intérieur du tableau de bord, le évaporateur de courant alternatif il prend le relais. Lorsque le réfrigérant à basse pression pénètre dans la voiture, il absorbe la chaleur de l'air de la cabine, le refroidit et le séche avant de le renvoyer dans la voiture. Un évaporateur bouché ou sale, ou un filtre à air de cabine restreint, peuvent entraîner un faible débit d'air et des odeurs moisies.
- Vérifie le débit d'air: Vérifiez si les ailerons du condenseur ne contiennent pas de débris et vérifiez que les ventilateurs du radiateur fonctionnent pendant le fonctionnement de la climatisation.
- Signes d'avertissement de l'évaporateur: Faible débit d'air, fuites d'eau sous le tableau de bord, ou odeurs persistantes.
- Conseils d'entretien: Remplacer régulièrement le filtre de cabine et redresser les nageoires du condensateur pliées pour des performances optimales.
Rôle de la vanne d'expansion et du tube d'orifice
Avant que le réfrigérant n'entre dans l'évaporateur, il passe par un détendeur AC ou un tube-orifice —collectivement appelés le dispositif d'expansion du climatiseur . La vanne d'expansion est une vanne intelligente et réglable qui dose le débit du frigorigène en fonction de la demande de refroidissement, évitant ainsi le gel ou un refroidissement insuffisant. En revanche, le tube orifice constitue une restriction fixe : il laisse passer une quantité prédéfinie de frigorigène et filtre les impuretés grâce à son tamis, mais ne peut s'adapter aux conditions changeantes. Les deux marquent la transition entre le côté haute pression et le côté basse pression du système.
- Indices de défaillance : La présence de givre sur les tuyauteries, un refroidissement irrégulier ou un tube orifice bouché peuvent indiquer un problème.
- Conseil de remplacement : Vérifiez toujours et remplacez le désiccateur ou le déshydrateur lors de l'entretien de ces pièces afin d'éviter l'humidité dans le système.
| CompoNent | Travail principal | Emplacement | Symptômes de Défaillance | Remplacer par |
|---|---|---|---|---|
| Compresseur de climatisation | Met sous pression et fait circuler le fluide frigorigène | Coffre moteur, entraîné par courroie | Pas d'air froid, bruit, poulie grippée | Récupérateur/sécheur, dispositif d'expansion |
| Condensateur de climatisation | Dissipe la chaleur du réfrigérant | Avant du véhicule, derrière la calandre | Air tiède, débris visibles, fuites | Récepteur/sécheur, vérifier les ventilateurs |
| Évaporateur de courant alternatif | Absorbe la chaleur de l'air intérieur | À l'intérieur du tableau de bord | Débit d'air faible, fuites d'eau, odeurs | Vanne d'expansion/tube orifice, filtre d'habitacle |
| Vanne d'expansion | Régule le débit du frigorigène | En ligne avant l'évaporateur | Givre sur les tuyauteries, refroidissement irrégulier | Récupérateur/sécheur |
| Tube-orifice | Limite le débit du frigorigène, filtre les débris | En ligne avant l'évaporateur | Bouchons, refroidissement insuffisant, problèmes de pression | Récupérateur/sécheur |
En comprenant les fonctions spécifiques et les signaux d'alerte de ces composants de climatisation automobile , vous pourrez choisir les bonnes pièces de rechange, détecter les problèmes à temps et maintenir votre système en marche efficace. Ensuite, nous vous guiderons pas à pas dans le diagnostic des symptômes et l'identification de la pièce nécessitant une intervention, rendant votre prochaine réparation ou mise à niveau plus sûre.
Diagnostic basé sur les symptômes et vraiment efficace
Air tiède et refroidissement intermittent
Lorsque votre climatiseur souffle soudainement de l'air tiède ou refroidit de manière irrégulière, cela peut être frustrant et indique souvent quelques problèmes classiques. Commencez par les bases : votre embrayage du compresseur de climatisation s'engage ? Lorsque vous allumez la climatisation, écoutez attentivement un clic distinctif provenant du compartiment moteur. Ce clic provient de l'embrayage qui relie le pompe à chaleur à la courroie d'entraînement : l'absence de clic signifie généralement qu'il n'y a pas de refroidissement. Si vous entendez le clic mais que l'air n'est toujours pas froid, un niveau insuffisant de réfrigérant, un compresseur défectueux, un relais du compresseur de climatisation , ou un interrupteur de basse pression pourrait être à l'origine du problème. Parfois, un tube orifice obstrué ou une vanne d'expansion défectueuse peut restreindre l'écoulement du réfrigérant, entraînant une baisse de pression côté basse pression et soufflant de l'air tiède ( voir le tableau de diagnostic ).
- Inspection visuelle : Vérifiez la présence de fuites, de résidus huileux ou de dommages sur les tuyaux de climatisation et les flexibles.
- Test de l'embrayage du compresseur : Moteur en marche et climatisation activée, écoutez le clic de l'embrayage. Aucun bruit ? Vérifiez le interrupteur AC et le relais.
- Vérification du relais et des fusibles : Inspectez le fusible de la climatisation et le relais du compresseur de climatisation dans la boîte à fusibles. Remplacez-le s'il est grillé ou défectueux.
- Test de pression : Connectez les manomètres à les orifices de service. Pression basse des deux côtés ? Soupçonnez un manque de frigorigène, un dispositif d'expansion bloqué ou un tube orifice obstrué.
- Détection de fuites : Utilisez un colorant UV ou un détecteur électronique pour trouver les fuites dans le tuyaux de climatisation , le condenseur ou les raccords.
- Isolement des composants : Si tout est en ordre, isolez et testez le pompe à chaleur et les capteurs associés (comme le interrupteur de basse pression ).
Faible débit d'air et problèmes d'habitacle
Avez-vous déjà augmenté le ventilateur sans ressentir un souffle d'air ? Un faible débit d'air est souvent dû à un filtre à habitacle bouché ou à un moteur de ventilation défectueux moteur de ventilation de voiture . Commencez par localiser et inspecter le filtre à air d'habitacle — si celui-ci est rempli de saletés et de débris, remplacez-le. Si le débit d'air ne s'améliore pas, écoutez attentivement si des bruits de grincement ou de sifflement proviennent de la zone du moteur de ventilation, surtout lorsque vous ajustez la vitesse du ventilateur. Le problème persiste ? La cause pourrait être des volets de mélange bloqués à l'intérieur du tableau de bord ou même une fuite de vide dans le système de commande ( consultez le guide de diagnostic détaillé ).
- Vérification du filtre à habitacle : Retirez et inspectez le filtre. Nettoyez-le ou remplacez-le s'il est sale.
- Test du moteur de ventilation : Sans le filtre, mettez le ventilateur à puissance maximale. Si le bruit ou un débit faible persiste, il se peut que le moteur du ventilateur doive être remplacé.
- Fonctionnement de la trappe de mélange : Passez d'une position de ventilation à l'autre. Si l'air sort uniquement d'un seul groupe de bouches, il s'agit probablement d'un problème au niveau de la commande ou du vide.
Embrayage non enclenché et vérifications électriques
Si votre climatiseur ne refroidit pas du tout et que l' embrayage du compresseur de climatisation embrayage ne s'enclenche jamais, les problèmes électriques figurent en bonne place parmi les causes probables. Commencez par vérifier le interrupteur AC bouton sur le tableau de bord et assurez-vous qu'il envoie du courant vers le relais. Ensuite, testez le relais du compresseur de climatisation relais et les fusibles. Si tout cela est en ordre, inspectez le câblage et les connexions pour vérifier qu'il n'y a pas de corrosion ou de dommages. Le interrupteur de basse pression capteur de pression du réfrigérant peut également empêcher le fonctionnement de l'embrayage si le niveau de réfrigérant est bas ou si le capteur lui-même est défectueux. Tester la continuité et la tension à ces points permet d'isoler rapidement le problème.
| Symptôme | Composant(s) probable(s) | Prochain test |
|---|---|---|
| Air chaud, compresseur ne cycled pas | Réfrigérant faible, embrayage du compresseur de climatisation, relais, interrupteur de pression basse | Vérifier l'embrayage, le relais, la pression du réfrigérant |
| Refroidissement intermittent | relais du compresseur de climatisation, commutateur de climatisation, dispositif de détente | Tester le relais, le commutateur, inspecter les tuyaux pour givre |
| Débit d'air faible ou nul | moteur de ventilation de voiture, filtre d'habitacle, volet mélangeur | Inspecter le filtre, tester le ventilateur, faire varier les positions de ventilation |
| L'embrayage ne s'engage pas | clutch du compresseur AC, relais, fusible, interrupteur de pression basse | Vérifier la tension, tester la continuité, inspecter le câblage |
Des mesures de pression précises dépendent de la température ambiante et des directives du constructeur de votre véhicule — consultez toujours le manuel avant de tirer des conclusions à partir des données du manomètre.
En suivant ce processus de diagnostic répétable, vous pouvez rapidement associer les symptômes aux problèmes probables et éviter des remplacements de pièces inutiles. Ensuite, nous nous concentrerons sur l'identification et la conformité des frigorigènes, afin que vous puissiez recharger votre système en toute sécurité et respecter la réglementation en vigueur.
Identification et conformité des frigorigènes simplifiées
Comment identifier le frigorigène de votre véhicule
Avez-vous déjà eu du mal à savoir « Quel frigorigène utilise réellement votre voiture ? » Vous n'êtes pas seul — choisir le mauvais type peut entraîner des réparations coûteuses, voire des problèmes juridiques. La méthode la plus rapide consiste à ouvrir le capot et à chercher une étiquette blanche ou jaune vif. Cette étiquette indique généralement le type de frigorigène — soit R-134a ou R-1234yf —et parfois la capacité du système. Si vous ne trouvez pas d'étiquette, le manuel du propriétaire ou la base de données en ligne du fabricant peut vous aider à confirmer le bon réfrigérant pour votre modèle. Certains détaillants et outils, comme la base de spécifications de A/C Pro, vous permettent de faire une recherche par marque, modèle et année pour une vérification rapide.
Toujours pas sûr ? La taille des ports de service et les couleurs des capuchons peuvent également fournir des indices. Les raccords des systèmes R-134a et R-1234yf sont volontairement différents, afin d'éviter toute confusion lors du rechargement. En cas de doute, ne faites jamais de suppositions — vérifiez toujours deux fois avant d'ajouter du réfrigérant, en particulier avec des produits tels que 134a avec manomètre ou tout kit de réfrigérant R-1234yf.
R-134a contre R-1234yf : Différences essentielles
Imaginez deux bombes similaires sur une étagère : R-134a et R-1234yf . Les deux servent de base au refroidissement des systèmes de climatisation modernes, mais elles ne sont pas interchangeables. Voici une comparaison :
| Réfrigérant | Compatibilité | Équipement/Raccords | Impact environnemental | Remarques légales/réglementaires |
|---|---|---|---|---|
| R-134a | Véhicules des années 1990 à 2010. Ne peut pas être utilisé directement comme remplacement dans les systèmes R-12 sans une mise à niveau appropriée (changement de composants et d'huile). | Raccords spécifiques ; nécessite des outils adaptés à l'R-134a (comme l'R-134a avec manomètre) | Potentiel de réchauffement global (PRG) plus élevé | En cours d'élimination dans de nombreuses régions ; vérifiez les restrictions avant d'acheter |
| R-1234yf | La plupart des véhicules à partir de 2010 ; non compatible avec l'R-134a ou l'R-12 | Raccords dédiés ; nécessite du matériel spécifique pour l'R-1234yf | PRG beaucoup plus faible ; plus écologique | Obligatoire pour les nouveaux véhicules dans de nombreuses régions ; vérifiez la réglementation locale |
| R-12 (« Freon ») | Véhicules antérieurs à 1995 ; obsolète pour les nouveaux véhicules | Anciens raccords ; équipements difficiles à trouver | Appauvrissant l'ozone ; interdit pour la production neuve | Disponible uniquement en recyclé/d'occasion ; réfrigérant r12 à vendre est strictement réglementé |
Bien que le R-134a soit encore disponible pour les véhicules anciens, son fort potentiel de réchauffement global (PRG) a entraîné un passage à réfrigérant r-1234yf (parfois appelée freon 1234yf ), qui offre des performances de refroidissement similaires avec un impact environnemental nettement réduit. Toutefois, le R-1234yf est souvent plus onéreux et peut ne pas être aussi largement disponible dans tous les magasins de pièces automobiles.
Certification et bonnes pratiques de service
Songez à recharger ou réparer vous-même votre système de climatisation ? Aux États-Unis, toute personne effectuant des réparations sur un système de climatisation mobile contre rémunération doit détenir une Certification EPA 609 . Celle-ci garantit une manipulation correcte, une récupération et un recyclage appropriés des frigorigènes, protégeant ainsi votre santé et l'environnement. Les programmes de certification enseignent l'utilisation sécuritaire des machines de récupération, comment éviter la contamination croisée ainsi que les obligations légales liées à la vente et à l'élimination des frigorigènes ( voir les programmes approuvés par l'EPA ).
- Ne mélangez jamais les frigorigènes — cela peut endommager votre pièces de climatisation automobile et est illégal dans de nombreux endroits.
- Utilisez toujours le bon type d'huile et en quantité appropriée pour votre système.
- N'utilisez que des colorants détecteurs de fuite approuvés et évitez de trop remplir le système.
- Étiquetez votre système après chaque intervention afin d'éviter toute confusion ultérieure.
- Éliminez ou recyclez les anciens frigorigènes de manière responsable ; ne les relâchez jamais dans l'atmosphère.
Mélanger des réfrigérants ou des huiles peut endommager les composants et constitue une violation des réglementations fédérales et des États — veuillez toujours suivre les instructions du fabricant ainsi que les lois en vigueur.
Grâce à ces bases, vous pourrez identifier, sélectionner et manipuler les réfrigérants en toute confiance — assurant ainsi l'efficacité et la conformité du système de climatisation de votre voiture. Ensuite, nous verrons comment choisir entre les pièces d'origine, les pièces d'après-marché ou les pièces remanufacturées afin d'assurer une réparation fiable.
OEM, Après-vente ou Reman
Quand choisir OEM plutôt que l'après-marché
Avez-vous déjà été devant un comptoir de pièces, vous demandant s'il fallait acheter la pièce OEM ou opter pour une alternative moins chère de l'après-marché ? En ce qui concerne les pièces de moteur , votre choix peut influencer les performances, la fiabilité, voire votre garantie. Voici ce que vous devez savoir pour prendre la bonne décision.
Les pièces OEM (Original Equipment Manufacturer) sont conçus selon les spécifications exactes du système d'origine de votre véhicule. Ils sont développés, testés et garantis par le constructeur automobile ou ses fournisseurs agréés. Résultat : un ajustement précis, une grande fiabilité, et généralement une garantie plus longue. Toutefois, cette tranquillité d'esprit a un prix plus élevé et peut entraîner des délais d'attente plus longs si les pièces ne sont pas en stock.
Pièces de rechange sont produits par des entreprises tierces et peuvent varier largement en termes de qualité. Ils sont souvent moins chers, parfois 25 à 60 % moins onéreux, et facilement disponibles via votre fournisseur local d'entrepôt de pièces auto ou en ligne fourniture de pièces auto ac . Toutefois, ces économies impliquent des compromis : certaines pièces d'après-vente peuvent ne pas s'adapter aussi parfaitement, offrir des garanties plus courtes, ou entraîner des problèmes de compatibilité pouvant affecter l'efficacité et la durée de vie de votre système.
| Catégorie | Confiance en l'ajustement | Longévité prévue | Normes de garantie | Utilisation typique |
|---|---|---|---|---|
| Équipement d'origine (OEM) | Correspondance exacte, garantie | La plus élevée (respecte les spécifications d'usine) | Souvent 1-5 ans | Réparations critiques, sous garantie, possession à long terme |
| Pièces de rechange | Varie selon la marque ; peut nécessiter des ajustements | Incohérent (dépend du fournisseur) | Plus courte (quelques mois à 1 an) | Réparations économiques, hors garantie, véhicules anciens |
| Remanufacturé | Généralement bonne, mais vérifier les caractéristiques essentielles | Proche du neuf si le fournisseur est fiable | 6 mois à 1 an (parfois plus) | Économique, possession à court terme, marques de reconditionné fiables |
Ce que signifie réellement le terme 'remanufacturé'
Remanufacturé pièces de climatiseur automobile offrent un intermédiaire. Ces composants sont démontés, nettoyés et remontés avec de nouveaux roulements, joints et autres pièces internes essentielles. Environ 70 % de l'ensemble est généralement remplacé par des pièces neuves, et l'unité est testée afin de répondre ou de dépasser les normes d'origine.
Les unités remanufacturées sont plus abordables — permettant souvent d'économiser 25 à 50 % par rapport au neuf — et peuvent être un choix judicieux si vous avez un budget limité ou si vous ne comptez pas garder le véhicule sur le long terme. Toutefois, certaines pièces réutilisées peuvent présenter une usure indétectable, et les garanties sont généralement plus courtes que celles des pièces constructeur (6 à 12 mois est courant). Pour de meilleurs résultats, achetez uniquement des pièces remanufacturées auprès de fabricants fournisseurs de pièces de climatisation automobile et n'oubliez jamais de purger soigneusement le système avant l'installation afin d'éviter toute contamination.
Les indicateurs de qualité les plus importants
Vous ne savez pas comment reconnaître une pièce de haute qualité ? Que vous achetiez des pièces de climatisation automobile ou que vous recherchiez pièces de climatisation pour voitures en ligne, utilisez cette liste de contrôle avant d'acheter :
- L'emballage est propre et non endommagé
- Tous les bouchons de protection sont présents sur les lignes et les ports
- Les joints toriques et les joints corrects sont inclus
- Le type et la quantité d'huile sont clairement indiqués (surtout pour les compresseurs)
- Aucune ailette du condenseur n'est tordue ni défaut visible
- Documentation claire concernant la garantie et les instructions d'installation
Signaux d'alarme à surveiller :
- Bouchons ou joints manquants
- Type d'huile inconnu ou non répertorié
- Quincaillerie tordue ou endommagée
- Aucune information sur la garantie
Acheter de haute qualité pièces de moteur auprès de sources fiables réduit considérablement les retours et les réparations coûteuses répétées – ne faites pas de compromis sur les composants critiques.
En évaluant l'adaptation, la garantie et la réputation du fournisseur, vous pouvez choisir en toute confiance le bon pièces de climatisation automobile pour votre prochaine réparation ou mise à niveau. Ensuite, nous allons vous guider à travers les étapes d'installation sécurisées et les meilleures pratiques pour que vos nouveaux composants durent le plus longtemps possible.
Remplacer et valider soi-même les composants courants de la climatisation
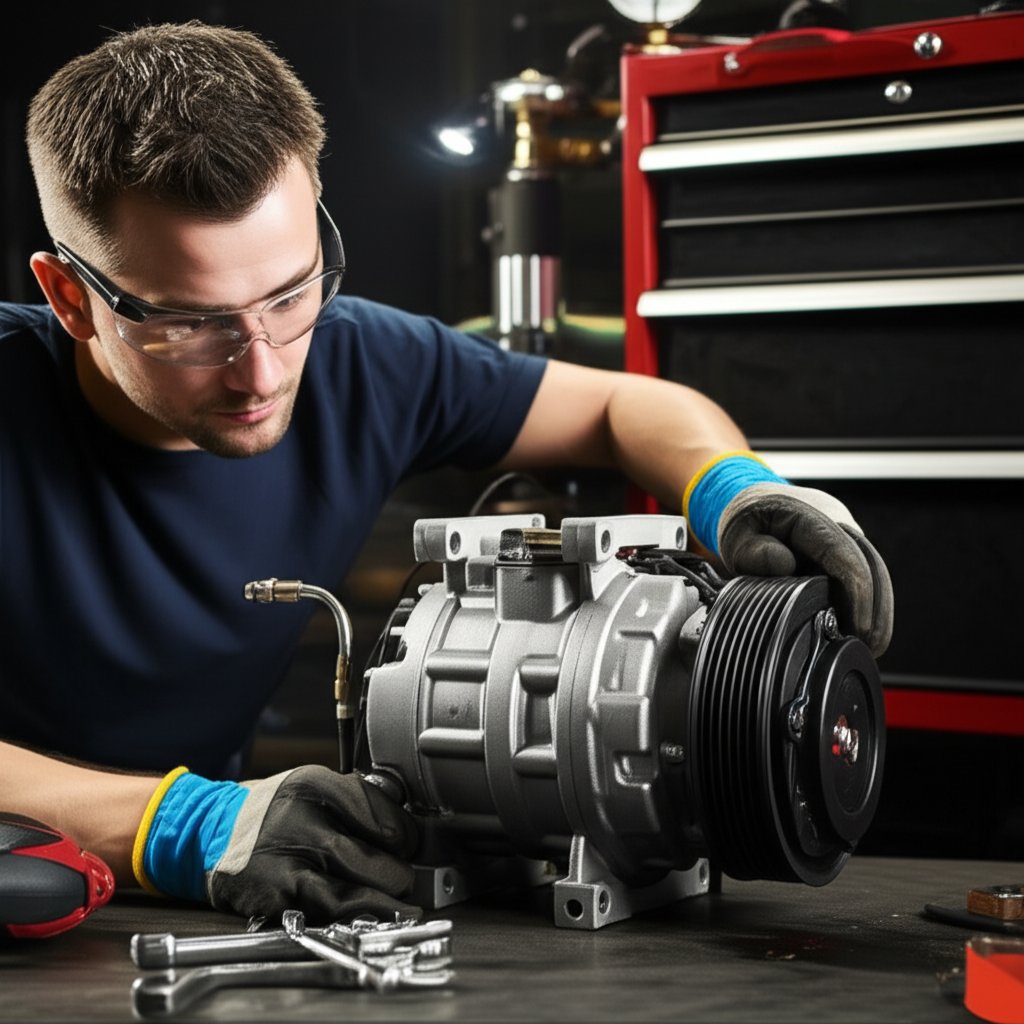
Éléments essentiels pour le remplacement du compresseur
Vous êtes-vous déjà demandé ce qu'il fallait vraiment pour remplacer un compresseur de clim avec embrayage de votre côté ? La clé est une préparation minutieuse et une attention aux détails. Avant de commencer, assurez-vous de disposer d'un kit complet kit de clim avec le bon compresseur, kits d'anneaux O automobiles , et de l'huile neuve huile PAG 46 si votre système le requiert.
- Débranchez la batterie pour éviter les courts-circuits électriques.
- Récupérez le frigorigène en utilisant du matériel certifié—ne jamais le relâcher dans l'atmosphère. Si vous ne disposez pas d'une machine de récupération, faites évacuer le système par un professionnel avant toute opération.
- Retirez la courroie du compresseur et déconnectez le connecteur électrique.
- Déconnectez les tuyaux de climatisation pour automobiles du compresseur. Bouchonnez immédiatement les orifices ouverts afin d'empêcher l'entrée d'humidité et de débris.
- Démontez et retirez l'ancien compresseur , en gardant les éléments de fixation pour le remontage.
- Videz et mesurez l'huile de l'ancien compresseur. Ajoutez la même quantité d'huile neuve, spécifiée par le constructeur (par exemple, huile PAG 46) dans le nouveau compresseur.
- Installez des nouveaux joints toriques de vos kits d'anneaux O automobiles à chaque raccordement, appliquez légèrement de l'huile pour assurer un bon joint.
- Montez le nouveau compresseur , reconnectez les raccords de tuyauterie AC et les connecteurs électriques, puis remontez la courroie.
- Faites pomper le système sous vide, tester les fuites et recharger par un professionnel, ou utilisez une pompe à vide et des manomètres si vous êtes équipé.
Conseils pour l'entretien du condenseur et des tuyauteries
Imaginez remplacer un condenseur pour voir une fuite lente ruiner vos efforts. C'est pourquoi il est essentiel d'inspecter chaque tuyauterie de climatisation et vérifiez qu'il n'y a pas de dommages ou d'usure. Voici comment garder votre tuyau de climatisation raccords serrés et sans problème :
- Après avoir récupéré le frigorigène, déconnectez tous les tuyaux en utilisant les clés adaptées afin d'éviter d'abîmer les raccords.
- Inspectez chaque raccord de tuyau de climatisation et remplacez ceux présentant des fissures, des gonflements ou des résidus d'huile.
- Nettoyez soigneusement les points de connexion : la saleté ou l'ancien joint peut provoquer des fuites.
- Utilisez toujours des nouveaux joints toriques lubrifiés avec l'huile appropriée, et respectez les couples recommandés par le fabricant afin d'éviter un serrage excessif ou insuffisant.
- Après l'installation du nouveau condenseur ou des flexibles, vérifiez à nouveau que tous les climatisation pour voitures sont correctement éloignés des sources de chaleur et des pièces en mouvement.
- Vérifiez les fuites à l'aide d'un colorant UV ou d'un détecteur électronique après le chargement.
- Contrôlez le débit d'air – les ventilateurs et les protections contre les débris doivent être dégagés pour que le condenseur fonctionne correctement.
Erreurs courantes liées à l'évaporateur et au dispositif d'expansion
Remplacer un évaporateur ou un vanne d'expansion peut s'avérer complexe, car cela implique souvent de retirer des éléments du tableau de bord. Si vous relevez le défi, voici ce que vous devez garder en mémoire ( Réparations fastidieuses guide pour vanne d'expansion ):
- Déconnectez la batterie et récupérez le fluide frigorigène, comme pour d'autres réparations.
- Retirez soigneusement les panneaux du tableau de bord et les composants associés afin d'accéder au noyau évaporateur et à la vanne d'expansion.
- Prenez des photos pendant le démontage — cela facilite le remontage et évite d'oublier des fixations.
- Vérifiez et remplacez tous les joints toriques et les joints, en vous assurant qu'ils correspondent à votre kits d'anneaux O automobiles .
- Nettoyez toutes les surfaces et utilisez uniquement l'huile et le fluide frigorigène recommandés pour votre système.
- Remontez le tableau de bord en vérifiant soigneusement toutes les connexions électriques et les raccords sous vide.
- Testez les fuites et le fonctionnement du système avant de réinstaller tous les panneaux.
- Remplacez le filtre à air de l'habitacle afin d'éviter que les débris n'entrent dans l'évaporateur neuf.
Détection des fuites et validation après réparation
| Liste de contrôle | Objectif |
|---|---|
| Boucher toutes les lignes ouvertes pendant l'entretien | Évite la contamination par l'humidité et les débris |
| Utiliser une pompe à vide pendant au moins 30 minutes | Élimine l'air et l'humidité, évite les problèmes futurs |
| Recharger le système par poids, pas par pression | Assure un refroidissement correct et empêche la surcharge |
| Vérifier les fuites avec un colorant UV ou un détecteur | Confirme l'intégrité du système avant utilisation |
| Surveiller la température de sortie et les pressions du système | Vérifie la réparation efficace et les performances de refroidissement |
- Évacuez et maintenez le vide pendant au moins 30 minutes.
- Chargez avec la quantité exacte de réfrigérant.
- Testez le système pour obtenir de l'air froid au niveau des bouches et vérifiez qu'il n'y a pas de bruits inhabituels.
L'utilisation d'un type ou d'une quantité d'huile incorrecte est une cause fréquente de pannes répétées : veillez toujours à adapter l'huile et le réfrigérant aux spécifications de votre véhicule.
En suivant ces étapes détaillées et en vérifiant deux fois chaque connexion, vous maximiserez la fiabilité de votre nouveau pièces de climatisation automobile . Ensuite, nous aborderons la vérification des spécifications et des conseils d'adaptation afin que vous puissiez choisir la bonne pièce à chaque fois — sans avoir à deviner.
Vérification des Spécifications et Correspondances d'Adaptation
Spécifications essentielles à vérifier avant l'achat
Avez-vous déjà commandé une pièce de climatisation pour découvrir qu'elle ne s'adapte pas ? C'est un problème courant, mais vous pouvez l'éviter en sachant exactement quoi vérifier avant de cliquer sur « ajouter au panier ». Que vous remplaciez un compresseur de climatisation automobile , une condenseur de climatisation de la voiture , ou un noyau évaporateur , le choix des bonnes spécifications est essentiel pour une installation sans problème et des performances durables.
- Compatibilité du compresseur : Vérifiez le type d'embrayage, poulie automatique le diamètre, le nombre de sillons, le modèle de fixation et le type de connecteur électrique. Même une petite différence dans le embrayage du compresseur de climatisation ou le connecteur peut causer de gros problèmes pendant l'installation.
- Compatibilité du frigorigène : Assurez-vous que le compresseur et le système sont conçus pour utiliser le même frigorigène (R-134a, R-1234yf ou ancien R-12). Une incompatibilité peut entraîner une mauvaise réfrigération ou des dommages au système.
- Détails du condenseur : Mesurer la hauteur, la largeur et l'épaisseur du cœur. Vérifier les emplacements des entrées et sorties, et déterminer si le design est à flux parallèle ou sinueux. Un condenseur de climatiseur de votre véhicule incorrect peut empêcher l'installation ou réduire l'efficacité.
- Cœur d'évaporateur : Vérifier la forme, l'orientation des ports et les onglets de fixation. Même de légères différences peuvent empêcher un bon joint derrière la planche de bord.
- Tuyaux et flexibles : Comparer la longueur, le diamètre et le type de raccord de chaque tuyau de climatisation automobile . Des flexibles sur mesure ou spécifiques au véhicule sont souvent nécessaires pour assurer une connexion étanche ( voir le guide de sélection des flexibles ).
- Sécheur/Récupérateur: Vérifiez le type de raccord, le style de support de fixation et la capacité du dessiccant en fonction des besoins de votre système.
Un conseil: Vérifiez toujours à l'aide du numéro de série de votre véhicule (VIN) et consultez les catalogues du fabricant ou les bases de données en ligne pour obtenir les numéros de pièce exacts et les options compatibles.
Correspondance et association des numéros de pièce
Imaginez que vous regardez un catalogue de pièces avec des dizaines d'options similaires. Comment savoir laquelle compresseur de climatisation pour véhicule ou condenseur de climatisation de la voiture convient ? La correspondance entre les numéros d'équipement d'origine (OE) et leurs équivalents après-vente est essentielle. De nombreux fournisseurs proposent des tables de correspondance ou des outils en ligne — il suffit d'entrer le numéro de pièce OE ou le VIN de votre véhicule pour afficher toutes les options compatibles. Cela s'avère particulièrement utile pour comparer les spécifications électriques, les configurations de l'embrayage et les points de fixation.
| Catégorie | Numéro OE | Équivalents après-vente | Détails électriques | Informations sur l'embrayage/poulie | Compatibilité avec le frigorigène | Remarques |
|---|---|---|---|---|---|---|
| Compresseur | (Saisir le numéro OE) | (Saisir le numéro post-vente) | Nombre de broches du connecteur, tension | Diamètre de la poulie, nombre de sillons, type d'embrayage | R-134a, R-1234yf ou R-12 | Vérifier le modèle de fixation, type d'huile |
| Condenseur | (Saisir le numéro OE) | (Saisir le numéro post-vente) | N/A | N/A | Frigorigène du système | Vérifier la taille du noyau, entrée/sortie |
| Évaporateur | (Saisir le numéro OE) | (Saisir le numéro post-vente) | N/A | N/A | Frigorigène du système | Confirmer l'emplacement du port, le montage |
| Sécheur/Récupérateur | (Saisir le numéro OE) | (Saisir le numéro post-vente) | N/A | N/A | Frigorigène du système | Style de support, type de dessiccant |
| Tuyaux/Flexibles | (Saisir le numéro OE) | (Saisir le numéro post-vente) | N/A | N/A | Frigorigène du système | Longueur, diamètre, type de raccord |
Compatibilité des joints et tuyaux
De petits détails peuvent faire ou défaire votre installation. Pour chaque tuyau de climatisation automobile ou un nouveau kit de joints, vérifiez soigneusement la compatibilité du matériau avec votre frigorigène et votre huile. Certains joints toriques sont conçus pour le R-134a, tandis que d'autres sont spécifiques aux systèmes R-1234yf ou anciens systèmes R-12. L'utilisation d'un matériau incorrect peut provoquer des fuites ou une détérioration rapide.
- Utilisez toujours des joints et des O-rings neufs pour chaque installation.
- Lubrifiez les joints avec l'huile appropriée afin d'éviter qu'ils ne pincent ou ne se déchirent.
- Inspectez chaque poulie automatique et boulon de montage pour vérifier l'usure ou un mauvais alignement avant le montage final.
Et n'oubliez pas—choisir le bon condenseur de climatiseur de votre véhicule et les flexibles assurent l'efficacité de votre système et évitent des corrections coûteuses à l'avenir.
- Liste de vérification pré-achat :
- Numéro de série (VIN) et numéro de pièce d'origine (OE)
- Type d'embrayage du compresseur et spécifications de la poulie
- Type de connecteur électrique
- Taille du noyau du condenseur et orientation des orifices
- Forme de l'évaporateur et mode de fixation
- Longueur des tuyaux/flexibles et raccords
- Matériau d'étanchéité et joint torique
- Vérifiez toujours l'adaptation auprès d'un fournisseur de confiance ou d'un catalogue en ligne avant d'acheter.
Recherche par numéro de série (VIN) : De nombreux fournisseurs proposent des outils de recherche vous permettant d'entrer le VIN de votre véhicule pour obtenir une correspondance garantie : utilisez cette fonction autant que possible pour plus de sérénité.
Les erreurs d'adaptation proviennent souvent d'incompatibilités au niveau des connecteurs et des poulies : vérifiez toujours ces spécifications avant de passer commande.
En suivant ces recommandations, vous réduirez les retours, éviterez les temps d'arrêt, et vous assurerez que chaque pièce de climatisation automobile s'adapte et fonctionne correctement. Ensuite, nous verrons comment la qualité de fabrication et la précision du poinçonnage influencent la fiabilité à long terme du système et l'alignement des pièces.
Qualité de fabrication et poinçonnage protégeant les systèmes de climatisation
Pourquoi les composants poinçonnés influencent la fiabilité du système de climatisation
Avez-vous déjà vous demandé pourquoi un petit support ou une plaque de montage pouvait influencer les performances de votre système de climatisation ? Imaginez l'installation d'un nouveau embrayage de compresseur de climatisation , pour découvrir ensuite que la courroie couine ou que la poulie vibre. Souvent, le responsable est un support ou une bride emboutie présentant des irrégularités géométriques. Dans les systèmes de climatisation automobile, la précision des pièces embouties — comme les supports de compresseur, les plaques d'embrayage et les entretoises du condenseur — est essentielle pour maintenir un alignement parfait.
Quand ces composants sont emboutis avec des tolérances serrées, ils garantissent que l embrayage du compresseur c s'aligne correctement avec la poulie du moteur et la courroie d'entraînement. Cela réduit les vibrations, empêche l'usure prématurée des roulements et permet à votre embrayage du compresseur de climatisation automobile de s'enclencher en douceur à chaque fois. À l'inverse, des pièces mal embouties ou déformées peuvent entraîner un désalignement, un fonctionnement bruyant, et même des fuites de frigorigène dans votre condenseur de voiture ou support du compresseur.
Comment l'analyse par éléments finis et la maîtrise des processus réduisent les retouches
Cela semble technique ? Voici la vérité simple : l'utilisation avancée de l'ingénierie assistée par ordinateur (CAE) et des contrôles rigoureux des processus permet d'éliminer les incertitudes dans le domaine de l'estampage. Les fabricants qui utilisent la conception des outils d'estampage assistée par CAE peuvent simuler comment chaque support ou disque d'embrayage se comportera sous des charges réelles — avant même que la première pièce ne soit produite ( découvrez l'analyse par éléments finis dans l'estampage automobile ).
En combinant cette modélisation numérique avec les principes de fabrication allégée, les fournisseurs leaders minimisent les tâtonnements inutiles, réduisent les cycles de développement et livrent des pièces estampées qui s'adaptent parfaitement dès la première fois. Pour les composants automobiles à haut volume destinés au conditionnement d'air, cela signifie que chaque lot de supports, de renforts de condenseur ou de disque d'embrayage du climatiseur est constant — réduisant ainsi les retouches coûteuses et les pannes du système.
| Fournisseur/Option | Précision dimensionnelle | Délai de livraison | Extensibilité | Systèmes de qualité |
|---|---|---|---|---|
| Shaoyi (Moules et Pièces d'Estampage Automobiles) | Élevé (orienté CAO, tolérances serrées) | Court (flux de travail maigres et efficaces) | Excellent (prend en charge de grands volumes) | Intégré avec une commande de processus avancée |
| Atelier d'emboutissage traditionnel | Variable (réglage manuel, moins de simulation) | Modéré à long | Limité (variation d'un lot à l'autre) | Peut manquer de rigueur dans l'audit |
| Fabrication interne | Dépend de l'outillage et de l'expertise | Long (constructions sur mesure, moins d'automatisation) | Faible à modéré | La qualité varie selon l'installation |
Choisir des partenaires de fabrication performants
Alors, comment savoir si un fournisseur de pièces embouties est à la hauteur ? Voici une liste de vérification rapide pour vous guider dans vos décisions d'approvisionnement pour supports, plaques d'embrayage et supports de condenseur :
- Rapports dimensionnels et contrôles des premiers échantillons
- Documentation du processus d'approbation de la production (PPAP - Production Part Approval Process)
- Certifications relatives au fini de surface et au revêtement
- Conformité aux normes IATF 16949 ou ISO 9001
- Géométrie des pièces constante d'un lot à l'autre
- Capacité d'intégrer rapidement des modifications techniques
Lorsque vous évaluez des partenaires potentiels, privilégiez ceux qui démontrent des compétences techniques avancées, comme Matrices et Pièces de Poinçonnage Automobile de Shaoyi, où la conception assistée par le calcul (CAE) et la production allégée permettent de créer des pièces embouties hautement précises et répétables pour les systèmes de climatisation automobile. Cette approche améliore non seulement la fiabilité de votre embrayage du compresseur c et disque d'embrayage du climatiseur assemblages, mais vous permet également de commercialiser plus rapidement des produits supérieurs.
Des matrices d'emboutissage stables et des contrôles qualité rigoureux garantissent que chaque support, plaque d'embrayage et entretoise s'adaptent de manière systématique et précise, préservant ainsi les performances de votre système de climatisation à long terme.
Comprendre l'importance de la qualité des composants emboutis vous permet d'exiger des pièces plus performantes et moins problématiques. Dans la prochaine étape, nous conclurons par des conseils d'entretien préventif et des recommandations d'approvisionnement pour maintenir votre système de climatisation en parfait état pendant de nombreuses années.
Entretien préventif et démarches fiables pour des performances optimales de votre système de climatisation sur le long terme
Habitudes d'entretien qui prolongent la durée de vie des composants
Lorsque vous comptez sur la climatisation de votre voiture pour rendre chaque trajet confortable, négliger l'entretien courant peut entraîner des réparations coûteuses ou des surprises désagréables. Imaginez partir en road trip estival, pour découvrir que votre climatisation de voiture souffle de l'air chaud. Que pourriez-vous avoir fait différemment ? L'entretien préventif est la solution. Voici quelques habitudes qui permettent à vos composants de climatisation automobile résister à l'épreuve du temps :
- Contrôles saisonniers : Vérifiez les boulons de fixation, l'état de la courroie et l'intégrité des flexibles avant l'arrivée de la chaleur.
- Contrôles visuels des fuites : Recherchez les résidus huileux ou l'accumulation de saleté autour des raccords des flexibles et des connexions du compresseur — premiers signes de fuites : pièces climatisation véhicule .
- Nettoyage du condenseur : Gardez les débris, feuilles et insectes loin du condenseur pour maintenir un bon flux d'air et une efficacité de refroidissement.
- Soyez attentif aux changements : Des bruits inhabituels provenant de compresseurs de climatisation ou des fixations peuvent indiquer une usure ou un désalignement.
- Charge correcte en frigorigène : Effectuez toujours le remplissage en poids, et non en pression, afin d'éviter un sous-remplissage ou un sur-remplissage.
Listes de vérification avant achat et avant installation
Êtes-vous déjà acheteur d'une pièce, pour finalement réaliser qu'elle ne s'adapte pas ou qu'elle manque d'éléments d'étanchéité essentiels ? Évitez les désagréments en suivant ces listes de vérification claires avant d'acheter ou d'installer pièces de climatisation pour voiture :
| Liste de contrôle | Objectif |
|---|---|
| Pré-réparation |
|
| Détection de fuites |
|
| Validation après réparation |
|
Partenaires de confiance et moment de faire monter l'information
Même avec les meilleures habitudes, certaines réparations nécessitent l'appui de professionnels ou de partenaires de fabrication de haute qualité. Envisagez de faire appel à un technicien de confiance si vous remarquez des fuites persistantes, des pannes électriques ou des défaillances répétées dans votre pièces automobiles du système de chauffage et de climatisation . Lorsque vous choisissez des supports, des plaques d'embrayage ou des entretoises de condenseur, la précision et la régularité sont essentielles — un matériel mal aligné peut entraîner une usure prématurée ou des fuites à travers les lots de pièces de climatisation automobile .
Pour ceux qui évaluent la fiabilité de leur chaîne d'approvisionnement, collaborer avec un spécialiste des interfaces réalisées par estampage précis peut faire toute la différence. Par exemple, celle de Shaoyi Matrices et Pièces de Poinçonnage Automobile propose des solutions d'estampage avancées pilotées par CAO, permettant d'assurer un ajustage parfait de chaque support ou entretoise, lot après lot. Cette approche réduit les problèmes d'installation et permet de maintenir vos pièces climatisation véhicule performances optimales.
Un ajustage précis et la propreté du système sont aussi importants que la pièce elle-même — une attention portée à ces détails empêche les pannes répétées et maximise la durée de vie du système de climatisation.
En adoptant ces routines préventives, en vérifiant chaque achat et en choisissant des partenaires fiables pour les pièces et la fabrication, vous maintiendrez votre climatisation de voiture fonctionnement frais, efficace et sans problème - peu importe où la route vous mène.
Pièces de climatisation automobile : Questions fréquemment posées
1. Quels sont les principaux composants d’un système de climatisation automobile ?
Les composants principaux incluent le compresseur, le condenseur, le récepteur/sécheur ou l'accumulateur, la vanne d'expansion ou le tube orifice, ainsi que l'évaporateur. Chaque pièce joue un rôle spécifique dans la circulation du fluide frigorigène, l'élimination de la chaleur et la fourniture d'air frais dans l'habitacle. Identifier ces composants facilite le dépannage et le choix des remplacements.
2. Comment savoir si le compresseur de climatisation de ma voiture ou les pièces associées sont défectueux ?
Les signes courants de défaillance incluent l'émission d'air chaud par les ventilateurs, des bruits inhabituels (comme des cliquetis ou des grincements), des fuites visibles ou encore l'embrayage du compresseur qui ne s'enclenche pas. Des vérifications systématiques, telles que l'inspection des fusibles, des relais, la mesure des pressions et l'écoute du clic de l'embrayage, permettent d'identifier la pièce défectueuse avant de remplacer un quelconque composant.
3. Puis-je utiliser n'importe quel frigorigène dans le système de climatisation de mon véhicule ?
Non, vous devez utiliser le type de frigorigène spécifique indiqué sur l'étiquette située sous le capot de votre véhicule ou dans le manuel du propriétaire, généralement R-134a ou R-1234yf pour les véhicules récents. L'utilisation d'un frigorigène incorrect, comme mélanger du R-134a avec du R-1234yf ou ajouter du R-12 dans un système plus récent, peut causer des dommages, réduire les performances et peut être illégal.
4. Dois-je choisir des pièces d'origine (OEM), des pièces d'après-marché ou des pièces reconditionnées pour la climatisation ?
Les pièces d'origine garantissent un ajustement parfait et une grande fiabilité, mais sont souvent plus onéreuses. Les options du marché de l'après-vente permettent de réaliser des économies, mais leur qualité et leur compatibilité peuvent varier. Les pièces reconditionnées offrent un bon équilibre entre coût et performance, à condition de les obtenir auprès de fournisseurs fiables. Quel que soit votre choix, vérifiez toujours l'emballage, les scellés et les conditions de garantie.
5. Quelles sont les étapes à suivre pour assurer une réparation ou une installation de la climatisation réussie ?
Commencez par une vérification préalable : identifiez le type de frigorigène, vérifiez la compatibilité des connecteurs et des poulies, et assurez-vous que tous les joints sont présents. Utilisez les outils adaptés, récupérez le frigorigène en toute sécurité, et remplacez les joints toriques et l'huile conformément aux spécifications. Après l'installation, effectuez une mise sous vide du système, recherchez les fuites et chargez-le avec la quantité correcte de frigorigène pour garantir des performances durables.