 Petits lots, altes estàndards. El nostre servei d'prototipatge ràpid fa que la validació sigui més ràpida i fàcil —

Dissenyos de tallat làser metàl·lic: del primer esbós al fi acabat impecable

Comprendre els dissenys de tall làser de metall i el seu potencial creatiu
Imagineu transformar una fulla plana i anodina d'acer en una pantalla arquitectònica intrincada, una obra d'art per a paret impressionant o un component amb precisió d'enginyeria —tot amb toleràncies tan ajustades com ±0,1 mm. Aquesta és la potència dels dissenys de tall làser de metall, i està canviant la manera com arquitectes, artistes i enginyers donen vida a les seves visions.
Sigui que esteu explorant panells de metall tallats amb làser per a una façana comercial o creant peces decoratives personalitzades per a espais interiors, comprendre com funciona aquesta tecnologia ajuda a tancar la bretxa entre la inspiració creativa i l'execució exitosa. Endinsem-nos en allò que fa d'aquest mètode de fabricació un procés tan transformador.
Del metall brut a l'art amb precisió
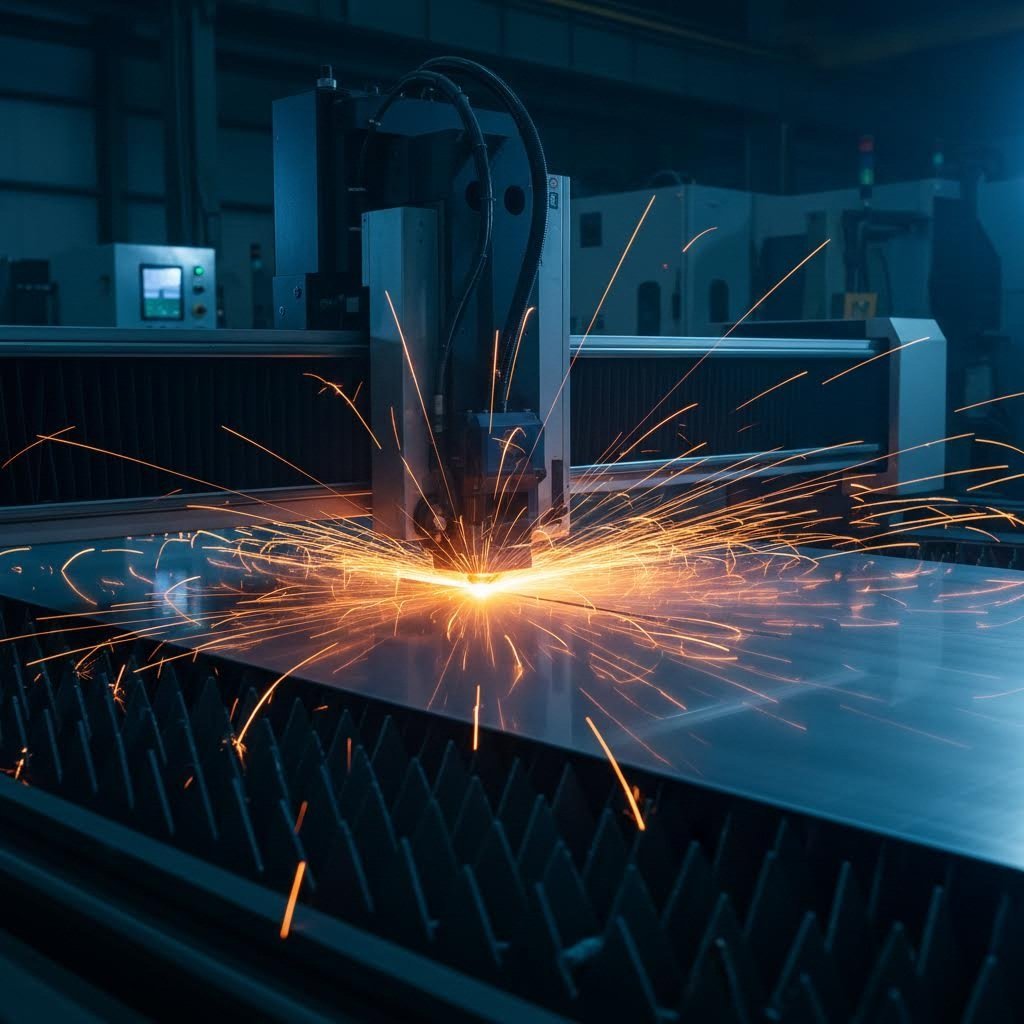
Al seu nucli, el disseny de tall per làser es basa en un principi sorprenentment elegant. Un feix de llum altament concentrat —prou potent per vaporitzar o fondre metall— segueix camins programats sobre la superfície d’una làmina. Segons els recursos tècnics de Xometry, aquest feix coherent passa per dispositius de col·limació i de focus per assolir una intensitat al punt focal capaç de tallar acer, titani, alumini, llautó i coure amb extrema precisió.
El resultat? Vores netes i lliures de baves que requereixen un mínim de processament posterior. A diferència dels mètodes tradicionals de tall mecànic, que poden deixar vores rugoses o distorsió del material, una màquina de tall de metall per làser produeix talls tan precisos que es fan possibles patrons geomètrics complexos, formes orgàniques fluides i detalls fins d’una manera que, fa només unes dècades, era simplement impossible.
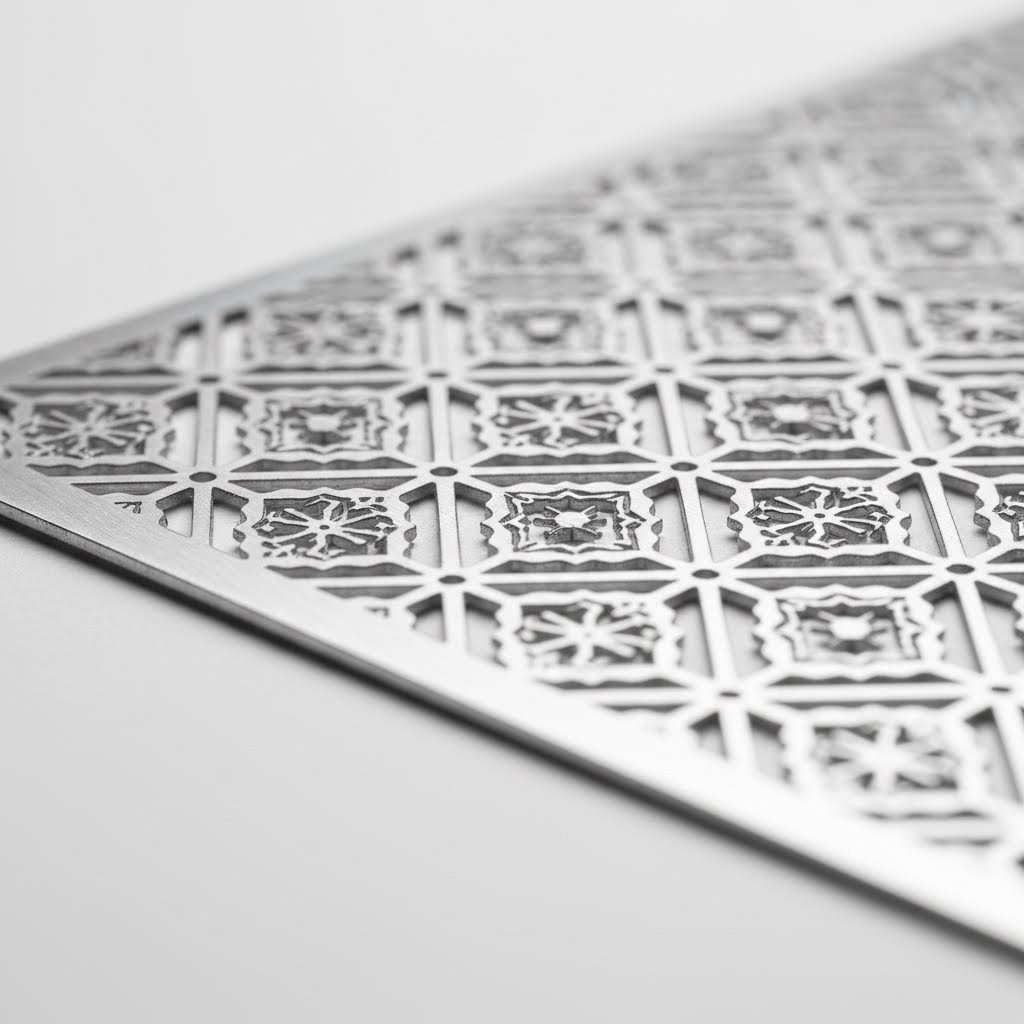
Pensi-hi d'aquesta manera: el raig làser elimina material al llarg del seu recorregut (un concepte anomenat "kerf"), creant obertures tan estretes com una fracció de mil·límetre. Això permet als dissenyadors crear peces metàl·liques tallades amb làser que presenten:
- Motius florals i inspirats en la natura intrincats
- Tessel·lacions geomètriques complexes
- Tipografia delicada i senyalització personalitzada
- Components mecànics funcionals amb ajustos precisos
Per què els dissenyadors trien el metall tallat amb làser
La creixent popularitat del disseny de tall làser en metall en aplicacions arquitectòniques, industrials i decoratives no és accidental. Quan es compara amb mètodes tradicionals de fabricació, les avantatges queden clares.
Primer, hi ha la precisió. El tall làser modern aconsegueix ajustos típics de ±0,1 mm per a materials d'una gruixària fins a 6 mm —precisió que obre portes per a dissenys que requereixen especificacions exactes. En segon lloc, la velocitat és important. Per a metalls fulla primes, les velocitats de tall poden arribar fins a 1000 polzades per minut, fent que tant la prototipatge com les sèries de producció siguin econòmicament viables.
Però potser el més important per als professionals creatius és que el metall tallat amb làser ofereix una versatilitat sense igual. La mateixa tecnologia que produeix pantalles d'intimitat arquitectòniques també pot crear regals personalitzats, senyalització comercial o peces industrials de precisió. Un client que treballava amb peces decoratives de metall va informar d'una reducció del 30% en el temps de producció comparat amb els mètodes tradicionals, segons Els estudis de casos de HeatSign .
Al llarg d'aquesta guia, descobrireu tot el necessari per portar els vostres projectes des del concepte inicial fins a la peça acabada impecable. Explorarem les tecnologies làser i la compatibilitat amb metalls, les directrius essencials de disseny que eviten errors costosos, els fluxos de treball de preparació de fitxers, les opcions d'acabat superficial i com triar entre plantilles i fabricació personalitzada. A punt per convertir metall en art de precisió? Comencem.
Tipus de tecnologia làser i compatibilitat amb metalls explicats
Aquí teniu una pregunta que fa caure a molts dissenyadors: per què el vostre tallador làser manipula l'acer sense esforç però té dificultats amb l'alumini? La resposta rau a entendre que no tots els làsers són iguals, i triar la tecnologia equivocada pel tipus de metall pot significar la diferència entre talls perfectes i fracassos costosos.
Quan es planegen dissenys de tallat làser de metalls, la tecnologia làser que es tria afecta directament la qualitat del tall, la velocitat de tall i els metalls que realment es poden processar. Analitzarem les tres tecnologies principals i l'ajudarem a associar el làser adequat a les necessitats específiques del seu projecte.
Làsers de fibra vs sistemes CO2 per a treballs en metall
Les dues tecnologies dominants en el tall professional de metalls són els làsers de fibra i els làsers CO2, cadascun amb característiques diferents. Comprendre les seves diferències ajuda a prendre decisions informades, tant si està especificant equipament per a un taller de fabricació com si està triant el proveïdor adequat per al seu projecte.
Làsers de fibra han esdevingut l'estàndard industrial per al tall de metalls, i amb motiu. Funcionant a una longitud d'ona d'aproximadament 1,06 micròmetres, els sistemes de gravat làser de fibra ofereixen un rendiment excepcional en metalls. Segons la guia tècnica de ADHMT, els làsers de fibra d'alta potència s'han convertit en l'opció principal indiscutible per a la majoria d'aplicacions amb xapes gruixudes de metall —incloent-hi acer al carboni, acer inoxidable, alumini i coure— degut a la seva eficiència, avantatges econòmics i ampla compatibilitat amb materials.
Làsers CO2 , que funcionen a una longitud d'ona de 10,6 micròmetres, van ser en el seu moment l'opció preferida per al tall de metalls, però actualment ocupen un nínxol més especialitzat. Encara conserven avantatges per a l'acer al carboni ultra-gruixut que exigeix una qualitat de tall superior i destaquen amb materials no metàl·lics com la fusta, l'acrílic i el vidre. Si els seus projectes impliquen materials mixtos, un sistema de CO2 ofereix una versatilitat que els làsers de fibra no poden igualar.
I què passa amb gravadora làser de diode sistemes? Tot i que són cada cop més populars per a aplicacions d'aficionat, principalment són efectius amb materials orgànics com la fusta, el cuir i el paper. Els làsers de díode generalment no són adequats per al processament de metalls, cosa que els fa poc pràctics per a treballs seriosos de tall làser de metall.
Ajustar la tecnologia làser al tipus de metall
Metalls reflectants com l'alumini, el coure i el llautó presenten reptes únics que fan essencial la selecció del làser. Com Explica BCAMCNC , aquests materials poden reflectir cap al capçal de tall una part de l'energia làser, reduint l'eficiència i podent causar danys òptics si la màquina no està pròpiament equipada.
Per què passa això? L'alumini, el coure i el llautó tenen superfícies llises i alta conductivitat tèrmica. Quan un feix làser continu estàndard els impacta, gran part de l'energia es reflecteix directament en comptes d'absorbir-se. Això no només redueix l'eficiència del tall, sinó que pot danyar les lentilles protectores i fins i tot la font làser mateixa.
La solució? Sistemes moderns de tall per làser CNC dissenyats per a metalls reflectants que utilitzen el mode de tall pulsant en lloc de la sortida d'ona contínua. El tall pulsant subministra energia en burses curtes i controlades: cada pols fusiona instantàniament una petita secció mentre permet al metall refredar-se entre polsos. Menys energia roman a la superfície el temps suficient per reflectir-se, reduint significativament el risc de reflexions posteriors perilloses.
| Tipus de tecnologia | Millors aplicacions en metalls | Rang d'espessor | Qualitat del tall | Característiques de velocitat |
|---|---|---|---|---|
| Làser de Fibra | Acer, acer inoxidable, aluminio, llautó, coure, titani | Fins a 30 mm+ (segons la potència) | Excel·lent: net, amb mínim rebav | Alta velocitat; fins a 3 vegades més ràpid que el CO2 en metalls primes |
| Làser CO2 | Acer, acer inoxidable; destaca en acers de carboni ultra gruixuts | Fins a 25 mm per a l'acer | Superior en acers de carboni gruixuts | Moderada; més lent que la fibra en la majoria de metalls |
| Làser de díodes | No recomanat per a metalls | N/D per al tall de metalls | N/A | Adequat només per a gravat o marcatge |
Les necessitats d'energia també són importants. La potència d'una màquina de tall metàl·lic per làser afecta directament tant el gruix de tall com les possibilitats de disseny. Una potència més elevada significa un treball més ràpid i la capacitat de tallar materials més gruixuts, però hi ha un matís en aquest aspecte. Segons dades del sector, la densitat energètica (com de concentrada està l'energia en el punt focal) és tan important com la potència bruta. Un làser de baixa potència amb una qualitat excepcional del feix de vegades pot superar un sistema de més potència però mal enfocat.
Per a orientació pràctica:
- làsers de fibra de 3-6 kW: Ideal per a metalls de gruix fi a mitjà; manegable per a la majoria de treballs de panells decoratius
- làsers de fibra de 12-20 kW+: Necessaris per a talls de xapa gruixuda i producció d’alta volumetria
- làsers de CO2 de 40-150 W: Adequats per a tallers mixtes que processen tant metalls com no metalls
Comprendre aquestes diferències tecnològiques us permet especificar l'equip o el proveïdor de serveis adequat per als vostres projectes. Però seleccionar el làser adequat és només la meitat de l'equació: triar el metall adequat per a la vostra aplicació és igualment crucial per assolir resultats professionals.
Seleccionar el metall adequat per a la vostra aplicació de disseny
Teniu el vostre concepte de disseny preparat i sabeu quina tecnologia làser s'adapta a les vostres necessitats, però aquí és on molts projectes troben un obstacle inesperat. Triar el metall equivocat per a la vostra aplicació pot comprometre fins i tot els fulls de metall tallats amb làser més cuidadosament planejats , provocant corrosió, fallades estructurals o costos que es descontrolen.
La realitat és que la selecció del material influeix directament en tot, des de la intricàcia del patró fins a la durabilitat a llarg termini. Explorarem les propietats dels metalls habituals utilitzats en el tall amb làser i els relacionarem amb aplicacions específiques perquè pugueu prendre decisions segures i informades.
Acer, aluminio i més enllà
Cada metall aporta característiques diferents al vostre projecte. Comprendre aquestes propietats us ajuda a equilibrar l'estètica, la funcionalitat i el pressupost, tant si esteu creant panells d'acer tallats per làser per a ús industrial com pantalles decoratives delicades per a espais interiors.
Acer suau (A36/1008)
Quan la resistència i soldabilitat són el més important, l'acer suau ho ofereix. Segons la guia de materials de SendCutSend, aquest aliatge de ferro i carboni és resistent, durader i fàcil de soldar, cosa que el fa ideal per a aplicacions estructurals on l'acabat estètic és menys rellevant. Disponible en acabats laminats en calent, laminats en calent decapats i engrassats (HRP&O) i laminats en fred, l'acer suau ofereix flexibilitat tant en cost com en qualitat superficial.
- Millors aplicacions: Suports estructurals, components industrials, bastidors de mobles
- Soldabilitat: Excel·lent: funciona bé amb soldadura MIG, TIG i per elèctrode revestit
- Opcions d'acabat: Revestiment en pols, pintura, galvanització per protecció contra la corrosió
- Factor de cost: L'opció metàl·lica més econòmica per al tall per làser
- Aptece per a l'entorn: Ús preferent en interior; requereix un acabat protector per a exposició exterior
Acer inoxidable (304/316)
Necessiteu resistència a la corrosió sense sacrificar l'aparença? L'acer inoxidable combina crom amb aliatges tradicionals de ferro-carboni, permetent que la superfície s'oxide naturalment i protegeixi contra l'erosió. Com es va assenyalar per experts del sector , això el fa perfectament adequat per a entorns altament corrosius o de gran tensió, com ara aplicacions marines i aerospacials.
- Millors aplicacions: Panells arquitectònics, accessoris de cuina, equipaments mèdics, senyalització exterior
- Soldabilitat: Bo—requereix una tècnica adequada per evitar deformacions
- Opcions d'acabat: Brossat, polit, projecció de microesferes, electropolit
- Factor de cost: Superior a l'acer suau; el grau 316 és més car que el 304
- Aptece per a l'entorn: Excel·lent tant per a ús interior com exterior; el 316 és preferit en entorns costaners
Alumini (5052/6061/7075)
Quan el pes importa, els panells d'alumini tallats amb làser ofereixen una relació resistència-pes difícilment superable. L'alumini és lleuger, durader i assequible, sent el metall predilecte per a aplicacions que van des de la restauració de vehicles fins a l'enginyeria robòtica. La seva capa d'òxid natural proporciona una protecció contra la corrosió integrada, reduint significativament els requisits de manteniment.
- Millors aplicacions: Peça d'automoció, components aerospacials, panells decoratius lleugers, carcasses electròniques
- Soldabilitat: Requereix tècniques especialitzades (es prefereix la soldadura TIG)
- Opcions d'acabat: Anodització, recobriment en pols, acabat cepillat, polit
- Factor de cost: Moderada—varia significativament segons la qualitat de l'aliatge
- Aptece per a l'entorn: Excel·lent per a ús exterior; té una resistència natural a la corrosió
Coure i Brass
Busqueu calidesa i atractiu visual? Aquests metalls combinen funcionalitat i estètica d'una manera que l'acer i l'alumini simplement no poden igualar. La puresa del coure del 99,9 % (grau electrolític C110) el fa ideal per a aplicacions elèctriques, mentre que el llautó —una aliatge de coure i zinc— ofereix propietats de baixa fricció perfectes per a components funcionals com panys, frontisses i buits.
- Millors aplicacions: Art decoratiu per a parets, components elèctrics, detalls arquitectònics, senyalització
- Soldabilitat: El llautó es pot soldar i soldar fàcilment; el coure requereix habilitat
- Opcions d'acabat: Pàtina natural, amb acabat cepillat, oliat o lacat per a la seva conservació
- Factor de cost: Preus elevats: especialment car en el cas del coure
- Aptece per a l'entorn: Resistent a la corrosió de forma natural; desenvolupa una pàtina protectora a l'aire lliure
Tria de metalls per a aplicacions interiors i exteriors
Aquí és on la selecció del material esdevé crítica. Segons Metal Supermarkets, les estructures exteriors enfronten condicions exigents: la humitat, les fluctuacions de temperatura i els contaminants poden provocar corrosió i deteriorament posterior. La tria adequada del metall assegura que el vostre disseny mantingui tant l'aparença com la integritat estructural amb el pas del temps.
Per a aplicacions interiors , teniu màxima flexibilitat. L'acer suau funciona molt bé quan està recobert amb pols, i fins i tot els metalls sense acabadur es poden mantenir en bon estat en ambients amb control climàtic. Sovint, el cost es converteix en el factor principal de decisió.
Per a aplicacions exteriors , la resistència a la corrosió esdevé fonamental. Les millors opcions inclouen:
- Alumini: Lleuger i naturalment protegit per la seva capa d'òxid
- Acer inoxidable (grau 316): Resistència superior en entorns costaners o contaminats
- Acer Galvanitzat: El revestiment de zinc proporciona una protecció robusta a preus econòmics
- Acer Corten (autoprotector): Forma una passivació protectora semblant a la rovell que en realitat evita la corrosió posterior
Tot i que aquesta guia se centra en metalls, cal tenir en compte que moltes tallers de fabricació també treballen amb fulls d'acrílic per a tall làser i acrílic tallat amb làser per a projectes que requereixen transparència o colors vius. Tanmateix, aquests materials necessiten paràmetres d'equipament i consideracions de disseny completament diferents del treball en metall.
Com l'espessor afecta la complexitat del disseny
L'espessor del material té un impacte directe en el que es pot aconseguir amb els vostres patrons. Tal com subratlla la guia de disseny de Komacut, utilitzar espessors de material estàndard és una de les maneres més fàcils d'optimitzar el procés de tall làser. Els espessors no estàndard sovint requereixen calibració especial o l'obtenció de materials específics, cosa que augmenta significativament els terminis i els costos.
Aquesta és la realitat pràctica: els materials més fins permeten detalls més acurats i patrons més intrincats, mentre que el material més gruixut limita les mides mínimes de les característiques. Un tallador de xapa metàl·lica pot produir treballs de filigrana delicats en alumini de 1 mm que serien impossibles en acer de 6 mm. Com a regla general, les mides mínimes de les característiques haurien de ser com a mínim iguals al gruix del material i, preferiblement, 1,5 vegades aquest gruix per garantir resultats fiables.
Comprendre aquestes característiques dels materials us situa en una millor posició per prendre decisions intel·ligents abans d'invertir en el desenvolupament del disseny. Tanmateix, ni tan sols una selecció perfecta de materials salvarà un projecte amb defectes de disseny fonamentals, cosa que ens porta a les directrius tècniques que eviten errors costosos.
Directrius Tècniques per al Tall Precís de Metalls
Heu seleccionat el metall perfecte i coneixeu les vostres opcions de tecnologia làser, però aquí és on sovint fallen els projectes. Dissenyar per al tall làser no és el mateix que dissenyar per a pantalla o impressió. Ignoreu les restriccions tècniques específiques de la fabricació de metalls i us trobareu amb fitxers rebutjats, materials espatllats o peces que senzillament no encaixen.
La bona notícia? Un cop enteneu les regles fonamentals de disseny, es converteixen en una segona naturalesa. Explorarem les directrius essencials que separen un disseny d'èxit en xapa metàl·lica dels fracassos costosos.
Regles de disseny que eviten errors costosos
Cada tallador làser elimina material mentre talla, i aquest material eliminat afecta directament les dimensions finals. Comprendre les mides mínimes de les característiques, l'espaiat adequat i els requisits de tolerància evita l'escenari frustrant de rebre peces que semblen correctes però que en realitat no funcionen.
Els diàmetres mínims dels forats importen més del que penseu. Quan un làser talla un cercle, traça un camí mentre elimina material simultàniament. Si es fa un forat massa petit en relació amb el gruix del material, s'obtenen obertures distorsionades o talls incomplets. La regla general? El diàmetre mínim del forat hauria de ser com a mínim igual al gruix del material. Per a l'acer de 3 mm, no dissenyeu forats més petits de 3 mm. Per a resultats fiables, especialment amb patrons intrincats, aspireu a 1,5 vegades el gruix del material.
Amplàries de nervis entre talls segueixen una lògica similar. Aquestes tires fines de metall que queden entre els elements tallats necessiten una amplada suficient per mantenir la integritat estructural durant i després del tall. Si són massa estretes, es deformaran per l'acumulació de calor o simplement col·lapsaran.
- Per a materials d’un gruix fins a 1,5 mm: Amplària mínima del nervi de 1,5 mm entre elements
- Per a materials de 1,5 mm a 3 mm: Amplària mínima del nervi igual al gruix del material
- Per a materials de 3 mm a 6 mm: Amplària mínima del nervi de 1,2 vegades el gruix del material
- Per a materials superiors a 6 mm: Amplada mínima de web de 1,5 vegades el gruix del material o superior
- Espaiatge vora a vora de fulla: Mantingueu sempre com a mínim la meitat del gruix del material entre qualsevol tall i la vora de la fulla
- Text i detalls fins: Amplada mínima de traç de 0,5 mm per a materials prims; 1 mm o més per a materials més gruixuts
- Cantonades internes agudes: Afegiu un petit radi (mínim 0,5 mm) per evitar concentracions d'esforç
Aquests no són números arbitraris — provenen de com interactuen els sistemes de tall làser amb el metall. Segons la guia de disseny de Komacut, utilitzar gruixos de material estàndard és una de les formes més senzilles d'optimitzar el procés de tall làser, ja que les màquines de tall làser estan calibrades per a aquestes mides. Els gruixos no estàndard requereixen una calibració especial, cosa que augmenta tant els terminis com els costos.
Comprendre el Kerf i la Tolerància en Patrons Metàl·lics
Aquí teniu el concepte que diferencia els dissenys d'amateurs dels fitxers professionals: el kerf. Com Explica Metal-Tech Industries , el kerf fa referència a l'amplada de material que el làser elimina durant el tall—essencialment, la separació que queda quan el raig travessa el metall.
Sembla insignificant? Pensa en això: si un làser té una amplada de kerf de 0,15 mm i no ho tens en compte, el component final resultarà lleugerament més petit del que es desitjava. Quan les toleràncies són estretes, aquesta diferència importa enormement per a peces que han d'encaixar, soldar o subjectar amb cargols.
Per què varia el kerf: L'amplada del kerf no és fixa—depèn de diversos factors que actuen conjuntament:
- Tipus i potència del làser: Els làsers de fibra solen produir un kerf més estret que els sistemes CO2
- Tipus i gruix del material: Els materials més gruixuts creen un kerf més ample ja que el raig s'estén al llarg de la profunditat
- Velocitat de tall: Les velocitats més lentes augmenten l'acumulació de calor i poden ampliar el kerf
- Longitud focal: Un raig ben enfocat produeix un kerf més fi; els raigs fora de focus tallen més ample
- Pressió del gas d'assistència: Una pressió més alta pot reduir efectivament el kerf en eliminar el material fos més ràpidament
Per a aplicacions de tall CNC, l’ample típic de la ranura (kerf) varia entre 0,08 mm i 0,4 mm, molt més estret que els mètodes tradicionals de tall amb serra o plasma. Aquesta precisió permet crear patrons intrincats que fan que el gravat i el tall per làser siguin tan valuoses per a aplicacions decoratives.
Compensació de la ranura (kerf) en la pràctica: Els fabricants professionals apliquen la compensació de la ranura desplaçant la trajectòria de tall. Si un làser per tallar metall produeix una ranura de 0,15 mm, el programa CNC ajusta la trajectòria d’eina reduint-la la meitat d’aquesta amplada (0,075 mm) a cada costat de la línia de disseny. Això assegura que les peces acabades coincideixin exactament amb les dimensions previstes.
Per a peces que requereixen toleràncies ajustades, comuniqueu sempre els vostres requisits dimensionals al vostre soci de fabricació. Aquest aplicarà la compensació de ranura adequada segons l’equipament concret que utilitzi i el material escollit.
Gas auxiliar i qualitat del cantell: El gas auxiliar que es fa passar per la tovella de tall afecta notablement els resultats obtinguts. Segons l’expertesa industrial, cada tipus de gas té una finalitat específica:
- Nitrogen (alta pressió): Produeix vores netes, lliures d'òxids, en acer inoxidable i alumini; ideal per a superfícies visibles
- Oxigen: Crea una reacció exotèrmica amb l'acer, permetent talls més ràpids en materials gruixuts però pot ampliar lleugerament la obertura del tall
- Aire comprimit: Opció econòmica per a aplicacions no crítiques; els resultats varien segons el material
La qualitat de la vora és especialment important per a panells arquitectònics visibles o components que requereixin soldadura posterior. Els talls amb ajuda de nitrogen en acer inoxidable gairebé no necessiten post-processat, mentre que l'acer tallat amb oxigen pot requerir neteja de vores abans de l'acabat.
Comprendre aquests paràmetres tècnics transforma la vostra aproximació al disseny. En comptes d'il·lusionar-vos que els vostres patrons funcionaran, sabreu exactament què és assolible abans d'enviar els fitxers a la fabricació, estalviant temps, diners i frustracions. Quin és el següent pas? Preparar aquests fitxers de disseny en formats que es tradueixin perfectament de la pantalla al metall acabat.
Formats de fitxers i fluxos de treball de programari per a la fabricació de metall
Domines les directrius de disseny i entens la compensació del querf, però aquí és on comencen els problemes. El teu brillant disseny de tall per làser en metall només existeix com a concepte fins que es tradueix a un format de fitxer que l'equip del teu fabricant pugui llegir realment. Si et quedes curt en aquest pas, fins i tot el projecte més meticulós s’aturarà abans de començar la producció.
La diferència entre enviaments d'aficionats i fitxers preparats per a la producció sovint rau en entendre com interpreten els talladors làser la informació digital. Recorrem junts els fluxos de treball del programari i les tècniques de preparació de fitxers que transformen la teva visió creativa en metall tallat amb precisió.
Creació de fitxers de disseny preparats per a la producció
Tots els talladors làser—ja sigui una màquina per a aficionats que utilitza LaserGRBL o un sistema CNC industrial—necessiten instruccions basades en vectors per seguir-les. A diferència de les imatges matricials compostes per píxels, els gràfics vectorials utilitzen equacions matemàtiques per definir trajectòries. Segons la documentació tècnica de Xometry, els fitxers DXF (Drawing Interchange Format) contenen vectors que creen trajectòries 2D que el tallador làser pot seguir amb precisió.
Per què és important? Quan envies un fitxer dxf a un fabricant, la màquina interpreta cada línia com una trajectòria de tall. Aquestes trajectòries indiquen al làser exactament on moure’s, quan disparar i com navegar pel teu disseny. Les imatges matricials com els JPEG simplement no funcionen—el làser necessita instruccions vectorials explícites, no graelles de píxels de colors.
Comprendre els tipus de línia i el seu significat:
Els teus fitxers de tall làser comuniquen operacions diferents mitjançant elements visuals diferents. Com la guia de disseny de xTool explica, les línies i els omplerts tenen finalitats completament diferents:
- Línies de tall: Trajectes definits amb amplàries específiques que el làser segueix per tallar completament el material
- Àrees de gravat: Àrees omplertes on el làser elimina capes de material superficial sense arribar a perforar-lo
- Marques de scoring: Talls superficials lleugers que marquen sense penetrar: útils per a línies de plegat o guies d'alineació
Molts serveis de fabricació utilitzen sistemes codificats per colors per diferenciar aquestes operacions. Una aproximació comuna assigna valors RGB específics a cada funció: vermell per al tall, blau per al gravat, negre per al scoring. El vostre proveïdor especificarà els seus requisits exactes, però organitzar els fitxers de disseny amb aquesta separació des del principi estalvia temps de revisions posteriorment.
Essencials de programari vectorial per a la fabricació de metall
Quin programari hauríeu d'utilitzar? La resposta depèn de la complexitat del vostre projecte i de les habilitats que ja tingueu. Segons recursos del sector, els fitxers DXF utilitzen un format de codi obert, cosa que significa que qualsevol pot desenvolupar programari per crear-los. A continuació es mostren les opcions més competents:
- Adobe Illustrator: Estàndard de la indústria per a gràfics vectorials a 20,99 $/mes; excel·lent per a dissenys artístics complexos però requereix una corba d'aprenentatge
- Inkscape: Gratuït i de codi obert; disponible a Windows, macOS i Linux: ideal per a dissenyadors principiants i conscients del pressupost
- Fusion 360: Programari CAD basat en núvol amb opcions gratuïtes i nivells de pagament d'uns 70 $/mes; permet la col·laboració en temps real i el disseny paramètric
- CorelDRAW: Programari vectorial professional amb fortes capacitats d'exportació DXF; preferit per moltes botigues de senyalització
- Programari LightBurn: Dissenyat específicament per al control de làser; excel·lent per a usuaris que posseeixen el seu propi equip
Per a dissenys senzills, fins i tot el programari de control del tallador làser pot gestionar la creació de gràfics bàsics. Tanmateix, els projectes complexos de fabricació metàl·lica s'beneficien d'aplicacions de disseny especialitzades on es pot perfeccionar la geometria abans de l'exportació.
Procés pas a pas de preparació de fitxers:
- Creeu o importeu el vostre disseny base utilitzant trajectòries vectorials—assegureu-vos que tots els elements estiguin correctament escalats a les dimensions reals (l'escala 1:1 és essencial)
- Converteix tot el text en contorns/trajectòries —els talladors làser no poden processar quadres de text actius; necessiten formes convertides
- Organitza els elements segons el tipus d'operació —separa les línies de tall, àrees de gravat i marques de puntuació en capes diferents amb colors adequats
- Comprova si hi ha trajectòries obertes i línies solapades —les corbes no tancades poden confondre el làser; les trajectòries duplicades malgasten temps de tall i poden cremar excessivament les vores
- Aplica la compensació del querfe si es requereix —desplaça les trajectòries mitja amplada del querfe per assolir dimensions finals precises
- Verifica les mides mínimes de les característiques —confirmeu que tots els forats, nervis i detalls compleixen les directrius per al gruix del vostre material
- Exporta com a DXF o format vectorial adequat —utilitzeu configuracions compatibles amb l'equip del vostre fabricant (normalment DXF R14 o 2000 per a la màxima compatibilitat)
Tècniques d'optimització de fitxers:
Més enllà de la preparació bàsica, diverses estratègies d'optimització redueixen el temps de tall i milloren els resultats. Segons La guia de fabricació de Beegraphy , un anivellat eficient de peces —organitzar els components per maximitzar l'ús del material— redueix significativament el desperdici i el cost. Molts fabricants gestionen l'anivellat al seu extrem, però comprendre aquest concepte us ajuda a dissenyar pensant en l'eficiència del material.
Pràctiques addicionals d'optimització inclouen:
- Elimineu nodes redundants: Trajectòries excessivament complexes amb punts d'ancoratge innecessaris alenteixen el processament i poden provocar micro-hesitacions durant el tall
- Simplifica les corbes on la precisió no és crítica: Reduir la complexitat del trajecte accelera el processament del fitxer sense pèrdua visible de qualitat
- Agrupa els elements relacionats: Els fitxers organitzats ajuden als fabricants a entendre la vostra intenció i detectar problemes potencials més ràpidament
- Inclou dimensions de referència: Afegir algunes mesures clau ajuda a verificar l'escala durant la revisió prèvia a la producció
Llista de control de pre-enviament:
Abans d'enviar els fitxers DXF a la fabricació, passa per aquestes passes de verificació per detectar problemes habituals:
- Tots els camins estan tancats i correctament units?
- No hi ha línies solapades ni duplicades?
- El text s'ha convertit a contorns?
- Escala correcta (1:1 amb unitats del món real)?
- Les capes estan organitzades per tipus d'operació?
- S'han verificat les mides mínimes de les característiques per al vostre material?
- El format del fitxer és compatible amb els requisits del fabricant?
Cerqueu inspiració abans de crear dissenys personalitzats? Molts dissenyadors comencen estudiant fitxers gratuïts per a tall amb làser disponibles a través de biblioteques en línia. Aquests recursos us ajuden a entendre com estan estructurats els fitxers professionals, tot i que, pel que fa a la fabricació de metall, sempre cal verificar que les plantilles compleixin les restriccions de disseny específiques que hem tractat anteriorment.
Un cop teniu els fitxers preparats per a la producció, esteu en condicions d’explorar l’ample ventall de possibilitats creatives. Des de panells arquitectònics fins a art decoratiu, les aplicacions del tall de metall amb làser ben executat abasten gairebé totes les disciplines de disseny.
Categories de disseny populars i aplicacions creatives
Ara que enteneu la preparació de fitxers i les restriccions tècniques, explorem què és realment possible. Tant si sou un aficionat que crea una pantalla de jardí única com si sou un arquitecte que especifica panells metàl·lics decoratius tallats per làser per a una façana comercial, la mateixa tecnologia permet aplicacions remarcadament diverses. Allò que separa un projecte oblidable d’un impressionant sovint es redueix a entendre quina categoria de disseny s’ajusta millor als vostres objectius.
Des de la precisió geomètrica fins a formes orgàniques i fluides, els dissenys metàl·lics tallats per làser abasten gairebé totes les sensibilitats estètiques. Examinem les categories més populars i les consideracions pràctiques que influeixen en els costos de producció i els terminis per a cadascuna.
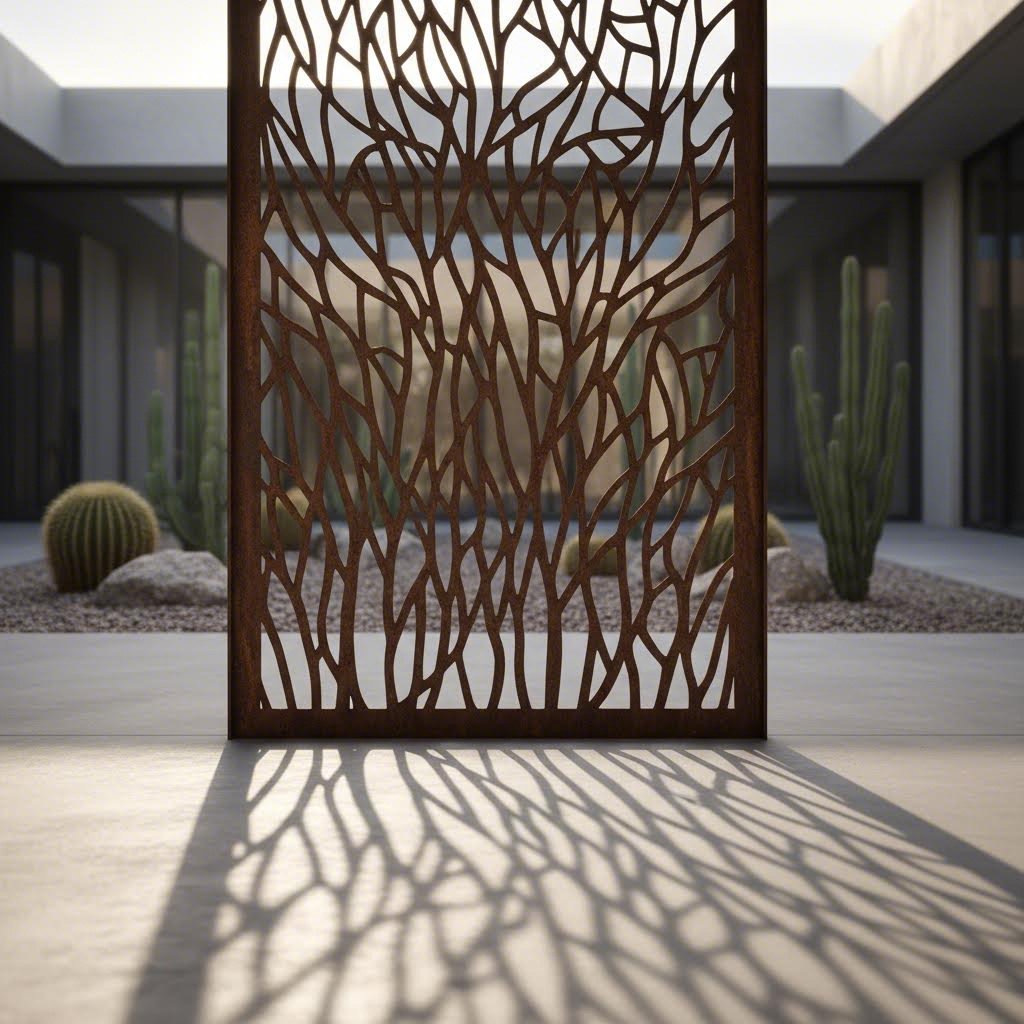
Panells Arquitectònics que Transformen Espais
Pocs usos mostren el potencial del tall metàl·lic per làser de manera més dramàtica que els panells arquitectònics. Segons el Manual de fabricació de KF Laser , els panells metàl·lics tallats a mida amb làser han guanyat una gran popularitat en l'arquitectura, el disseny d'interiors i les aplicacions industrials per la seva precisió, versatilitat i atractiu estètic.
Revestiments exteriors i façanes representen una de les aplicacions més visibles. Els dissenys de panells tallats amb làser en les façanes dels edificis creen efectes visuals dinàmics quan la llum natural travessa obertures complexes, projectant ombres que canvien al llarg del dia. Aquest joc entre ple i buit transforma estructures ordinarines en declaracions arquitectòniques memorables.
Pantalles d'intimitat ofereixen funcionalitat juntament amb bellesa. Com indica StructureWorks , els panells decoratius de tamis han sorgit com a solució líder per crear espais exteriors privats però acollidors, des de terrasses a les cobertes fins a zones de menjador exterior i patis corporatius. L'alçada mínima recomanada de 3'6" serveix com a base per a una pantalla de privacitat eficaç mantenint una sensació d'obertura.
Què fa que els panells arquitectònics siguin especialment atractius? Resolen múltiples reptes al mateix temps:
- Filtratge de la llum: Els motius tallats amb làser controlen la quantitat de llum natural que entra en un espai sense crear foscor total
- Ventilació: A diferència dels barreres sòlides, els panells perforats permeten el flux d'aire mantenint encara una separació visual
- Ombra i reducció de calor: La col·locació estratègica redueix la calor solar acumulada en les façanes dels edificis
- Interès visual: Transforma parets o façanes llises en elements centrals que milloren el valor del bé immoble
Les tendències arquitectòniques actuals prefereixen línies netes i motius minimalistes, segons l'anàlisi del sector. Aquest enfocament complementa l'arquitectura comercial contemporània mentre ofereix un atractiu atemporal per a instal·lacions a llarg termini.
Des de l'art decoratiu fins a components funcionals
Més enllà de l'arquitectura, els projectes per a talladors làser abasten una gamma impressionant: des de peces purament decoratives fins a components funcionals d'enginyeria de precisió. Comprendre aquestes categories us ajuda a identificar quin enfocament s'ajusta millor a les vostres necessitats.
Categories d'estil de disseny:
- Motius geomètrics: Disseny net i matemàtic amb formes repetitives, tesel·lacions i simetria precisa. Segons la guia de disseny de TBK Metal, els patrons geomètrics són especialment adequats per a espais contemporanis degut al seu aspecte ordenat: combinen bé amb l'estètica minimalista i el disseny d'interiors industrial.
- Motius orgànics i inspirats en la natura: Corbes fluides, elements botànics i formes inspirades en fenòmens naturals. Aquests dissenys aporten tranquil·litat i calor tant a interiors com a exteriors mitjançant contorns suaus i la integració de fulles o flors.
- Composicions abstractes: Patrons artístics que prioritzen l'impacte visual per sobre de la representació figurativa: ideals quan l'atractiu estètic és la preocupació principal.
- Text i tipografia: Senyalització personalitzada, logotips i tipografies que combinen la marca amb treballs metàl·lics dimensionals.
- Disseny mecànic funcional: Components de precisió, suports, carcasses i peces on la precisió dimensional és més important que l’atractiu decoratiu.
Exemples d’aplicació en diversos sectors:
La versatilitat del tall per làser en metall fa que gairebé tots els sectors se’n beneficiïn:
- Art mural i decoració interior: Els panells metàl·lics tallats per làser personalitzats creen punts de focalització únics que transformen qualsevol espai amb un encant contemporani.
- Senyalització i orientació: Els senyals metàl·lics dimensionals ofereixen durabilitat i sofisticació que les alternatives impresses no poden igualar.
- Art per al jardí i elements paisatgístics: Metalls resistents a la intempèrie, com l’acer Corten o l’alumini revestit amb pols, permeten crear escultures exteriors, pantalles i portes decoratives.
- Components de mobiliari: Les bases de taula, respatllers de cadira i sistemes d'organització incorporen elements tallats amb làser per a detalls personalitzats
- Components industrials: Les cobertes de màquines, reixes, ventilacions i proteccions combinen funcionalitat amb un flux d'aire controlat
Com la complexitat del disseny afecta els costos de producció:
Això és el que molts dissenyadors passen per alt: els patrons intrincats no només tenen un aspecte diferent, sinó que també tenen un cost diferent. Tal com explica TBK Metal , els patrons senzills sense moltes obertures són comparativament més econòmics de fabricar perquè requereixen menys temps de tall i generen menys desperdici de material. Els dissenys intrincats amb nombrosos punts de tall i àrees extenses a tallar suposen un cost significativament més elevat.
Els impactes sobre el cronograma segueixen una lògica similar. Un patró de quadrícula geomètrica amb elements regulars i repetits es talla més ràpidament que un disseny orgànic amb milers de corbes úniques. En projectes a escala de producció, aquesta diferència pot representar dies addicionals de temps de màquina.
Ampliació de dissenys en diferents mides de panell:
Penseu utilitzar el mateix patró en diverses dimensions de panell? Tingueu en compte aquests factors:
- Densitat del patró: Un disseny que sembla equilibrat en un panell de 600 mm pot semblar escàs o massa intens quan es redimensiona a 1200 mm sense ajustaments
- Preservació mínima de detalls: Redimensionar cap avall comprimeix tots els elements: comproveu que les amplàries de les nervadures i els diàmetres dels forats encara compleixin els requisits tècnics en mides més petites
- Pes visual: Les instal·lacions grans poden necessitar gruixos de línia més marcats i obertures més amples per mantenir l'impacte visual des de distàncies de visió
- Consideracions modulars: Per a instal·lacions de múltiples panells, cal decidir si els patrons han d'encaixar de manera contínua entre panells o funcionar com unitats independents
Tant si esteu portant a terme projectes d'enginy de tall làser com a aficionat com si esteu especificant instal·lacions arquitectòniques de qualitat professional, s'apliquen els mateixos principis. Ajusteu la vostra categoria de disseny als vostres requisits funcionals, enteneu com la complexitat influeix en el cost i verifiqueu que els vostres patrons compleixin les limitacions tècniques a l'escala prevista. Un cop tingueu aquestes consideracions resoltes, la següent decisió consisteix a protegir i millorar les peces acabades mitjançant tractaments superficials adequats.
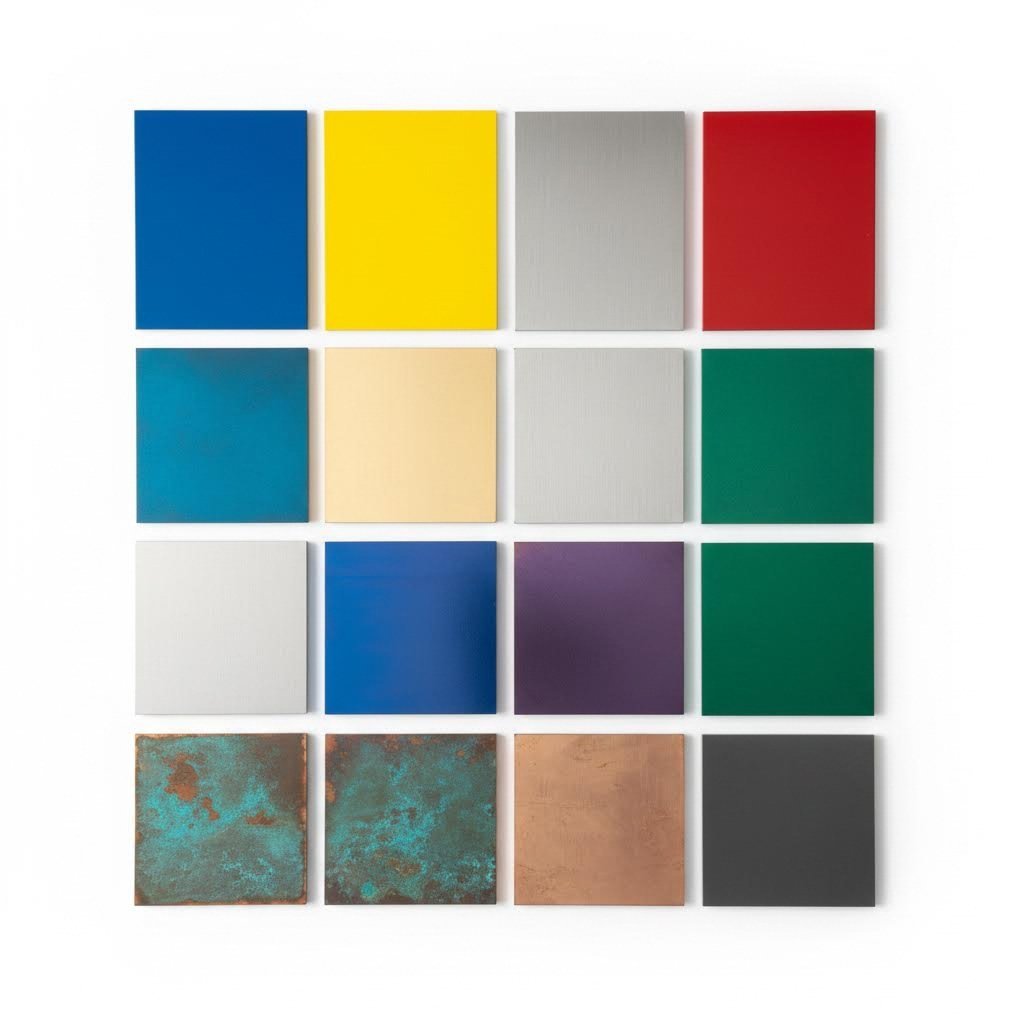
Acabats superficials que protegeixen i realcen els vostres dissenys
La vostra peça metàl·lica tallada amb làser sembla impressionant quan surt de la màquina: vores netes, patrons precisos, exactament el que havíeu imaginat. Però aquí teniu una realitat: sense un acabat adequat, aquell panell d'acer inoxidable mostrarà empremtes digitals en qüestió d'hores, i aquella pantalla de jardí d'acer suau començarà a oxidar-se en qüestions de setmanes. L'acabat que trieu determina si el vostre projecte mantindrà la seva bellesa durant mesos o dècades.
Els tractaments superficials fan molt més que afegir color. Segons la guia d'acabats de SendCutSend, els acabats metàl·lics poden augmentar la resistència a l'abrasió, canviar la duresa superficial, prevenir la corrosió, inhibir la conductivitat i molt més. Entendre quan utilitzar cada tractament —i com la preparació de la superfície afecta la qualitat final— és el que diferencia els resultats professionals dels intents aficionats.
Acabats protectors per a una bellesa duradora
Cada mètode d'acabat ofereix avantatges concrets segons el material, l'entorn i els objectius estètics. Analitzem les opcions més habituals per a projectes de metall tallat amb làser.
Revestiment en polvere
Quan necessiteu tant color com durabilitat, el recobriment en pols és la solució. A diferència de la pintura tradicional, que s'aplica humida, el recobriment en pols comença sent un pols sec que s'aplica electrostàticament i després es cura en un forn. Segons dades del sector, el recobriment en pols pot durar fins a 10 vegades més que la pintura, i el pols sobrant de l'aplicació es pot reciclar i tornar a utilitzar, cosa que el fa més respectuós amb el medi ambient i sense els COV que conté la pintura.
El recobriment en pols funciona excepcionalment bé en aluminio, acer i acer inoxidable, bàsicament en qualsevol material que pugui mantenir una càrrega electrostàtica. L'acabat curt té molta més resistència a les esquitxades, ratllades i decoloració que les superfícies pintades, cosa que el fa ideal per a instal·lacions amb molt trànsit o aplicacions exteriors.
Anodització
Per a projectes d'alumini, l'anodització ofereix una solució elegant. Aquest procés submergeix l'alumini en un bany de líquid carregat (típicament àcid sulfúric), creant una capa d'òxid més gruixuda que és integral amb el propi metall en lloc d'un recobriment superficial. El resultat? Un acabat resistent a la corrosió, la calor i l'electricitat, ideal per a elements exteriors o aplicacions exposades a components elèctrics.
Més enllà de la protecció, l'anodització permet opcions de colors vius mantenint alhora la qualitat metàl·lica que el gravat làser mostra tan bellament en l'alumini. Quan es gravin dissenys de plaques o es creïn patrons superficials detallats abans de l'anodització, l'acabat realça aquests detalls en comptes d'ocultar-los.
Galvanització a calor
L'acer destinat a entorns exteriors agressius es beneficia de la galvanització, un procés que uneix el zinc a la superfície del metall. Aquesta capa de zinc protegeix activament l'acer fins i tot si es ratlla, cosa que el fa excepcional per a aplicacions estructurals, instal·lacions de jardí i components industrials on l'accés per al manteniment és limitat.
Capes transparents i acabats naturals
De vegades vols que el metall parli per si mateix. Les capes transparents preserven l'aparença natural del coure, el llautó o l'acer inoxidable cepillat, alhora que ofereixen protecció contra l'oxidació i les empremtes digitals. Per a projectes en què l'etching làser al metall crea patrons decoratius a la superfície, els acabats transparents mostren aquest treball sense interferències de color.
Patina i acabats artístics
No tots els acabats pretenen assolir la perfecció. Els tractaments de patina controlada en coure i llautó creen efectes envellits i artístics impossibles d'aconseguir amb recobriments uniformes. De manera similar, permetre que l'acer Corten desenvolupi la seva superfície protectora semblant a la rovella produeix una aparença envejada distintiva que en realitat evita una corrossió addicional.
Ajustar els tractaments superficials al vostre entorn
L'acabat adequat depèn molt del lloc on estarà la vostra peça. Les instal·lacions interiors en espais amb clima controlat pateixen esforços mínims, mentre que les aplicacions exteriors costaneres exigeixen una màxima resistència a la corrosió.
| Tipus de acabat | Millors aplicacions | Qualificació de durabilitat | Opcions de color | Requisits de manteniment |
|---|---|---|---|---|
| Revestiment en polvere | Panells interiors/exteriors, senyalització, mobiliari, elements arquitectònics | Excel·lent (més de 10 anys a l'aire lliure) | Pràcticament il·limitat—mate, brillant, metàl·lic, texturat | Baixa—neteja ocasional amb sabó suau |
| Anodització | Panells d'alumini, envolventes electròniques, aplicacions marines | Excel·lent (integrat al metall) | Transparent, negre, bronze, vermell, blau, daurat i més | Molt baixa—molt resistent a ratllades |
| Galvanització a calor | Estructures d'acer exteriors, art de jardí, components industrials | Excel·lent (25-50+ anys) | Gris plata només (es pot pintar per sobre) | Mínima—capa de zinc autoregenerativa |
| Revestiment clar/Laca | Cobre/brass decoratiu, exposicions interiors d'acer inoxidable | Moderada (2-5 anys segons l'exposició) | Transparent—preserva l'aparença natural del metall | Moderada—pot necessitar reaplicació |
| Patina/Envelheciment natural | Instal·lacions artístiques, elements de Corten, detalls de coure | Excel·lent (es desenvolupa una capa protectora de manera natural) | Tons marrons, verds, blaus segons el metall i l'entorn | Cap—està dissenyat per evolucionar amb el temps |
| Revestiment de zinc/niquel | Components funcionals, accessoris, components elèctrics | Bo a excel·lent (varia segons el gruix) | Tons platejats, de zinc groc, de zinc negre, de niquel | Baix—resisteix eficaçment la corrosió |
Com la preparació de la superfície afecta la qualitat final:
Això és el que molts passen per alt: l'acabat només és tan bo com la preparació que hi ha sota. Segons experts en acabats, els recobriments sovint es beneficien d'un procés abrasiu prèvi per augmentar l'adhesió. Per a peces pintades o amb recobriment en pols, fregar amb un material abrasiu i netejar amb aceton o alcohol crea una textura superficial rugosa que ajuda els acabats a adherir-se correctament.
Les vores tallades amb làser solen sortir neta i relativament llises, però la superfície adjacent pot tenir olis, oxidació o escòria que interfereixen amb l'acabat. Els fabricants professionals inclouen processos de desbarbat o rodinat per preparar les peces i garantir una adhesió òptima de l'acabat, alhora que eliminen vores afilades o imperfeccions superficials.
Impacte en la visibilitat del disseny i definició de vores:
La vostra elecció d'acabat afecta directament com es perceben visualment els vostres motius intrincats. Tingueu en compte aquests factors:
- Recobriments gruixuts (com una capa gruixuda de pintura en pols) pot suavitzar lleugerament els detalls de vores fines — tingueu-ho en compte en dissenys amb característiques molt primes
- Acabats brillants creen reflexos que poden ocultar els detalls del patró en certes condicions d’illuminació
- Acabats mates o texturitzats redueixen el desllupeig i fan que els patrons siguin més llegibles des de diversos angles
- Colors foscos solien mostrar els detalls tallats al làser de forma més marcada mitjançant el contrast d’ombres
- Acabats metàl·lics destaquen la qualitat tridimensional de les vores tallades
Especificació d’acabats quan es demanen fabricacions personalitzades:
Quan us comuniqueu amb el vostre gravador o proveïdor de fabricació en metall, proporcioneu especificacions clares:
- Tipus i color exactes d'acabat (inclosos els codis de color del fabricant quan sigui possible)
- Nivell de brillantor desitjat (mate, sedós, semibrillant, molt brillant)
- Si cal acabar ambdós costats o només la cara visible
- Condicions ambientals a les quals estarà sotmès l'element (interior, exterior, zona costanera, industrial)
- Qualsevol àrea que hagi de romandre sense acabar (per soldadura, posada a terra o altres requisits)
Tant si esteu pensant en gravar acer inoxidable amb làser per a una instal·lació en un vestíbul corporatiu com si voleu crear pantalles de jardí recobertes en pols, l'acabat adequat transforma una bona fabricació en bellesa duradora. Un cop preses les decisions sobre el tractament superficial, la consideració final consisteix a triar entre motlles predefinits i una fabricació totalment personalitzada segons les necessitats del vostre projecte.
Triar entre motlles predefinits i fabricació personalitzada
Heu explorat les possibilitats de disseny, enteneu les opcions de materials i sabeu exactament quin acabat protegirà la vostra peça durant anys. Però aquí teniu la decisió que sovint determina si el vostre projecte es manté dins del pressupost i del termini: cal començar amb una plantilla ja feta, personalitzar un disseny existent o invertir en una fabricació totalment personalitzada?
Aquesta elecció no és tan senzilla com podria semblar. Cada enfocament comporta compromisos diferents en cost, singularitat i complexitat de producció. Analitzem el marc de presa de decisions que us ajuda a associar els requisits del vostre projecte amb la via de fabricació adequada.
Quan funcionen les plantilles i quan guanya la personalització
Les plantilles ja fetes i els dissenys totalment personalitzats ocupen extrems oposats d’un espectre, mentre que la personalització de plantilles s’hi situa en algun punt intermedi. Comprendre quan cada enfocament té sentit evita tant despeses innecessàries en treball personalitzat com acceptar resultats genèrics que no coincideixen del tot amb la vostra visió.
Plantilles ja fetes ofereixen el camí més ràpid i econòmic per obtenir panells metàl·lics tallats amb làser personalitzats. Aquests patrons prèviament dissenyats ja han estat optimitzats per al tall amb làser, de manera que la preparació del fitxer, la compensació de l'ample de tall (kerf) i les mides mínimes de les característiques ja estan resoltes. Vostè selecciona un patró, especifica el material i les dimensions, i la producció comença gairebé immediatament.
Les plantilles funcionen millor quan:
- El seu calendari és ajustat i necessita un temps de resposta ràpid
- Les limitacions pressupostàries restringeixen la inversió en disseny
- Els patrons disponibles s'ajusten molt als seus objectius estètics
- L'eficàcia tècnica importa més que l'aparença única
- Està demanant peces individuals o quantitats petites
Personalització de plantilles tanca la llacuna entre velocitat i singularitat. Partint d'un patró existent com a base, les modificacions poden incloure canvis d'escala, afegir text personalitzat, ajustar la densitat o combinar elements de diverses plantilles. Aquest enfocament aconsegueix una certa originalitat evitant alhora el cost complet del desenvolupament d'un disseny original.
Fabricació totalment personalitzada ofereix exactament el que imagineu, però requereix una inversió més gran en temps de disseny i normalment té un preu premium. Segons l'anàlisi de costos de SendCutSend, com més complex sigui el vostre disseny, més temps trigarà a tallar-se i maquinarse, cosa que augmenta els costos. Una peça més fina i complexa pot costar significativament més degut a la seva geometria complexa en comparació amb dissenys més simples.
La personalització és guanyadora quan:
- La identitat de marca o l'estil distintiu requereix patrons originals
- Les especificacions tècniques demanen una enginyeria precisa
- Les instal·lacions a gran escala justifiquen la inversió en disseny en molts panells
- Les plantilles existents simplement no coincideixen amb la vostra visió creativa
- El projecte implica requisits funcionals únics més enllà de l'estètica
Avaluació dels requisits del vostre projecte
Abans de comprometre's amb cap camí de fabricació, avaluïeu honestament aquests criteris clau de decisió. Les vostres respostes indicaran clarament l'enfocament adequat per a la vostra situació específica.
Marc de criteris de decisió:
- Restriccions de Pressupost: Els dissenys personalitzats requereixen una inversió inicial en el desenvolupament del disseny i possiblement uns costos de producció per unitat més elevats. Tanmateix, segons dades sectorials de preus, la quantitat afecta dràsticament els costos per peça: una peça petita que costa 29 $ per unitat baixa a només 3 $ per peça quan es demanen deu unitats, amb descomptes de fins al 86 % per a comandes massives
- Requisits d'unicitat: Quant és important que la vostra instal·lació sembli diferent a qualsevol altra? Sovent, la marca comercial exigeix originalitat, mentre que els projectes residencials poden prioritzar el valor
- Complexitat tècnica: Els components funcionals que requereixen toleràncies precises, fixacions específiques o integració amb altres sistemes normalment necessiten enginyeria personalitzada
- Necessitats de volum: Les peces úniques rarament justifiquen els costos de disseny personalitzat, però les instal·lacions que necessiten desenes de panells tallats per làser personalitzats reparteixen la inversió en disseny entre moltes unitats
- Pressions temporals: Les plantilles s'envien més ràpid; els dissenys personalitzats requereixen el desenvolupament del disseny, cicles d'aprovació i potencialment cues de producció més llargues
Avaluació de socis de fabricació:
Tant si trieu plantilles com treballs personalitzats, les capacitats del vostre soci de fabricació afecten directament la qualitat final. Segons la guia de selecció de Metal Works of High Point, diversos factors requereixen una avaluació cuidadosa:
- Experiència i trajectòria: Cerqueu proveïdors amb experiència demostrada en projectes similars; les empreses més noves poden mancar d'experiència en els vostres requisits específics
- Inversió en equipament: L'equip de talladora làser CNC d'un proveïdor determina l'eficiència i la qualitat. Les empreses que utilitzen tecnologia d'avantguarda amb programari actualitzat ofereixen resultats més precisos i consistents
- Certificacions: Certificacions de qualitat com ISO 9001:2015 indiquen un compromís amb estàndards consistents. Per a aplicacions automotrius o aerospacials, cerqueu certificacions específiques del sector
- Capacitats d'acabat Triar un fabricant que gestioni tot el vostre projecte des del tall fins al acabat estalvia temps, redueix els costos d'enviament i assegura la consistència
- Servei al client: Una comunicació àgil durant tot el procés de producció evita sorpreses. Pregunteu als futurs socis com gestionen els problemes i si els preus i els terminis romanen transparents
Temps d'entrega esperats:
El termini varia considerablement segons l'opció triada. Segons els serveis urgents d'Approved Sheet Metal, la selecció de materials en estoc permet la fabricació en tan sols 2-5 dies per a quantitats de prototips. Les comandes de fabricació complexes s'entreguen constantment al límit inferior dels terminis urgents indicats quan es treballa amb socis centrats en l'eficiència.
Per als aficionats que exploren opcions de màquines de tall i gravat làser com el tallador làser xTool, el càlcul canvia: tenir equipament propi permet fer prototips iteratius i producció de petites sèries sense costos de fabricació per comanda. Tanmateix, el tall de metall de qualitat industrial normalment supera les capacitats de les màquines d'aficionat, fet que fa essencials els serveis professionals de fabricació per a la majoria de projectes seriosos.
Quan la precisió exigeix una fabricació especialitzada:
Alguns projectes requereixen capacitats més enllà dels serveis estàndard de tall làser. Per a lectors que desenvolupen components metàl·lics de precisió, especialment per a aplicacions automotrius, d'automatització industrial o de producció en gran volum, els fabricants especialitzats en empremtació metàl·lica personalitzada i muntatges de precisió tanquen la bretxa entre la visió de disseny i la realitat de producció.
Aquests fabricants especialitzats ofereixen un suport complet de Disseny per a Fabricació (DFM) que optimitza els vostres dissenys per facilitar-ne la fabricació abans de començar la producció. En lloc de descobrir problemes durant la fabricació, l'anàlisi DFM identifica possibles problemes durant la fase de disseny, estalviant temps i costos i assegurant que les peces compleixin els requisits funcionals.
Per a aplicacions automotrius i industrials que requereixen estàndards de qualitat certificats segons la IATF 16949, capacitats de prototipatge ràpid o fabricació a escala de producció amb control de qualitat automatitzat, Shaoyi Metal Technology ofereix prototipatge ràpid en 5 dies i respostes a pressupostos en 12 hores, dissenyat específicament per a treballs de màquines de gravat precisió en metall i components estampats. Aquest nivell d'especialització és essencial quan el vostre projecte exigeix qualitat consistent en milers d'unitats o ha de complir requisits estrictes de certificació industrial.
El camí adequat de fabricació no consisteix a triar l'opció més econòmica, sinó a adaptar la vostra inversió a les necessitats reals del vostre projecte en quant a singularitat, precisió i cronograma.
Un cop seleccionat el vostre enfocament de fabricació i amb els criteris d'avaluació del soci en mans, esteu en condicions de transformar el disseny del vostre tall laser en metall de concepte a realitat. El procés des del primer esbós fins al acabat impecable requereix comprendre cada punt de decisió, i ara teniu els coneixements per transitar cada pas amb confiança.
Fent realitat la vostra visió de tall laser en metall
Heu recorregut tot el panorama de dissenys de tall làser en metall, des de comprendre les tecnologies làser i les propietats dels materials fins a dominar la preparació de fitxers i la selecció d'acabats protectors. Ara arriba la part més emocionant: posar aquest coneixement en pràctica. Ja sigui que esteu dissenyant el vostre primer panell decoratiu o augmentant la producció de components a gran escala, el camí a seguir queda clar quan abordeu cada projecte de manera sistemàtica.
La diferència entre els projectes exitosos de tall làser en metall i els fracassos frustrants rarament es deu únicament al talent creatiu. És la base tècnica —comprendre la compensació del kerf, respectar les mides mínimes de les característiques, triar materials adequats per al vostre entorn— el que transforma conceptes ambiciosa en peces acabades impecables.
El vostre camí des del concepte fins al metall acabat
Tots els projectes exitosos segueixen un recorregut previsible. Segons El flux de treball de prototipatge de Pinnacle Precision passar del concepte a la realitat requereix una col·laboració precoç, una selecció adequada de materials, una fabricació precisa, un acabat apropiat i una inspecció rigorosa de la qualitat. Això no és només teoria: és la seqüència demostrada que els professionals de la fabricació utilitzen diàriament.
La percepció més crítica per a projectes exitosos de tall de metall amb làser: les restriccions tècniques no són limitacions, sinó el marc que fa possible assolir l’ambició creativa. Comprendre les propietats dels materials, les normes de disseny i les opcions d’acabat abans d’iniciar el projecte evita revisions costoses i assegura que la vostra visió es tradueixi perfectament des de la pantalla fins al metall acabat.
Penseu en el vostre projecte de manera integral abans d’entrar al programari de disseny. En quin entorn viurà la vostra peça? Quin nivell de detall requereix realment el vostre concepte? Quin acabat protegirà la vostra inversió mentre en millora l’impacte visual? Respondre aquestes preguntes des del principi estalvia temps i despeses significatives, comparat amb descobrir problemes durant la fabricació.
Donar el primer pas amb seguretat
Preparat per començar? Aquí tens la teva llista d'actuacions prioritàries: els passos essencials que asseguren l'èxit de qualsevol projecte de tall làser de metall:
- Defineix primer els requisits de la teva aplicació. Instal·lació interior o exterior? Decorativa o funcional? Peça única o tirada de producció? Aquestes respostes guiarn les decisions següents.
- Selecciona el material segons l'entorn i l'estètica. Recorda: acer inoxidable per resistència a la corrosió, aluminio per aplicacions lleugeres, acer suau per economia, coure i llautó per un toc decoratiu càlid.
- Verifica que el disseny compleixi les limitacions tècniques. Comprova els diàmetres mínims dels forats (com a mínim iguals al gruix del material), les amplàries de nervis entre talls i l'espaiat de vores abans de finalitzar els fitxers.
- Prepara fitxers vectorials preparats per a producció. Converteix el text en contorns, elimina els camins superposats, organitza les capes segons el tipus d'operació i exporta en format DXF a escala 1:1.
- Especifica clarament els requisits d'acabat. Inclou el tipus exacte de recobriment, els codis de color, el nivell de brillantor i quines superfícies necessiten tractament.
- Trieu un soci fabricant les capacitats del qual coincideixin amb les vostres necessitats. Avalieu la qualitat dels equips, certificacions, opcions d'acabat i temps de lliurament abans de comprometre-vos.
- Sol·liciteu talls de prova en materials sobrants per a projectes complexos o d'alta volumetria. Una petita inversió en prototipatge evita errors costosos a gran escala.
Per als dissenyadors que treballen amb programari per gravadores làser o sistemes dedicats de tall i gravat làser, els principis segueixen sent idèntics — només canvia el mètode de producció. Tant si esteu tallant fitxers en equipaments propis com si col·laboreu amb fabricants professionals, el mateix coneixement tècnic determina l'èxit.
Quan la precisió exigeix una col·laboració professional:
Alguns projectes superen el que poden oferir els serveis habituals de fabricació. Components automotrius complexos, peces industrials d’alta producció i aplicacions que requereixen certificacions estrictes de qualitat necessiten una experiència especialitzada en fabricació. En aquestes situacions, col·laborar amb tallers que ofereixin suport complet en Disseny per a la Fabricació (DFM) assegura que els vostres dissenys es puguin traduir amb èxit des del concepte fins a la realitat productiva.
Si el vostre projecte implica components metàl·lics de precisió, necessitats de prototipatge ràpid o fabricació a escala de producció amb requisits de qualitat propis del sector automotriu, Shaoyi Metal Technology ofereix fabricació certificada segons IATF 16949 amb prototipatge ràpid en 5 dies i respostes pressupostàries en 12 hores. Aquest nivell de suport especialitzat és essencial quan importa la qualitat constant en milers d'unitats o quan la vostra aplicació exigeix complir amb estàndards de certificació industrial.
Equilibrar l'ambició amb la comprensió:
Aquesta és la realitat esperançadora: la tecnologia de tall làser de metall permet realitzar treballs intrincats i de qualitat professional d'una manera que ni tan sols fa una dècada era possible. Els sistemes actuals de gravat i tall làser per a metalls —des de màquines per a aficionats fins a equips industrials de producció— obren possibilitats creatives que haurien semblat impossibles per a generacions anteriors de metal·listes.
Però accés no vol dir senzillesa. El millor gravador làser del món no pot compensar dissenys que ignorin les propietats del material o les limitacions tècniques. La vostra comprensió del kerf, les característiques mínimes, la selecció de materials i les opcions d'acabat transforma l'ambició creativa en realitat assolible.
Comenceu amb projectes més senzills si sou nous en aquest procés. Un panell geomètric senzill ensenya els fonaments sense una complexitat excessiva. A mesura que creixi la vostra confiança, afronteu dissenys cada vegada més intrincats —sabent que cada projecte construeix l'experiència necessària per al següent.
El viatge des del primer esbós fins al acabat impecable ara és a les vostres mans. Dotats de coneixements tècnics i d’un marc d’actuació clar, esteu preparats per transformar fulls metàl·lics plans en obres d’art de precisió, components funcionals i elements arquitectònics duradors. El vostre proper disseny de tall làser metàl·lic us espera: feu-lo excepcional.
Preguntes freqüents sobre dissenys de tall làser metàl·lic
1. On puc trobar dissenys gratuïts per tallar amb làser?
Diversos llocs web de prestigi ofereixen fitxers gratuïts de tall làser, com Atomm, 3axis.co, Vecteezy, Ponoko, Design Bundles i Thingiverse. Tanmateix, quan utilitzeu plantilles gratuïtes per a la fabricació metàl·lica, sempre verifiqueu que els dissenys compleixin les restriccions tècniques, com els diàmetres mínims de forats, amplades mínimes de nervis i compensació de querf específics pel gruix del material triat. És possible que calgui modificar fitxers gratuïts optimitzats per a fusta o acrílic per adaptar-los al tall metàl·lic.
2. Fins a quina gruix d'acer pot tallar un làser?
La capacitat de tall làser depèn de la potència de la màquina. Un làser de fibra de 1000W normalment talla fins a 5 mm d'acer inoxidable, mentre que els sistemes de 2000W poden manejar 8-10 mm amb facilitat. Els làsers d'alta potència de 3000W o més poden processar 12-20 mm o més segons els paràmetres de qualitat. Per a l'acer al carboni ultra gruixut que exigeix una qualitat de vora superior, encara es poden preferir els làsers CO2. El tipus de material també és important: metalls reflectants com l'alumini requereixen un mode de tall pulsant per a un procés eficient.
3. Quins metalls funcionen millor per a instal·lacions exteriors tallades amb làser?
Per a aplicacions exteriors, els metalls resistents a la corrosió són essencials. L'alumini ofereix protecció òxida natural i durabilitat lleugera. L'acer inoxidable de grau 316 proporciona una resistència superior en ambients costaners. L'acer galvanitzat utilitza un recobriment de zinc per a una protecció robusta a preus econòmics. L'acer Corten desenvolupa una passivació semblant a la ferruga que evita la corrosió addicional alhora que crea un atractiu estètic distintiu. Sempre cal combinar els metalls exteriors amb acabats adequats com el recobriment en pols o la galvanització.
4. Quin format de fitxer necessito per al tall làser de metall?
DXF (Drawing Interchange Format) és l'estàndard de la indústria per a fitxers de tall làser. A diferència de les imatges raster com ara els JPEG, els fitxers DXF contenen trajectòries vectorials que els talladors làser segueixen amb precisió. El vostre programari de disseny hauria d'exportar a escala 1:1 amb tot el text convertit a contorns, sense línies superposades i amb capes organitzades segons el tipus d'operació. Molts fabricants també accepten formats AI o SVG, però les versions DXF R14 o 2000 ofereixen la màxima compatibilitat entre equips.
5. Com triar entre dissenys plantilla i fabricació personalitzada?
Les plantilles funcionen millor per a cronogrames ajustats, restriccions pressupostàries o quan els patrons disponibles coincideixen amb els vostres objectius estètics. La fabricació personalitzada ofereix dissenys únics però requereix una inversió més elevada. Per a components automotrius certificats segons la IATF 16949 o peces industrials de precisió, fabricants especialitzats com Shaoyi Metal Technology ofereixen suport complet en DFM, prototipatge ràpid en 5 dies i respostes a pressupostos en 12 hores per optimitzar els dissenys en termes de fabricabilitat tot complint normes de qualitat exigents.