 Maliit na mga batch, mataas na pamantayan. Ang serbisyo sa paggawa ng mabilis na prototyping namin ay gumagawa ng mas mabilis at mas madali ang pagpapatunay —

Maaari Mo Bang Mag-weld ng Plastic? Tumigil sa Paghuhula Kung Anong Maaaring Talagang Kumapit
Kaya Mo Bang I-weld ang Plastic?
Basag na trim, sirang lalagyan, sirang takip ng bumper - kadalasan ito ang tinatanong ng mga tao, kaya bang magwelding ng plastik? Ang maikling sagot ay oo, ngunit ilang plastik lamang ang magandang kandidato. May pagkukumpuni kapag ang bahagi ay isang thermoplastic na maaaring iwelding, ang filler ay tugma sa base material , at ang init ay kontrolado nang sapat upang pahinain ang sambitan nang hindi ito sinisira.
Maaari bang ipaweld ang plastik
Oo. Ilan lamang ang plastic na maaaring i-weld, ngunit hindi lahat. Ang matibay na resulta ay nakasalalay sa tamang pagkilala sa uri ng plastic, paggamit ng compatible na rod o filler, at paglalapat ng pare-parehong init at presyon upang ang mga materyales ay mag-fuse sa isang hiwa.
- Ang pag-weld ay realistiko para sa maraming thermoplastic na may kilalang uri ng materyales.
- Ang pandikit ay nagpapakadugtong ng mga ibabaw. Ang pag-weld ng plastic ay nagpapa-fuse ng mismong plastic.
- Ang hindi alam, nadegrade, o hindi pwedeng i-weld na plastic ay hindi mainam na kandidato para sa pagkukumpuni.
Ano ang plastic welding
Ano ang plastic welding? Ito ay isang proseso na nag-uugnay ng plastic sa pamamagitan ng pagpainitin ng mga ibabaw hanggang sa makinis ang tekstura nito, pagkatapos ay ipinipindot ang mga ito nang magkasama o idinaragdag ang kaukulang filler upang matigas ang mga materyales bilang iisang sambungan. Ang mga gabay sa thermoplastic welding at mga kasangkapan para sa pagrepare ng plastic ay naglalarawan ng parehong pangunahing siklo: pagpindot, pagpainit, at paglamig.
Iyan ang malaking pagkakaiba mula sa adhesive repair. Ang pandikit ay nasa pagitan ng dalawang ibabaw at lumilikha ng isang layer ng pagkakabond. Ang welding naman ay natutunaw at muling pinagsasama ang mismong plastic. Kung nagtatanong ka kung paano talaga weldin ang plastic, ang pangunahing sagot ay simple: piliin ang katumbas na materyal, patunawin ang parehong bahagi at ang filler, at hayaan ang sira na lumamig sa lugar nito.
Kailan Talaga Posible ang Welding ng Plastic
Karaniwang maaaring i-weld ang plastic kapag ang bahagi ay gawa sa kilalang thermoplastic, ang nasirang lugar ay malinis at maabot, at ang orihinal na materyal ay nananatiling solid. Mga tala mula sa AMS ay nagpapahiwatig na ang welding ng mga bahaging gawa sa parehong materyal na plastic ay maaaring lumikha ng mas malakas at mas matagal na mga sambungan kaysa sa mga pandikit sa maraming aplikasyon.
- Mabuting pagkakasunod: naglilinis ng mga punit sa mga bahagi na gawa sa thermoplastic na may marka.
- Posibleng pagkakasunod: mga bahaging maliit ang karga kung saan mahalaga ang itsura at mababa ang stress.
- Hindi magandang pagkakasunod: hindi kilalang plastic, matutumbok na materyal, o mga bahaging kritikal sa kaligtasan.
Kung gusto mong i-weld ang plastic na talagang tumatagal, ang paghuhula ay ang pinakabilis na paraan para mabigo. Ang pagre-repair ay nagsisimula sa isang pangunahing tanong na nagdedesisyon ng halos lahat: anong uri ng plastic ito?
Alamin Kung Alin sa Mga Plastic ang Maaaring I-weld
Lumilinaw nang husto ang sagot kapag hinati mo ang mga plastic sa dalawang pamilya. Para sa praktikal na plastic-to-plastic welding, ang pagkakaiba ng dalawang pamilyang ito ay mas mahalaga kaysa sa kasangkapan na nasa kamay mo.
Paghahambing ng Thermoplastic Welding at Thermoset Limits
Nabanggit ng Trinetics na ang mga thermoplastic ay sumusobrang kapag iniinit at tumitigas muli kapag nilamigan, na kung bakit sila karaniwang napipili para sa welding. Iba ang mga thermoset. Kapag natapos na ang proseso ng pagka-cure, hindi na sila bumabalik sa isang kapaki-pakinabang na estado ng pagkatunaw, kaya ang init ay sinisira ang istruktura sa halip na lumikha ng isang gumagana nang maayos na sira. Ginagawa ni Herrmann ang parehong punto: ang pag-weld ay tunay na ugnayan ng materyal, at ito ay gumagana lamang kapag ang plastik ay maaaring dumaloy sa ilalim ng init.
Iyon ang pundasyon ng thermoplastic welding. Kung ang bahagi ay gawa sa epoxy, silicone, thermoset na katulad ng karet, o iba pang permanenteng na-cure na materyal, karaniwang hindi angkop ang pag-weld bilang paraan ng pagkukumpuni.
Anong Plastik ang Karaniwang Pinakamainam para sa Pag-weld
Ang karaniwang solidong thermoplastics ang pinakaligtas na simula para sa pagkukumpuni. Ang ABS ay malawakang itinuturing na madaling i-weld. Ang polypropylene, o PP, at polyethylene, o PE, ay karaniwan ding mga materyal sa pagkukumpuni, bagaman pareho ay nangangailangan ng kontroladong init. Maaari ring i-weld ang PVC, ngunit binabalaan ni Herrmann na ito ay mabilis na nasusunog kapag sobrang init at maaaring mag-produce ng hydrochloric acid, kaya ang pag-weld ng PVC ay nangangailangan ng dagdag na pag-iingat. Ang polyamides, na karaniwang tinatawag na nylon, ay maaari ring i-weld depende sa grado nito, ngunit ang kahalumigmigan ay maaaring magdulot ng mga butas at porous na sira.
Ang mga misteryosong plastik ang pinagmulan ng mga problema. Mas maraming dependensya ng isang bahagi sa mga additive, mixed formulations, fiber reinforcement, o hindi karaniwang foamed structure, mas kaunti ang dapat mong ipagpalagay na mag-uugali ito tulad ng isang standard na solid resin. Binibigyang-diin ni Herrmann na ang mga additive ay maaaring gawing mas mahirap i-process ang mga plastik, at malakas na nakaaapekto ang mga katangian ng materyal sa pag-uugali ng weld. Sa tunay na mundo ng pagre-repair, ang isang base material na malinaw na naka-marka ay karaniwang mas mainam na plastik para sa welding kaysa sa isang di-kilalang bahagi na kinuha mula sa isang mixed assembly.
| Pamilya ng Materyales | Karaniwang Paggamit | Karakteristikong kakayahang i-weld | Kakatayan ng filler | Mga paalala sa pagre-repair |
|---|---|---|---|---|
| ABS | Mga bahagi ng sasakyan, mga housing, mga appliance | Madaling i-weld sa pangkalahatan | Pinakamainam gamit ang ABS rod | Magandang pagpipilian para sa mga nagsisimula sa plastic welding |
| PP | Mga bahagi ng sasakyan at kemikal-na-resistente | Maaaring i-weld, ngunit sensitibo sa init | Pinakamainam kasama ang PP na rod | Karaniwan sa poly welding, ngunit maaaring mabilis na masunog kung sobrang init |
| PE, kabilang ang HDPE | Mga tangke, mga lalagyan | Madaling i-weld sa pangkalahatan | Pinakamainam kasama ang PE na rod | Ang polyethylene welding ay madalas na pinipili kung saan nabibigo ang mga karaniwang pandikit |
| PVC | Mga tubo, sistemang panlinis, bahagi ng konstruksyon | Maaaring i-weld nang may pag-iingat | Pinakamainam kasama ang PVC na rod | Ang PVC welding ay nangangailangan ng maingat na kontrol sa temperatura at mabuting bentilasyon |
| PA, nylon | Nag-iiba depende sa grado | Maaaring mapag-solderan, ngunit mas sensitibo | Ipareho ang tiyak na grado ng PA kapag alam na | Ang kahalumhan ay maaaring magdulot ng mga butas at porous na mga sira |
| Thermosets | Epoxies, silicones, cured rubbers | Hindi mainam na kandidato | Hindi karaniwang pagkukumpuni sa pamamagitan ng welding | Ang init ay hindi muling pinapalambot ang mga ito upang mabuo ang isang gamit na weld pool |
Bakit Nakasalalay ang Pag-weld ng Plastic sa Plastic sa Pagkakatugma ng Materyales
Ang matibay na pag-weld ng plastic sa plastic ay karaniwang nakasalalay sa pagkakatugma ng filler sa base resin. Ayon kay Herrmann, ang mga identikal na thermoplastic ang nagbibigay ng pinakapantay na weld, at ipinaliliwanag ng gabay na ito para sa welding rod kung bakit ang hindi tugmang filler ay nagdudulot ng mahinang adhesion at brittle na mga sambungan. Kung ang bahagi ay PP, gamitin ang PP filler. Kung PE naman, gamitin ang PE filler. Ang parehong patakaran ang nagpapahusay ng mabuting pag-weld ng PVC, maaasahang pag-weld ng polyethylene, at halos lahat ng iba pang pagre-repair na naglalayong i-weld ang plastic imbes na lamang pahiran ng mainit na filler ang ibabaw.
Ang pamilya ng materyal ang nagsasabi kung posible ba talaga ang pag-weld. Samantala, ang pagkakakilanlan ng materyal ang nagsasabi kung may tunay na pagkakataon bang manatili ang repair.
Paano Mag-weld ng Plastic sa Plastic: Simulan sa Pagkakakilanlan
Maraming nabigong pagkukumpuni ang nangyayari bago pa man i-on ang kagamitan. Ang dalawang bahagi na gawa sa itim na plastic ay maaaring magmukhang magkatulad ngunit kumikilos nang lubos na iba sa ilalim ng init. Kung tinatanong mo kung paano i-weld ang plastic at inaasahan na matatagal ang sira, ang unang gawain ay ang pagkilala. Ang mabuting DIY plastic welding ay nagsisimula sa pagkilala sa resin, pagsusuri sa kalagayan ng bahagi, at pagdedesisyon kung sulit pa nga ba ang pagkukumpuni.
Paano I-weld ang Plastic Pagkatapos ng Pagkilala Dito
Simulan sa mga marka na nabuo sa plastic. Maraming bahagi ang may mga letra tulad ng ABS, PP, PE, PVC, o PA na hinubog sa likod, at ilan sa mga ito ay may kasamang recycling triangle. Ito mga marka ng materyal na gabay ay nagpapaliwanag ng karaniwang mga code, samantalang ang buod ng weldability na ito ay binibigyang-diin na ang mga code 2, 4, at 5 ay karaniwang tumutukoy sa HDPE, LDPE, at PP—na mga thermoplastic na madalas ma-weld.
Kung ang bahagi ay walang marka, gamitin ang mga pisikal na palatandaan nang maingat. Ang PE ay kadalasang pakiramdam na parang wax at mas flexible. Ang PP ay karaniwang medyo mas matigas. Ang PA, o nylon, ay kadalasang pakiramdam na matibay at tumutol sa pagsuot. Ang tungkulin ng bahagi ay nakakatulong din. Ang isang matigas na housing, isang lalagyan na tumutol sa kemikal, at isang ibabaw na tumutol sa pagsuot ay bihira gawin mula sa parehong resin. Ang mga palatandaang ito ay kapaki-pakinabang, ngunit nananatili pa rin silang mga palatandaan, hindi ebidensya. Para sa pagre-repair ng plastic, ang datasheet mula sa tagagawa o isang piraso ng scrap na may katumbas na materyal ay mas maaasahan kaysa sa paghuhula batay lamang sa kulay.
Paano Mag-weld ng Plastic sa Plastic Gamit ang Tamang Pagkakatugma
Ang pagkakatugma ng materyal ang nagdedesisyon kung ang fusion ay posible man lang. Ang PE sa PE at PP sa PP ay malakas na kandidato. Ang PE sa PP ay mahinang pagkakatugma, kahit na magkakatulad ang hitsura ng mga bahagi. Ang anumang kombinasyon ng thermoplastic sa thermoset ay praktikal na isang dead end. Ang parehong gabay tungkol sa kahalumigmigan at mga additive ay babala rin na ang mga ahente para sa pag-alis mula sa mold, mga lubricant, mga filler, at kahalumigmigan ay maaaring bawasan ang kalidad ng weld. Ito ay mahalaga kapag ikaw ay natututo. paano mag-weld ng plastic sa plastic , dahil ang marumi o binago na ibabaw ay maaaring kumilos nang parang mali ang materyal kahit tama ang resin.
Mga Tip sa Pag-weld ng Plastic Bago Ilapat ang Anumang Init
- Hanapin ang marka ng resin, mga hugis na letra na nabuo sa plastic, o ang teknikal na dokumento kung meron.
- Kumpirmahin ang bakas gamit ang pandama, rigidity, kakayahang umunlad o lumuwag, at ang layunin ng bahagi.
- Linisin ang pintura, langis, dumi, alikabok mula sa kalsada, kandila, at residwal na kemikal.
- Suriin ang pinsala para sa katangian ng pagkabrittle, pagkachalk, pagkakalantad ng hibla, o nawawalang bahagi.
- Siguraduhing kilala ang base na materyal at na magagamit ang tugmang filler.
- Hindi kilalang plastic na walang tiwala na identipikasyon.
- Lumang materyal na sumusnap, nagpapatakbo ng pulbos, o nagpapakita ng mga pukyut na stress.
- Palamig (foam), plastic na may malakas na pampalakas, o thermoset na materyal.
- Mga bahagi na nabasa ng gasolina, solvent, o iba pang kontaminante.
- Mga bahaging kritikal sa kaligtasan kung saan ang pagkabigo ay maaaring magdulot ng sugat o pananagutan.
Ang mga tip na ito para sa plastic welding at mga tip para sa plastic weld ay nakakatipid ng maraming nawastong pagsisikap. Kapag alam na ang resin, malinis na ang ibabaw, at ang bahagi ay nananatiling kumakatawan sa istruktura nito, ang DIY plastic welding ay naging tunay na pagkukumpuni imbes na isang panganib. Ito rin ang nagpapakita kung ano ang susunod na mahalaga: ang tamang kagamitan, ang tamang filler rod, at isang setup na nagpapahintulot sa parehong materyales na uminit nang pantay.
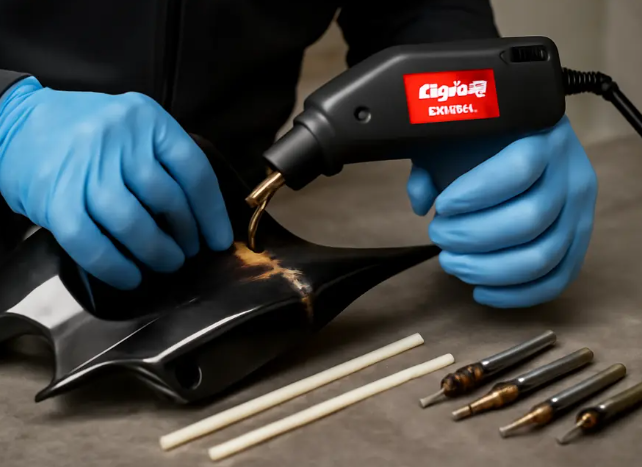
Mga Pangunahing Kaalaman Tungkol sa Plastic Welding Kit para sa Mas Matibay na Pagkukumpuni
Ang ID ng materyales ay nagpapakita kung aling pamilya ng filler ang dapat hanapin, ngunit ang kagamitan sa iyong kamay ang nagdedesisyon kung ang tugma na ito ay magiging tunay na sira. Isang kapaki-pakinabang na mga pangunahing kaalaman sa kagamitan ang setup ay hindi kumplikado. Karaniwan itong nakasalalay sa isang kontroladong pinagmumulan ng init, ang tamang nozzle, ang tugmang filler, ang mga simpleng kagamitan para sa paghahanda, at isang paraan upang pigilan ang bahagi habang ito ay lumalamig.
Ano-ano ang Dapat Kasama sa isang Plastic Welding Kit
Isang praktikal na plastik na welding kit ay kadalasang kasama ang isang hot air welder o welding heat gun, mga palitan na nozzle, mga tugmang filler rod, mga clamp, isang scraper o trimming tool, at pangunahing PPE. Ang mga nozzle ay tumutulong na i-focus ang init sa lugar kung saan kailangan ng sambitan ang init imbes na sobrang mainit ang buong bahagi. Ang mga clamp ay panatilihin ang punit na naka-align upang ang sira ay hindi matigas sa maling posisyon. Mahalaga rin ang mga preparatory tool. Kahit ang isang malakas na weld ay maaaring mabigo kung ang pintura, oksidasyon, o mga magaspang na gilid ay natitira sa sambitan.
A kagamitang pang-repair na may estilo ng pag-solder ay maaari pa ring makakuha ng lugar sa trabaho. Madali itong gamitin para sa mga maliit na tab, magaan na pagbabago ng hugis, o pansamantalang pagtatake ng punit bago ang pangunahing pagpasa. Ang hindi nito magagawa nang maayos ay mainit ang base na plastik at ang filler sa malawak at pantay na daloy ng init. Dito nagkakaroon ng kalamangan ang tamang hot-air welding, lalo na sa mas mahabang mga sira.
| Uri ng tool | Pinakamahusay na Gamit | Kurba ng Pag-aaral | Limitasyon |
|---|---|---|---|
| Hot air welder na may nozzle | Pangkalahatang pagre-repair ng punit, pagwelding ng sira, trabaho sa filler rod | Moderado | Kailangan ng pare-parehong bilis ng paggalaw at kontrol sa init |
| Plastik na kagamitang pang-repair na may estilo ng pag-solder | Mga maliit na tab, pansamantalang tacking, napakalokal na pagre-repair | Mababa hanggang Katamtaman | Maaaring sobrang mainit ang maliit na bahagi at mas hindi epektibo para sa pare-parehong pagsasamang pang-rod |
| Pandukha ng pagsasama o makina para sa plastik na pagsasama | Mas malalaking sira, paulit-ulit na gawain sa workshop, mas mabibigat na seksyon | Mas mataas | Higit na kailangan ng pag-setup, mas hindi maginhawa para sa mabilis na DIY na pagkukumpuni |
| Mga klipe, mga suklay, at mga kasangkapan para sa paghahanda | Pag-aayos ng posisyon, pagpupot, paghahanda ng butas, at paglilinis | Mababa | Sumusuporta sa pagsasama ngunit hindi nagbibigay ng pagsasama sa pamamagitan ng sarili nilang pagkakataon |
Paano Nakaaapekto ang mga Rod para sa Pagsasama ng Plastik sa Lakas ng Sambungan
Ang filler ay hindi lamang dagdag na plastik. Ang gabay sa rod ay malinaw na nagpapakita ng pangunahing punto: ang paggamit ng maling rod ay maaaring magdulot ng mahinang pagdikit, mahinang ugnayan, at brittle (madaling nababasag) na mga sambungan. Kaya naman dapat ipares ang mga rod para sa pagsasama ng plastik sa base resin kung posible.
Ang filler na partikular sa materyal ay karaniwang mas ligtas na pagpipilian. Ang mga bahagi ng PP ay nangangailangan ng rod na PP. Ang mga bahagi ng PE ay nangangailangan ng rod na PE. Ang isang rod para sa PVC ay para lamang sa PVC, hindi sa anumang random na itim na bahagi ng plastik na tila lang kapareho. Ilan sa mga tagapagkaloob ay hinahati rin ang PE sa iba’t ibang subtipo, kaya ang mga rod para sa HDPE ay dapat ituring bilang hiwalay na kategorya imbes na ipagpalagay na anumang rod na PE ay sapat na.
Pagpili ng Thermoplastic Welding Rod o Poly Welding Rod
Kung ang resin ay kilala, piliin muna ang tugmang thermoplastic welding rod at ituring ang pangkalahatang uri ng welding rod bilang kompromiso, hindi bilang madaling paraan. Dapat tugma ang poly welding rod kung ang bahagi ay gawa sa polypropylene o polyethylene. Ang parehong prinsipyo ay nalalapat din sa mga hindi gaanong karaniwang pagkukumpuni. Kung ang bahagi ay gawa sa nylon, ang paggamit ng nylon welding rod ay makatuwiran lamang kapag tiyak ka na ang base material ay nylon at hindi lamang iba pang matigas na engineering plastic.
- Magtrabaho sa malakas na bentilasyon, lalo na kung may anumang posibilidad na ang bahagi ay PVC.
- Iwasan ang sobrang pag-init ng mga plastik na maaaring magpalabas ng nakakairita o nakakasamang usok.
- Magsuot ng salaming pangkaligtasan at guwantes na tumutol sa init.
- I-clamp ang bahagi nang mahigpit upang ang parehong kamay ay makapagkontrol ng kagamitan at ng welding rod.
- Panatilihing matatag ang workpiece sa isang hindi nasusunog na ibabaw.
Ang mabuting kagamitan ay nagbibigay ng tamang kondisyon. Ang mismong pagkukumpuni ay nananatiling nakasalalay sa paraan ng paglilinis, pagbubukas, pagtatake, at pagpapadagdag ng filler sa sugat kapag umabot na ang init sa sambungan.
Paano i-weld ang plastik nang magkakasama upang manatiling matibay
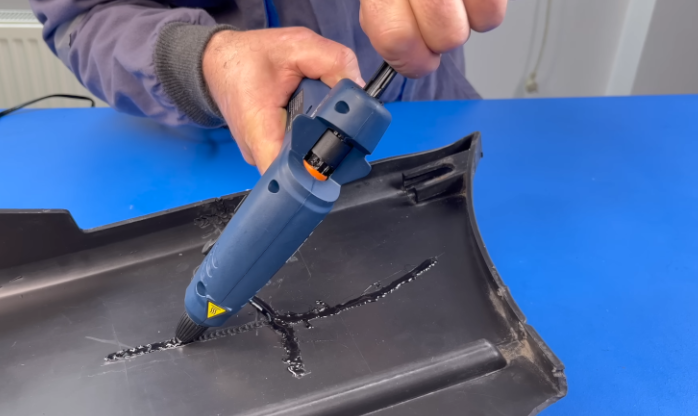
Maaaring mukhang simple ang isang punit hanggang sa sandaling mahubog ang filler. Ang pagkakaiba sa pagitan ng isang pangmatagalang pagkukumpuni at ng mahinang bead ay karaniwang ang workflow, hindi ang swerte. Ang praktikal na gabay sa weld guide na ito at sa repair guide ay tumutukoy sa parehong pattern: linisin nang mabuti ang joint, tugma ang rod, i-heat nang pantay ang parehong materyales, ilagay ang tuloy-tuloy na presyon, at hayaang lumamig nang buo ang seam bago ito tapusin. Kung gusto mong matuto kung paano mag-weld ng plastic sa bahay, sundin ang sunud-sunod na hakbang imbes na subukang patagalin ang punit sa isang mabilis na pagdaan.
Paano Mag-weld ng Plastic Hakbang-Ka-Hakbang
- Suriin ang pinsala. Suriin kung ang punit ay malinis, kung ang mga nabasag na gilid ay nananatiling maayos na nakakabit, at kung ang bahagi ay kapaki-pakinabang pa ring kumpunihin. Suportahan ang bahagi upang panatilihin ang hugis ng seam habang ginagawa ang kumpuni.
- Hugasan at patuyuin ang lugar. Simulan sa simpleng sabon at tubig. Alisin ang pintura, langis, mantika, dumi mula sa kalsada, at oksidisyong materyales sa ibabaw upang magtrabaho ka sa malinis na parent plastic.
- Kumpirmahin ang pagkakatugma ng filler. Subukan ang pag-weld ng rod sa isang nakatagong lugar o sa scrap kung posible. Kung ang rod ay hindi nananatiling nakakabit pagkatapos maging malamig, huminto at palitan ito ng tamang materyal.
- Ihanda ang sambungan. Gupitin ang manipis na V-groove kasalong pukyut. Ito ang magbibigay ng puwang para sa filler na ilalagay sa ilalim ng ibabaw imbes na nasa taas nito.
- Tack ang seam. Gawin ang light tack sa buong linya kung saan man planong idagdag ang filler upang panatilihin ang pagkakalign at pagkakasara ng mga gilid.
- Gawin ang pangunahing weld. Ipotong paunti-unti ang dulo ng rod upang maging point, painitin ang groove at ang rod nang sabay-sabay, at ipasok ang filler nang may pantay na presyon. Para sa maikling pagre-repair, ang mahinang pendulum motion ay tumutulong na painitin nang pantay ang parehong gilid.
- Itayo ang repair ayon sa kailangan. Ang isang manipis na groove ay maaaring kailanganin lamang ng isang pass. Ang mas malalim na repair ay mas mainam na punuan sa kontroladong mga layer, at ang accessible na likod na bahagi ay maaaring palakasin bago mo tapusin ang harap na bahagi.
- Payagan itong lumamig, pagkatapos ay tapusin. Iwanan ang bahagi hanggang sa tuluyang lumamig. Pagkatapos nito, putulin ang sobrang materyal at balatan lamang kung mahalaga ang itsura.
Ang matibay na plastic weld ay nangyayari kapag ang base material at ang filler ay nanghihina nang sabay-sabay. Kung ang filler rod ay nakapatong lamang sa ibabaw, hindi pa fuzed ang joint.
Paano Mag-Plastic Weld Nang Walang Mahinang Surface Bonding
Ang pinakamalaking pagkakamali ng mga nagsisimula ay ang pagtrato sa filler bilang hot glue. Ang repair guide ay hinahati ang plastic welding sa tatlong magkakaugnay na yugto: pagpindot, pagpainit, at paglamig. Ang presyon ay tumutulong upang panatilihin ang tamang alignment ng joint at mapabuti ang daloy ng natunaw na materyal sa interface. Ang pagpainit ay nagbibigay-daan sa mga materyal na maghalo sa seam. Ang paglamig naman ay naglalock sa bagong bond. Sa simpleng salita, ang layunin ay hindi i-smear ang mainit na rod sa isang punit. Ang layunin ay i-fuse weld ang groove upang ang filler ay maging bahagi na ng bahagi.
Kaya nga ang pagpapakain ng rod ay napakahalaga. Ang sobrang kakaunting presyon ay nag-iwan ng mga puwang at mga butas na tulad ng karayom. Ang sobrang bilis naman ay nag-iwan ng isang bead na tumatayog nang malinaw na may mahinang kontak sa ugat. Karaniwang nagmumula ang mas malinis na seam mula sa isang tuloy-tuloy na galaw, na pinapanood ang bahagyang paglalabas ng materyal sa mga gilid ng rod imbes na pilitin ang malaking dami ng filler na pumasok sa sambitan. Kung ikaw ay natututo pa lamang kung paano mag-weld ng plastic, tandaan mo ang patakaran na ito: unahin ang pagpapahina ng parehong materyales, pagkatapos ay ipakain at ipindot.
Paano Mag-weld ng Plastic Upang Manatili ang Seam
Ang lakas ay madalas na nakukuha pagkatapos ng pagpapain, hindi habang ginagawa ito. Binanggit ng gabay sa pag-weld na ang mga plastic ay hindi umaabot sa buong lakas hanggang lubos na lumamig, at ang gabay sa pagrepare ay nagpapahayag din ng parehong punto sa pamamagitan ng pagbibigay-diin kung gaano kahalaga ang proseso ng paglamig sa lakas ng weld. Ibig sabihin, huwag gamitin ang forced shock cooling, huwag putulin ang seam habang ito ay paunlarin pa lamang, at huwag ibaluktot ang bahagi para lamang subukan kung gumana ito.
Kung kailangan mong i-weld ang plastik nang magkasama sa isang panel, lalagyan, o bahagi na katulad ng bumper, bigyang-pansin muna ang integridad bago ang itsura. Para sa mga bahaging pangitsura, i-trim lamang ang bead pagkatapos ng ganap na pagkakatigas ng seam. Para sa mga lugar na may mas mataas na stress, iwanan ang sapat na reinforcement upang suportahan ang orihinal na load path. Hindi sapat ang isang maayos na tingnan na bead kung buksan ulit ang crack sa unang paggamit.
Hayaan ang seam na lumamig nang mag-isa. Ang pabilis na paglalamig ay maaaring mag-lock ng kahinaan bago pa man ganap na matatag ang bond.
Iyon ang buong DIY na ritmo kung paano i-weld ang plastik nang magkasama upang talagang tumagal: suriin, linisin, gawin ang groove, i-tack, i-feed, ilamig, at tapusin. Kung saan karamihan sa mga pagre-repair ay naging mahirap ay hindi ang pagkakasunod-sunod ng mga hakbang, kundi ang init sa loob ng bawat isa. Masyadong kaunti at ang rod ay hindi talaga magsasama nang husto. Masyadong sobra at ang plastik ay bubuhulan, magsisigarilyo, o mag-uumpisada nang bumaba.
Pangasiwaan ang Init para sa Mas Matibay at Mas Malinis na Seam
Iyan ang lugar kung saan maraming pagkukumpuni ang nababaliw. Ang groob ay maaaring tama, ang rod ay maaaring tugma, ngunit ang bead ay maaari pa ring mabigo kung hindi tama ang temperatura. Sa pag-weld ng plastic gamit ang heat gun, ang dial ay isang simpleng starting point lamang. Ang iba't ibang uri ng plastic ay nangungunot sa magkakaibang saklaw ng temperatura, at dalawang kagamitan na naka-set sa parehong numero ay maaaring magbigay ng napakalaking pagkakaiba sa init sa nozzle.
Pag-weld ng Plastic Gamit ang Heat Gun Nang Hindi Ito Sinusunog
Gamitin ang temperatura bilang gabay, hindi bilang pangkalahatang patakaran. STANMECH naglilista ng mga simulaang saklaw ng mainit na hangin tulad ng PE-HD sa 300 hanggang 320 °C, PP sa 305 hanggang 315 °C, at PVC-U sa 330 hanggang 350 °C. Ang TWI ay nagsasabi na ang hot gas welding ay karaniwang naka-set sa mga 80 hanggang 100 °C na mas mataas kaysa melting point ng materyal. Mga kapaki-pakinabang na simulaang punto, oo. Mga eksaktong sagot para sa bawat gawain, hindi.
Dapat dumaloy at mag-fuse ang plastic. Hindi ito dapat sumunog, mag-produce ng usok, o lumabas na parang smear sa nasirang ibabaw.
- Kung ang rod ay nananatiling may karamihan sa orihinal nitong hugis at nakatayo nang mataas sa seam: dagdagan nang kaunti ang init, pabagalin ang bilis, o ilipat nang kaunti ang nozzle papalapit.
- Ang weld ay madaling nababasag o natatanggal pagkatapos ng paglamig: i-preheat nang kaunti pa ang sambitan upang ang rod at base ay makinis na magtunaw nang sabay.
- Ang PP o PE ay nagiging mapulang-bilugan (shiny) sa gilid ng weld: bawasan ang init. Sa tamang setting, ang mga materyales na ito ay karaniwang tumitingkad (dull) malapit sa seam.
- Ang PVC ay nagiging dumilim o kayumanggi, o may usok na lumalabas: agad na bawasan ang init. Ang PVC ay lalo pang hindi nagpapatawad kapag sobrang init.
- Ang welding rod ay tila bahagyang pina-plate na may maliit na bead sa mga gilid: ito ay karaniwang mas malusog na senyales kaysa sa isang rod na halos hindi nagbabago ng hugis.
Plastic Welding Gamit ang Heat Gun Laban sa Hot Air Welding ng Plastic
Ang plastic welding gamit ang heat gun ay maaaring makatulong sa mga simpleng pagkukumpuni, ngunit ang mga espesyalisadong kagamitan para sa hot air welding ng plastic ay idinisenyo para sa mas mahusay na kontrol. Inilalarawan ng TWI ang mga hot gas system na may kontroladong airflow at mga palitan-palitang nozzle, kabilang ang high-speed nozzle na nagpapahintulot sa iyo na ipindot ang welding rod at substrate nang sabay. Dahil dito, ang hot air gun welding ng plastic ay karaniwang mas pare-pareho kaysa sa simpleng paggalaw-galaw ng pangkalahatang heat gun sa buong sira.
Paano Binabago ng Pag-weld ng Plastic Gamit ang Mainit na Gas ang Kalidad ng Seam
Ang distansya ng nozzle, ang anggulo ng welding gun, at ang bilis ng paggalaw ay nagbabago sa aktwal na temperatura sa sambitan nang higit pa kaysa inaasahan ng mga nagsisimula. Kung ang nozzle ay itinutulak nang sobrang malayo, hindi talaga magsasama ang seam. Kung masyadong matagal kang nananatili sa isang lugar, ang ibabaw ay sobrang mainit bago pa man magbond ang ugat. Sa hot air welding ng plastic, ang maikling preheat ay tumutulong sa groove upang makahabol, kaya ang filler at base material ay umaabot sa magkatulad na window ng pagkamalambot. Ang balanseng ito ang sentro ng hot gas plastic welding at ng malinis na hot air welding.
Basahin ang seam habang nagpapaweld ka. Ang mga visual clue na ito ay naging lalo pang kapaki-pakinabang kapag ang weld ay lumamig, tila mabuti sa unang tingin, ngunit nabigo pa rin kapag pinapailalim sa load.
Paglutas ng Problema sa Pag-weld ng Plastic at Pagkilala Kung Kailan Dapat Huminto
Maaaring magmukhang maganda ang isang sira kaagad pagkatapos ng paglamig, ngunit nababigo pa rin sa unang pagkakataon na ito ay i-bend. Sa mga tunay na pagkukumpuni, ang pag-weld ng plastic ay karaniwang nababago dahil sa mga pangkalahatang dahilan: ang plastic ay marumi, basa, hindi tugma, sobrang init, kulang sa init, o hindi sapat ang panahon na ito ay pinapanatili sa hugis nito. Ang mga tsart ng kabiguan sa SpecialChem at ang gabay sa mga depekto na naaayon sa DVS 2207 ay parehong tumutukoy sa parehong mga pundamental na prinsipyo: oras, temperatura, presyon, malinis na ibabaw, at matatag na paglamig.
Bakit Minsan Nababigo ang Pag-weld ng Plastic
Kung tinatanong mo kung maaari bang patunawin ang plastic upang kumpunihin ito, ang sagot ay oo lamang kapag ang materyal ay maaaring i-weld at ang sira ay naaayos nang tama. Ang simpleng pagtatangka na patunawin ang plastic nang pilit gamit lamang ang mata ay madalas na nag-iwan ng mahinang surface bead imbes na tunay na pagsasamang (fusion). Ang parehong pag-iingat ay may bisa rin kapag tinatanong ng mga tao kung maaari bang i-solder ang plastic. Ang isang kasangkapan na katulad ng soldering ay maaaring makatulong sa maliit at lokal na pagkukumpuni, ngunit hindi nito mapapawi ang maling welding rod, kontaminasyon, o mahinang kontrol sa init.
| Sintomas | Pinakamalamang na Sanhi | Korektibong Aksyon |
|---|---|---|
| Mga butas o porosity | Kahalumigmigan, alikabok, o hindi pantay na pag-init sa lugar ng pagsasamantalang matunaw | Patuyuin ang materyal kapag kailangan, linisin nang mabuti ang sambungan, at i-init nang mas pantay |
| Pangkakulay na itim, dilaw, o mahrap na butil | Labis na init o sobrang tagal ng pag-init | Bawasan ang init, maikliin ang oras ng pagpapahinga, at panatilihin ang paggalaw ng pinagmumulan ng init |
| Ang rod ay nahuhulog o ang sira ay madaling nabubuwal | Maling filler rod, malamig na welding, o kulang sa pagsasamantalang pampisngay sa gilid | Kumpirmahin ang pagkakatugma ng materyal, buksan muli ang groove kung kinakailangan, at muling i-weld gamit ang mas mainam na pag-init sa sambungan |
| Mga butas na tulad ng mga butas ng karayom o mga puwang | Hindi pantay na pagpapasok ng rod, nakakulong na kontaminasyon, o hindi kumpletong puno ng ugat | Gamitin ang mas pantay na presyon, mabagal ang pagdaan nang bahagya, at idagdag ang kontroladong pangalawang pagdaan kung ang base ng plastik ay malusog |
| Hakbang o hindi pagkakalign | Mahinang pagkakapi o paggalaw habang nag-iinit at nag-iilang | Tack muna, i-fixture ang bahagi, at panatilihin itong suportado hanggang lubos na lumamig |
| Muling pumutok sa gilid ng weld | Ang orihinal na mataas na flexible na lugar ay hindi kailanman na-suportahan o pinatibay nang wasto | Ibalik ang hugis ng bahagi, palakasin ang kabaligtaran kapag posible, o palitan ang bahagi kung ang pukyut ay nasa isang bahagi na nagdadala ng bigat |
Lalo na karaniwan ang mga problema dulot ng kahalumigmigan at kontaminasyon. Binanggit ng SpecialChem na ang mga lugar ng weld na basa o marumi ay maaaring magdulot ng mga puwang, samantalang ang gabay sa mga depekto na estilo ng DVS ay nagsasambit na ang porosity ay nauugnay sa kahalumigmigan at alikabok, ang malamig na weld ay dahil sa hindi sapat na init, at ang warpage ay dahil sa hindi stable na kondisyon ng pag-iilang. Kaya naman, ang isang malinis na tingin na bead ay hindi sapat sa sarili nitong.
Paano Pagsamahin ang Plastik nang Walang Muling Pumuputok
Ang sinumang naghahanap kung paano pagsamahin ang plastik nang walang pagkabigo ng sira muli ay dapat mag-isip nang lampas sa mismong bead. Ang mainit na plastik ay lumalawak, at sumisiksik nang bumababa ang temperatura. Ipinaliliwanag ng SpecialChem na ang mga bahagi na walang suporta ay maaaring umilingon patungo sa weld, at ang paggamit ng fixture upang pigilan ang anyo ay tumutulong na panatilihin ang bahagi na tuwid. Kapag payagan ng access, ang karagdagang suporta mula sa kabaligtaran na gilid ay maaari ring bawasan ang posibilidad na bumalik ang sira sa parehong lugar.
Ito rin ang punto kung saan nagkakahiwalay ang mga opsyon sa pagrepare. Ang tinatawag na 'plastic glue weld' ay maaaring katanggap-tanggap para sa ilang mababang-load na cosmetic repairs, ngunit hindi ito kapareho ng tunay na fusion. Kapag patuloy na gumagalaw ang bahagi sa isang tab, bracket, o mounting point, ang hitsura lamang ay hindi isang mabuting sukatan ng tagumpay.
Kung Kailan Mas Mainam ang mga Serbisyo sa Plastic Welding
Ang ilang pagkukumpuni ay dapat itigil bago mainit ang kagamitan. Karaniwang mas matalino ang pumili ng propesyonal na serbisyo sa plastic welding kapag hindi alam ang uri ng materyal, kailangan ng kontroladong fixturing ang bahagi, o ang kabiguan ay magdudulot ng mga problema sa kaligtasan, pagsunod sa regulasyon, o pananagutan. Ang praktikal na gabay sa workshop sa Tomorrow's Technician ay nagpapakita ng mas malawak na punto na ang adhesive repair at welding ay parehong may bisa, depende sa bahagi, antas ng pinsala, accessibility, at kasanayan ng teknisyan.
- Huwag mag-weld ng hindi kilalang plastic o ng plastic na posibleng thermoset.
- Huwag mag-weld ng mga bahaging lubhang napatigas, parang puno ng apog (chalky), nabasa ng gasolina, o nasira dahil sa kemikal.
- Huwag ipagpalagay na ang isang glue weld sa plastic o isang mabilis na pagsubok na patunawin ang plastic ay makapagbabalik ng isang istruktural na bahagi.
- Huwag mag-weld ng malalaking nawawalang bahagi na nasa ilalim ng load maliban kung ang paraan ng pagkukumpuni ay nagrere-restore din ng suporta.
- Huwag mag-eksperimento sa mga bahaging mahalaga sa kaligtasan o regulado nang walang opisyally na aprubadong prosedura.
Kung patuloy kang nagtatanong kung maaari bang paitin ang plastik upang ayusin ito, tingnan mo muna ito bilang isang problema sa pagdedesisyon bago ituring na isang problema sa init. Minsan, ang mas mainam na solusyon ay ang pagpapakalat ng pandikit, mekanikal na pagpapatibay, buong pagpapalit, o propesyonal na pagkukumpuni. Sa mga gawaing pambenta at produksyon, ang ganitong pagtataya ay madalas na mas mahalaga kaysa sa mismong pagwelding, lalo na kapag kailangan pang baguhin ang disenyo ng bahagi imbes na simpleng ayusin lamang.
Paggamit ng Makina sa Pagwelding ng Plastik o Pagbabago ng Disenyo
Sa mga gawaing produksyon, ang tanong ay mas malaki kaysa sa isang simpleng pagkukumpuni. Kailangan ng mga koponan na magpasya kung ang pagwelding, pag-uulit ng proseso, pagbabago ng disenyo, o buong pagpapalit ang magbibigay ng pinakaligtas at pinakamaiiulit na resulta. Narito nang naging kapaki-pakinabang ang praktikal na sagot sa tanong kung maaari bang i-weld ang plastik: ilang bahagi ng thermoplastic ay napakahusay na kandidato para sa pagwelding, ngunit ang mga pagsasama ng iba’t ibang materyales, mga suporta na nasa ilalim ng presyon, at mga lugar kung saan paulit-ulit na nabubuo ang punit ay kadalasang nagpapahiwatig ng ibang solusyon.
Kung Kailan Ang Serbisyo sa Pagwelding ng Plastik Ay Angkop Para sa mga Pangangailangan sa Produksyon
Ang mga serbisyo sa pag-weld ng plastik para sa industriya ay isang mahusay na pagkakasya kapag alam ang resin, paulit-ulit ang disenyo ng sambungan, at ang kinakailangang lakas ay tugma sa proseso. Inilalahad ng Fractory ang ilang paraan ng paggamit ng makina, kabilang ang ultrasonic, spin, hot plate, at high-frequency welding para sa mga thermoplastics. Sa tunay na termino, ang isang ultrasonic welder para sa plastik ay kapaki-pakinabang para sa mga manipis na overlapping joints; maaaring napakabilis ng ultrasonic welding ng plastik sa tamang geometry, at ang spin welding ng plastik ay gumagana nang maayos sa mga bilog na bahagi na may symmetrical na mating surfaces. Binanggit din ng Fractory na ang hot plate plastic welding ay madalas na pinipili para sa mas malalaking bahagi ng plastik, samantalang hindi angkop ang hot plate welding ng plastik sa kapal na bababa sa 0.1 pulgada at nangangailangan ito ng regular na pagpapanatili. Para sa ilang compatible na materyales, ang radio frequency welding ng plastik ay maaaring umabot sa humigit-kumulang 100 hanggang 120 metro/kahit na minuto.
Mahalaga rin ang operasyonal na pagkakasya. Ang mga tanong tungkol sa pagre-repair na itinataas ng BodyShop Business ay kasing-kahalagahan din sa pagmamanupaktura: ang pagkakakilanlan ng materyales, kasanayan ng teknisyan, mga pamantayang prosedura, pagpapanatili ng mga kagamitan, imbentaryo, at kabuuang oras ng proseso ay lahat na nakaaapekto kung ang isang weld cell ay may kabuluhan sa ekonomiya.
Kapag Hindi Ang Pinakamahusay na Sagot ang Machine Welding ng Plastic
Ang machine welding ng plastic ay hindi ang pinakamahusay na sagot kapag hindi alam ang grado ng plastic, ang bahagi ay may kasamang inserts o mixed substrates, o ang parehong stress path ay paulit-ulit na nabigo sa mga tab, bracket, o housing. Ang mahinang pagkakabagay para sa sonic welding ng plastic o hot plate plastic welding ay madalas na isang senyal ng disenyo, hindi lamang isang problema sa proseso. Sa mga ganitong kaso, ang pagre-design ng load path patungo sa mga stamped reinforcements, machined mounts, o welded metal supports ay maaaring mas matalinong hakbang sa pangmatagalang panahon.
Shaoyi para sa Suporta ng Metal na Bahagi para sa Automotive
Iyan ang punto kung saan ang isang partner sa pagmamanupaktura ay maaaring mas mahalaga kaysa sa isa pang siklo ng pagkukumpuni. Shaoyi nag-aalok ng isang-stop na suporta para sa mga metal na bahagi ng sasakyan, kabilang ang stamping, CNC machining, welding assembly, mabilis na prototyping, at produksyon sa mataas na dami. Para sa mga tagagawa ng sasakyan at Tier 1 na supplier, ginagawa itong may kahalagahan ang Shaoyi kapag dapat palitan, suportahan, o i-redesign ang isang plastic na feature bilang isang mas matibay na metal na bahagi imbes na paulit-ulit na i-weld.
- Suriin kung ang supplier ay kayang suportahan ang parehong validation ng prototype at produksyon sa dami.
- Hanapin ang karanasan sa mga automotive mixed-material assemblies at bracket redesigns.
- I-verify ang mga sistema ng kalidad, kakayahang mag-inspeksyon, at pagkakapare-pareho ng proseso.
- Itanong kung ang stamping, machining, welding, at finishing ay maaaring koordinahin sa loob ng isang workflow.
- Kumpirmahin ang lead times, bilis ng engineering response, at disiplina sa change control.
Ang pinakamalakas na desisyon sa produksyon ay hindi laging ang nagsisiguro na mananatili ang bahagi bilang plastic. Ito ay ang desisyong nagpapalakas, nagpapalinis, at nagpapadali ng pag-uulit nito sa malaking saklaw.
Mga Karaniwang Tanong Tungkol sa Plastic Welding
1. Maaari bang i-weld ang lahat ng plastic?
Hindi. Ang heat welding ay gumagana pangunahin sa mga thermoplastic dahil ang mga ito ay nagkakalambot at pagkatapos ay muling tumitigas habang lumalamig. Ang mga thermoset na materyales, mga hindi kilalang halo, mga foam, at mga plastik na sobrang nasisira dahil sa panahon ay karaniwang hindi bumubuo ng isang dependableng sira. Kung ang resin ay hindi maisasagot o ang bahagi ay madaling nababasag at kontaminado, ang welding ay karaniwang hindi mainam.
2. Paano mo malalaman ang uri ng plastik bago ito i-weld?
Simulan sa pamamagitan ng pagtingin sa bahagi para sa mga nakapormang marka ng resin tulad ng ABS, PP, PE, PVC, o PA. Pagkatapos noon, gamitin ang mga pangunahing palatandaan tulad ng rigidity, flexibility, texture ng ibabaw, at ang tungkulin ng bahagi upang suportahan ang identifikasyon. Kung walang marka at mahalaga ang pagre-repair, mas matalino ang kumpirmahin ang materyal gamit ang dokumentasyon o isang test piece, dahil ang pagpili ng filler ay nakasalalay sa kaalaman sa base na plastik.
3. Mas malakas ba ang plastic welding kaysa sa pandikit?
Maaari ito, ngunit tanging kapag ang materyal ay maaaring ipagkabit at ang pagkukumpuni ay ginagawa nang tama. Ang pag-weld ay nag-uugnay ng napanis na plastik sa napanis na plastik, kaya ang hiwa ay maaaring kumilos nang higit na tulad ng isang patuloy na piraso imbes na dalawang ibabaw na pinakakapit ng isang pandikit na layer. Maaaring pa rin ang pandikit ang mas mainam na opsyon para sa mga halo-halong materyales, mga magaan na estetikong kumpuni, o mga hugis na mahirap painitin nang pantay.
4. Maaari bang i-weld ang plastik gamit ang heat gun o soldering iron?
Minsan, oo, ngunit nakaaapekto ang kasangkapan sa resulta. Karaniwang mas mainam ang kontroladong hot-air welder para sa tunay na trabaho sa hiwa dahil ito ay nagpapainit ng guhit at ng filler nang mas pantay. Maaaring tumulong ang isang kasangkapan na may estilo ng soldering upang i-tack ang maliit na pukyut o kumpunihin ang maliit na tab, ngunit mas madali itong labis na mainitan ang ibabaw at lumikha ng kumpuni na tila kahusay-husay habang nananatiling mahina sa ilalim.
5. Kailan dapat baguhin o palitan ang bahagi ng plastik imbes na i-weld ito?
Kung ang bahagi ay may karga, patuloy na nabibitak sa parehong lugar, o nakapatong sa isang safety-sensitive assembly, ang muling pagdisenyo o pagpapalit ay kadalasang mas matalinong hakbang. Sa gawaing pang-auto, ang paulit-ulit na pagkukumpuni ng plastik ay maaaring mas mahal kaysa sa paglilipat ng stress sa isang metal bracket, suporta, o housing. Para sa mga team na nangangailangan ng ganitong uri ng pagbabago, ang Shaoyi ay isang mahalagang mapagkukunan ng pagmamanupaktura dahil sinusuportahan nito ang rapid prototyping, stamping, CNC machining, welding assemblies, at volume production sa ilalim ng IATF 16949.