 சிறு கலைகள், உயர் தரம் தரவுகள். எங்கள் வேகமான மாதிரி செயற்படுத்தும் சேவை சரிபார்ப்பை வேகமாக்கும் மற்றும் எளிதாக்கும் —

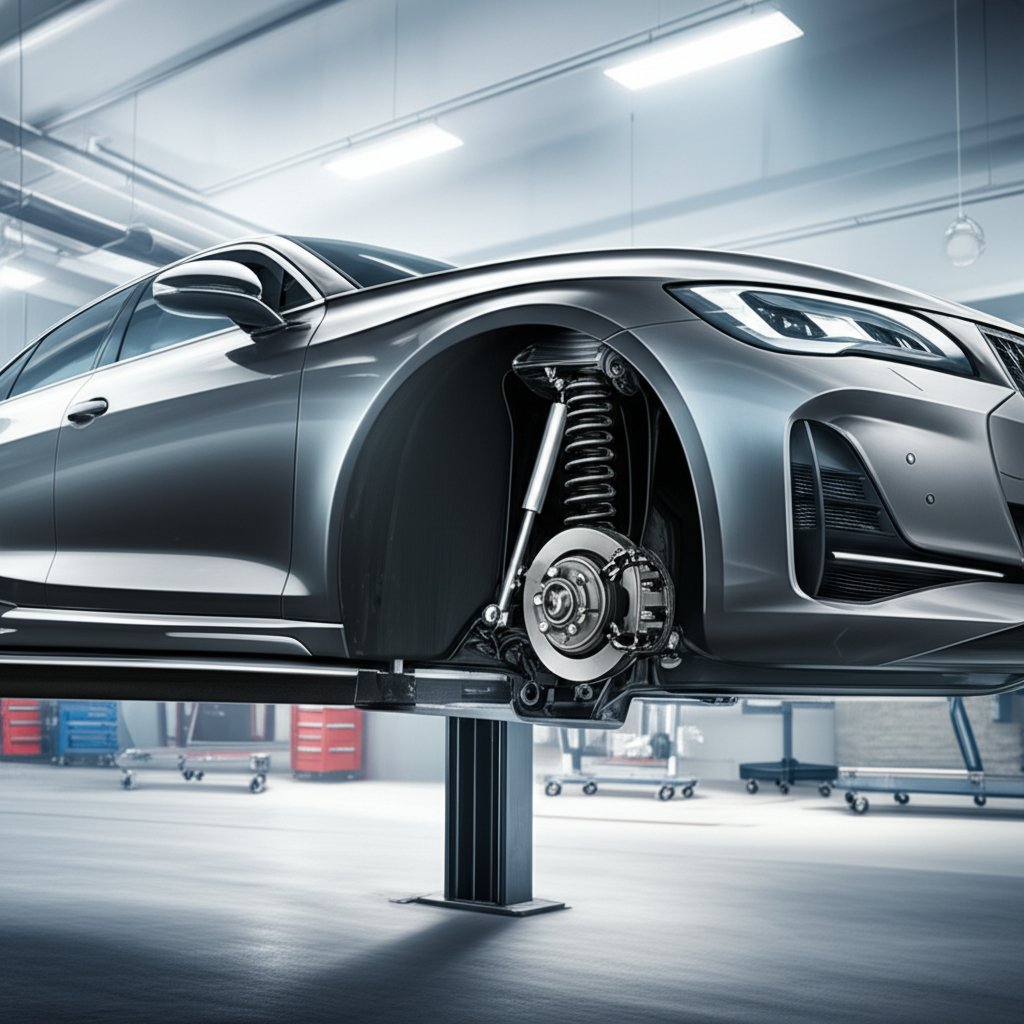
வாகனத்தின் சஸ்பென்ஷன் பாகங்கள்: DIY வெற்றிகள் மற்றும் புரோவை அழைக்க வேண்டிய நேரம்
ஒவ்வொரு ஓட்டுநரும் அறிந்திருக்க வேண்டிய சஸ்பென்ஷன் அடிப்படைகள்
கார் சஸ்பென்ஷன் எவ்வாறு செயல்படுகிறது
சாலையில் பல மேடுபள்ளங்கள் இருந்தாலும், உங்கள் அன்றாட பயணம் சுமுகமாக இருப்பது ஏன்? அதுதான் உங்கள் காரின் சஸ்பென்ஷன் செய்யும் வேலை – காரை நிலையாகவும், பாதுகாப்பாகவும், வசதியாகவும் வைத்திருக்க உதவும் பல பாகங்களின் இணைப்பு முறைமை. ஆனால் காரில் சஸ்பென்ஷன் என்ன செய்கிறது துல்லியமாக சொல்வதானால்? சஸ்பென்ஷன் சாலையில் உங்கள் டயர்களுக்கும் தரைக்கும் இடையே உள்ள உராய்வை அதிகபட்சமாக்கி, செங்குத்தான இயக்கத்தையும் கணிசமான கட்டுப்பாட்டையும் உறுதி செய்கிறது, உங்கள் பயணம் சாலையின் ஒவ்வொரு மேடுபள்ளத்தையும் உணர விடாமல் செய்கிறது. [மூலம்]
சஸ்பென்ஷன் பாகங்களின் முக்கிய செயல்பாடுகள்
- ஆதரவு: காரின் எடையையும் அது சுமையையும் தாங்குகிறது.
- கட்டுப்பாடு: சக்கரங்களின் இயக்கத்தை கட்டுப்படுத்தி டயர்கள் சாலையில் தொடர்ந்து தொடப்பதை உறுதி செய்கிறது.
- வசதி: தட்டுதல்கள் மற்றும் சாலை குறைபாடுகளிலிருந்து ஏற்படும் தாக்கங்களை உறிஞ்சி பயணிகள் அசைவுறாமல் பாதுகாக்கிறது.
- பாதுகாப்புஃ பிரேக், முடுக்கம் மற்றும் கோணத்தில் செல்லும் போது உங்கள் வாகனத்தை நிலையாக வைத்திருக்கிறது.
தெரிந்துகொள்வது சஸ்பென்ஷன் சிஸ்டம் தேவை இது முக்கியமானது: இது இல்லாமல், ஒவ்வொரு தட்டுதலும் நேரடியாக சேஸிக்கு மாற்றப்படும், இதனால் வாகனத்தை இயக்க கடினமாகவும், வசதியற்றதாகவும் இருக்கும். முதன்மை சஸ்பென்ஷன் பாகங்கள் - ஸ்பிரிங்குகள், டேம்பர்கள் (ஷாக்குகள் அல்லது ஸ்ட்ரட்கள்), லிங்க்குகள் மற்றும் புஷிங்குகள் - இந்த முக்கிய செயல்பாடுகளை சமன் செய்ய ஒன்றாக செயல்படுகின்றன.
| சப்சிஸ்டம் | குறிப்பு |
|---|---|
| சுருள்கள் | வாகனத்தின் எடையை தாங்குதல் மற்றும் சாலை தாக்கங்களை உறிஞ்சுதல் |
| டேம்பர்கள் (ஷாக்குகள்/ஸ்ட்ரட்கள்) | ஸ்பிரிங் இயக்கத்தை கட்டுப்படுத்துதல் மற்றும் சிறப்பான பயணத்திற்காக ஆற்றலை விரயப்படுத்துதல் |
| லிங்க்குகள்/ஆர்ம்கள் | சக்கர இயக்கத்தை வழிநடத்துதல் மற்றும் சீரான நிலைமையை பராமரித்தல் |
| புஷிங்ஸ் | நகரும் பாகங்களுக்கிடையே சத்தமும் அதிர்வும் குறைக்கவும் |
புஷிங்குகள் அல்லது பந்து மாண்டுகளில் சிறிய அளவு அழிவு கூட பெரிய பிரச்சினைகளுக்கு வழிவகுக்கலாம் - சீரற்ற டயர் அழிவு அல்லது தடைசெய்யப்பட்ட பிரேக்கிங் - ஒவ்வொரு ஓட்டுநருக்கும் தொடர்ந்து சரிபார்க்க வேண்டியது அவசியம்.
சாதாரண சஸ்பென்ஷன் வடிவமைப்புகளும் அவை ஏன் முக்கியம்
அனைத்து கார் சஸ்பென்ஷன் அமைப்புகளும் ஒரே மாதிரியாக உருவாக்கப்படவில்லை. பொதுவான அமைப்புகள் மாக்பெர்சன் ஸ்ட்ரட், இரட்டை விஷ்போன், பல-இணைப்பு, திட அச்சு, மற்றும் இலை-சுருள் வடிவமைப்புகளை உள்ளடக்கும். ஒவ்வொரு கட்டமைப்பும் செலவு, வசதி மற்றும் கட்டுப்பாட்டை வெவ்வேறு விதமாக சமன் செய்கிறது:
- மாக்பெர்சன் ஸ்ட்ரட்: எளிய, இடவிருப்பு சிக்கனமான மற்றும் முன் சக்கரங்களில் பொதுவானது.
- இரட்டை விஷ்போன்: மேம்படுத்தப்பட்ட கையாளுதலுக்கு துல்லியமான சக்கர கட்டுப்பாட்டை வழங்குகிறது.
- பல-இணைப்பு: பல கைகள் சொகுசு மற்றும் பிடியை துல்லியமாக சீராக்க அனுமதிக்கிறது.
- திண்ம அச்சு: நீடித்தது, சுமை தாங்கும் வலிமைக்காக டிரக்குகளில் அடிக்கடி காணப்படும்.
- இலை சுருள்: எளியதும் நேர்த்தியானதுமானது, பொதுவாக ாரீச் சாதனங்களிலும் பழமையான வாகனங்களிலும் பயன்படுத்தப்படும்.
ஸ்டீயரிங் மற்றும் சஸ்பென்ஷன் நெருக்கமாக இணைக்கப்பட்டுள்ளன. சஸ்பென்ஷனின் வடிவவியல் - கைப்பிடிகள் மற்றும் திருப்பும் புள்ளிகள் எவ்வாறு அமைக்கப்பட்டுள்ளன என்பது - சீரமைப்பு மற்றும் நிலைத்தன்மையை நேரடியாக பாதிக்கிறது. இந்த கோணங்கள் தரவினை விட்டு விலகும் போது, இழுத்தல், திசைமாறுதல் அல்லது சக்கர உருட்டுதல் போன்றவற்றை நீங்கள் காண்பீர்கள். இதனால்தான் தேய்ந்து போன பாகங்களை மாற்றுவது மட்டுமல்லாமல் சரியான சீரமைப்பை பராமரிப்பதும் மிகவும் முக்கியமானது.
சஸ்பென்ஷன் ஆரோக்கியத்தின் முக்கியத்துவம்
உங்கள் சஸ்பென்ஷன் பாகங்களை நல்ல நிலைமையில் வைத்திருப்பது பயணிகளின் வசதிக்காக மட்டுமல்ல, பாதுகாப்பு, டயர் ஆயுள் மற்றும் சிக்கல்களை ஆரம்பத்திலேயே கண்டறிவதன் மூலம் பணம் சேமிப்பதற்காகவும் ஆகும். தொடர்ந்து சோதனை செய்வதன் மூலம் விலை உயர்ந்த பழுதுபார்ப்புகளாக மாறுவதற்கு முன்பே சிக்கல்களை கண்டறியலாம். அடுத்த பிரிவுகளில், சஸ்பென்ஷன் தேய்மானத்தை முன்கூட்டியே கண்டறிய உதவும் விரிவான வரைபடங்கள் மற்றும் படி-ப்படியாக ஆய்வு குறிப்புகளை காணலாம்.
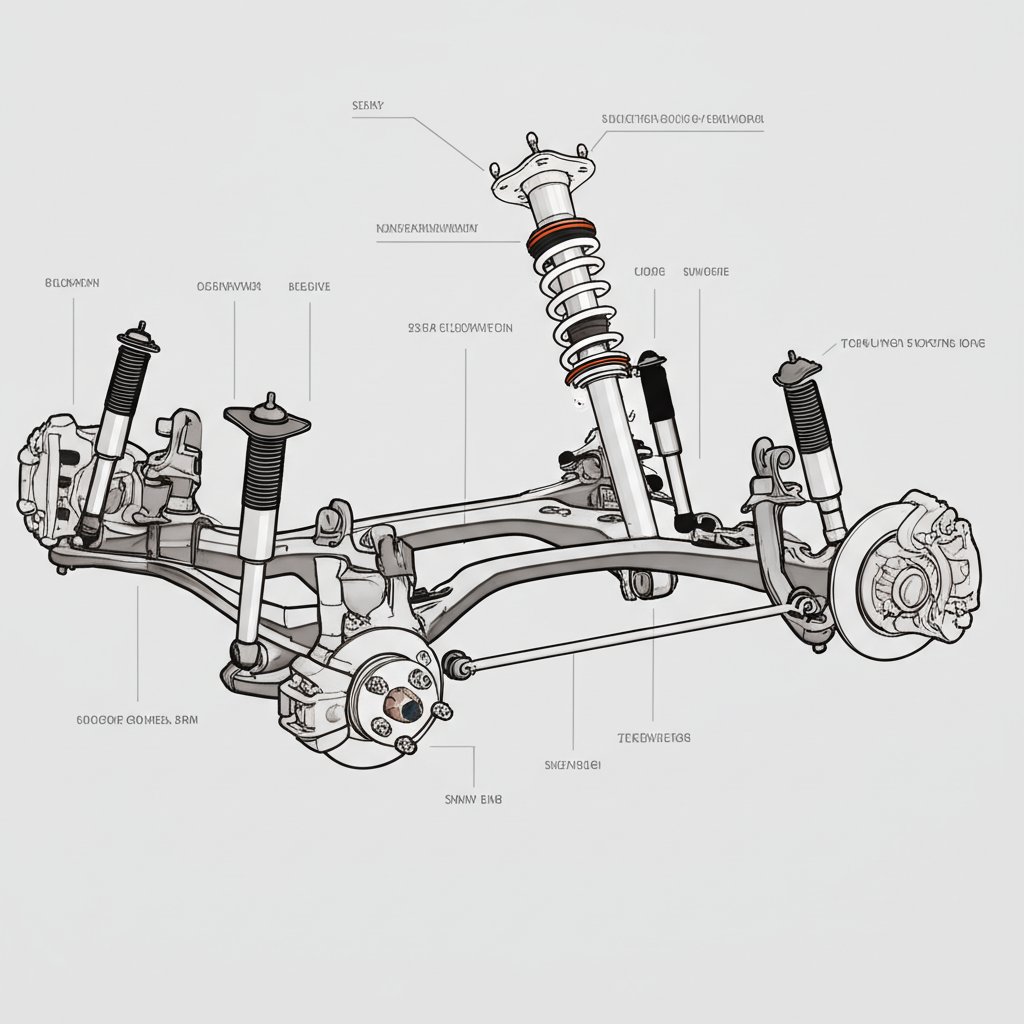
முன் மற்றும் பின் சஸ்பென்ஷன் பொருத்தும் பாகங்களின் அமைப்பியல்
முன் சஸ்பென்ஷன் பாகங்கள் குறித்த அறிமுகம்
உங்கள் காரின் கீழே என்ன இருக்கிறது என்று நீங்கள் எப்போதாவது யோசித்ததுண்டா? அது உங்களை கட்டுப்பாட்டில் வைத்திருக்கும் அதே வேளையில், தொடர்ந்து அதிர்வுகளை உறிஞ்சிக் கொண்டே இருக்கிறது. முன்பக்கத்தில் காணப்படும் காரின் சஸ்பென்ஷன் பாகங்களை இப்போது பார்ப்போம். முன்பக்க சஸ்பென்ஷன் கடினமான பணியை மேற்கொள்கிறது: இது வாகனத்தின் எடையை தாங்குவதுடன், அதிர்வுகளை உறிஞ்சுவது மட்டுமல்லாமல், திசைதிருப்புதல் மற்றும் சீரமைப்பையும் கையாள்கிறது. இந்த காரணத்திற்காகத்தான் சஸ்பென்ஷன் பாகங்களின் வரைபடம் முன்பக்கத்தில் நகரும் பல பாகங்களை கொண்டுள்ளது.
| பகுதியும் | செயல்பாடு | சாதாரண அணிவிக்கப்பட்ட அறிகுறி |
|---|---|---|
| கட்டுப்பாட்டு கோல்கள் | சக்கர ஹப்பை சாசியுடன் இணைக்கிறது, மேலும் கீழ்/மேல் நகர்வை அனுமதிக்கிறது | குமிழ் ஒலி, சீரற்ற டயர் அணிவு, தளர்வான திசைதிருப்புதல் |
| ஸ்ட்ரட்ஸ்/ஷாக்குகள் | சாலை தாக்கங்களை உறிஞ்சி குறைக்கிறது | மோதிக்கொண்டு செல்லுதல், திரவக்கசிவு, கடினமான அல்லது நீந்தும் பயணம் |
| சுருள் வளைவுகள் | வாகனத்தின் எடையை தாங்குதல், மோதல்களை உறிஞ்சுதல் | சாய்தல், கீழ்நோக்கி மோதுதல், சீரற்ற செங்குத்து உயரம் |
| சுவாய் பார் & இணைப்புகள் | திருப்பங்களில் உடல் உருளவில்லை | சத்தம், மோசமான மூலைவிட்ட நிலைத்தன்மை |
| பந்து மூட்டுகள் | திசைதிருப்பி மற்றும் அதிர்ச்சி குறைப்பான் நகர்வுகளுக்கு துருவங்கள் | வெடித்தல், திசைமாறுதல், சீரற்ற டயர் உடைவு |
| டை ராட் முனைகள் | சக்கரங்களுக்கு திசைச் செயலை மாற்றவும் | தளர்ந்த திசைத்திருப்புதல், அதிர்வு, சீரற்ற டயர் உடைவு |
| சக்கர மணிப்பைங்கள் | சக்கரங்கள் சுழல்வதை மென்மையாக்கவும் | உராய்வு ஒலி, சக்கர இடப்பெயர்ச்சி, ABS எச்சரிக்கை |
| புஷிங்ஸ் | இணைப்புகளை மென்மையாக்கவும், அதிர்வைக் குறைக்கவும் | மெல்லிய ஒலி, கடினமான பயணம், சீரமைப்பு இடம்பெயர்தல் |
முன் அதிர்ச்சி நீக்கி வடிவமைப்பு திசைத் திறன்களையும் கையாள வேண்டும். உதாரணமாக, கட்டிருப்புத் தண்டுகளும் பந்து இணைப்புகளும் சக்கரங்கள் மேலும் கீழும் நகர அனுமதிக்கின்றன, ஆனால் திசைதிருப்பும் போது இடதும் வலதும் திரும்புகின்றன. இந்த நெருங்கிய தொடர்பு காரணமாக முன் அதிர்ச்சி நீக்கி பாகங்கள் உடைந்தால் விரைவில் திசைதிருப்பும் பிரச்சினைகளும் சீரற்ற டயர் உடைவும் ஏற்படலாம்.
பின் அதிர்ச்சி நீக்கி பாகங்களின் விரிவான விவரம்
முன் பக்கம் திசைதிருப்புதலைக் கையாண்டாலும், பின் அதிர்ச்சி உறிஞ்சி பாகங்கள் நிலைத்தன்மை, சுமை தாங்கும் தன்மை மற்றும் பிடியை மேம்படுத்துவதில் கவனம் செலுத்துங்கள். பின்புற வடிவமைப்புகள் மாறுபடும்: சில சொகுசுக்காக காயில் ஸ்பிரிங்குகள் மற்றும் ஷாக்குகளைப் பயன்படுத்தும், சில கனமான பயன்பாட்டிற்கு லீஃப் ஸ்பிரிங்குகள் அல்லது டார்சன் பார்களை நாடும்.
| பகுதியும் | செயல்பாடு | சாதாரண அணிவிக்கப்பட்ட அறிகுறி |
|---|---|---|
| காயில்/லீஃப் ஸ்பிரிங்குகள் | எடையை தாங்குங்கள், பின்புற மோதல்களை உறிஞ்சுங்கள் | சாய்தல், கீழ்நோக்கி மோதுதல், சீரற்ற செங்குத்து உயரம் |
| ஷாக்குகள் | பௌன்ஸை கட்டுப்படுத்துங்கள், பயணத்தை நிலைநிறுத்துங்கள் | சிந்துதல், அதிகப்படியான பௌன்ஸ் |
| சுவாய் பார் & இணைப்புகள் | உடல் உருண்டை கட்டுப்படுத்துங்கள், கையாளும் தன்மையை மேம்படுத்துங்கள் | குலைச்சொட்டு ஒலி, குறைந்த கோணத்தில் பிடி |
| பின்புற கைகள்/இணைப்புகள் | அச்சு அமைக்க, சக்கர இயக்கம் நிர்வகிக்க | அலைந்து திரிதல், நிலையற்ற தன்மை |
| புஷிங்ஸ் | சத்தத்தைக் குறைத்தல், அதிர்வுகளை உறிஞ்சுதல் | சிரிப்பு, கடுமையான சவாரி |
| சக்கர மணிப்பைங்கள் | சக்கரங்கள் சீராக சுழல அனுமதிக்கவும் | அரைத்தல், சக்கர விளையாட்டு |
- ஈரப்பதம் மற்றும் சாலை உப்பு காரணமாக கடுமையான காலநிலைகளில் கோல் மூட்டுகள் மற்றும் புஷிங்ஸ் பெரும்பாலும் முதலில் தோல்வியடைகின்றன.
- அதிர்ச்சி மற்றும் ஸ்ட்ரூட்ஸ் காலப்போக்கில் கசிவு அல்லது இழப்பு அடர்த்தி, குறிப்பாக அசுர சாலைகளில்.
- ஸ்வைப் பார் இணைப்புகள் மற்றும் டை ராட் முனைகள் குழிகள் மற்றும் கரையோர தாக்கங்களிலிருந்து உடைந்து போகும்.
சஸ்பென்ஷன் பாகங்கள் விளக்கப்படம்
ஒரு கற்பனை செய்யுங்கள் காரின் சஸ்பென்ஷன் வரைபடம் : முன்புறத்தில், கட்டுப்பாட்டு கோல்கள், ஸ்ட்ரட்கள், மற்றும் திசை திருப்பும் இணைப்புகள் ஒருங்கிணைந்து செயல்படுவதைக் காண்பீர்கள். பின்புறத்தில், குறிப்பிட்ட அச்சினை கட்டுப்படுத்த குறிப்பிட்ட சுருள் சங்கிலிகளுக்கு பதிலாக இலை சுருள்களை பயன்படுத்தலாம், அல்லது பல இணைப்புகளை பயன்படுத்தலாம். ஒவ்வொரு வாகனமும் சற்று வித்தியாசமாக இருந்தாலும், முக்கிய பாகங்கள் ஒரே மாதிரியாக இருக்கும்.
ஒவ்வொரு சஸ்பென்ஷன் பாகங்களின் வரைபடம் உங்கள் காரில் கூடுதல் இணைப்புகள், புஷிங்கள், அல்லது கனமான பின்புற அச்சு இருக்கலாம். உங்கள் உரிமையாளர் கைப்பிடியையோ அல்லது நம்பத்தகுந்த பாகங்கள் பட்டியலையோ சரியான அமைப்புக்காக பார்க்கவும்.
இவற்றை அறியும் தானியங்கி சஸ்பென்ஷன் பாகங்கள் சிக்கல்கள் மிகவும் மோசமாக மாறுவதற்கு முன்பே அவற்றை கண்டறியும் முதல் படி ஆகும். அடுத்த பிரிவில், நீங்கள் அடையாளம் கண்ட பாகங்களுடன் ஒலிகள் மற்றும் கையாளும் சிக்கல்களை இணைப்பது எப்படி என்று கற்றுக்கொள்வீர்கள், இதனால் கண்டறிதல் மிகவும் எளிதாகும்.
உங்கள் சஸ்பென்ஷனில் ஒலிகள், இழுப்புகள், மற்றும் குலுக்கங்களுக்கான கணிசமான வழிகாட்டி
ஒலி-அடிப்படையிலான கணிசம்
உங்கள் காரிலிருந்து ஒரு குலுக்கம், கிரீச்ச், அல்லது தடார் ஒலி கேட்டு அது மிகவும் மோசமானதா என்று நீங்கள் யோசித்திருக்கிறீர்களா? நீங்கள் மட்டுமல்ல. முன் சஸ்பென்ஷன் மற்றும் பின் சஸ்பென்ஷன் பாகங்கள் தவறு ஏதாவது நடக்கும் போது தனித்துவமான ஒலிகளை உருவாக்கலாம். புரிந்து கொள்ள சஸ்பென்ஷன் என்ன செய்கிறது உங்கள் பயணத்தை சுகராகவும், பாதுகாப்பாகவும், நிலையாகவும் வைத்திருத்தல் - உங்களை ஒலிகளை சாத்தியமான பிரச்சினைகளுடன் விரைவாக இணைக்க உதவும்
| அறிகுறி | பொதுவான குற்றவாளிகள் | அடுத்த நல்ல படி |
|---|---|---|
| தடைகளை குலைத்தல் | அழிந்த பந்து மாறும், கட்டுப்பாட்டு கைகள், சீறும் பார் இணைப்புகள் | புஷிங்குகள் மற்றும் மூட்டுகளை ஆய்வு செய்யவும்; ஒலி மூலத்தை சரிபார்க்கவும் |
| குறைந்த வேகத்தில் சத்தம் | உலர்ந்த அல்லது அழிந்த புஷிங்கள், ஸ்டீயரிங் ராட்டுகள் | விரிசல் விழுந்த புஷிங்களைத் தேடவும், மென்மையான தைலமிடலை முயற்சிக்கவும் |
| பிரேக் செய்யும் போது சத்தம் | தளர்ந்த ஸ்ட்ரட் மவுண்டுகள், அழிந்த டை ராட் முனைகள் | நகர்வுக்காக மவுண்டுகள் மற்றும் ஸ்டீயரிங் இணைப்புகளை சரிபார்க்கவும் |
| வேகத்தில் குலைச்சல் | அழிந்த ஷாக்குகள்/ஸ்ட்ரட்ஸ், தளர்ந்த ஹார்டுவேர் | சோக்குகளை சரிபார்க்கவும் மற்றும் அனைத்து பாகங்களையும் பாதுகாப்பாக பொருத்தவும் |
கையாளும் அறிகுறிகள் மற்றும் பொதுவான காரணங்கள்
சில நேரங்களில், உங்கள் காரின் ஒலியைக் கேட்பது மட்டுமல்லாமல், அது எப்படி உணர்கிறது என்பதிலிருந்தும் குறிப்புகள் கிடைக்கின்றன. உங்கள் ஸ்டீயரிங் சக்கரம் விலகிச் செல்வதாகவோ, கார் திசைமாறிச் செல்வதாகவோ, அல்லது நீங்கள் நடுநிலையில் இருந்து விலகி செல்வதாகவோ உணர்ந்தாலோ, அல்லது நீங்கள் தொடர்பில்லாத அதிர்வுகளை உணர்ந்தாலோ, அதற்கான காரணத்தை கண்டறிய ஒரு முன் அதிரிசி சுருள் வரைபடத்தை அல்லது உரிமையாளர் கைப்புத்தகத்தை குறிப்பாக பார்த்து நடவடிக்கை எடுக்கவும்.
- ஸ்டீயரிங் சக்கரம் விலகுதல் அல்லது நடுநிலையில் இருந்து விலகுதல்: சீரற்ற சக்கர சீரமைப்பு, அழிந்து போன டை ராடுகள், அல்லது சீரற்ற டயர் அழுத்தம் இருக்கலாம். இது ஒரு பொட்ஹோல் (சேறு) வழியாக சென்ற பிறகு நிகழ்ந்தால், காரின் முன் அதிரிசி சுருள் மற்றும் சீரமைப்பை சரிபார்க்கவும்.
- வேகத்தில் ஏற்படும் அதிர்வுகள்: சமநிலையற்ற சக்கரங்கள், வளைந்த ரிம்கள், அல்லது அழிந்து போன ஷாக் ஏப்சார்பர்களை குறிக்கலாம். சீரற்ற டயர் அழிவு ஏற்பட்டுள்ளதா என்பதை மறக்கவே வேண்டாம் – இது அதிரிசி சுருள் சரியாக செயல்படவில்லை என்பதற்கான முக்கியமான அறிகுறி.
- சீரற்ற டயர் அழிவு: அடிக்கடி தேய்ந்து போன புஷிங்குகள், பந்து மாண்டுகள், அல்லது சீரமைப்பு பிரச்சினைகளை குறிக்கின்றது பின் சஸ்பென்ஷன் பாகங்கள் அல்லது முன்புறம்.
- மேடுகளுக்கு பின் அதிகமான தொலைவு தொடர்ந்து தாவுதல்: சாக்குகள் அல்லது ஸ்ட்ரட்கள் தேய்ந்து போனதை பொதுவாக குறிக்கின்றது.
ஓட்டுநர் இருக்கையில் அமரும் முன் விரைவான சோதனைகள்
- அறிகுறியை வகைப்படுத்தவும்: இரைச்சல்கள் அல்லது கையாளும் பிரச்சினைகள் ஏற்படும் நேரம் மற்றும் இடத்தை குறித்துக் கொள்ளவும்.
- எளிய சோதனைகள்: சக்கர வளைவுதிசை அழுத்தத்தை ஆய்வு செய்யவும், சாக்/ஸ்ட்ரட் பகுதிகளில் தெரியும் திரவ கசிவுகளுக்கு ஆய்வு செய்யவும், மற்றும் தளர்ந்த லக் நட்களை சரிபார்க்கவும்.
- முன்புறம் மற்றும் பின்புறத்தை பிரித்தறிதல்: சிக்கல் வருவது இதிலிருந்து முன் சஸ்பென்ஷன் அல்லது பின்புறமா? ஒவ்வொரு மூலையையும் தட்டி கவனமாக கேளுங்கள்.
- இணைப்புகள் மற்றும் புஷிங்குகளை ஆய்வு செய்யவும்: விரிசல், வறண்ட அல்லது காணாமல் போன புஷிங்குகள் மற்றும் தளர்ந்த ஸ்டீயரிங் ராடுகளுக்கு ஒரு பொம்மை விளக்கைப் பயன்படுத்தி சோதிக்கவும்.
- தாங்களே செய்வது அல்லது நிபுணரை அழைப்பது: ஸ்டீயரிங்கில் கடுமையான இடைவெளி இருப்பதை நீங்கள் கண்டறிந்தால், அல்லது ஒலிகள் விரைவாக மோசமடைந்தால், உங்கள் காரின் முன் அதிரிசி சுருள் மற்றும் பின்புற பொருத்தங்களை நிபுணர் ஆய்வு செய்வது பாதுகாப்பானது.
நீங்கள் கடுமையான அதிர்வு, ஸ்டீயரிங் இடைவெளி அல்லது திடீரென கையாளும் மாற்றங்களை உணர்ந்தால், வாகனத்தை மேலும் சோதனை ஓட்டம் செய்ய வேண்டாம் - கடுமையான நிலைத்தன்மை அல்லது ஸ்டீயரிங் தோல்வி உங்களை ஆபத்தில் ஆக்கலாம்.
அறிகுறிகளை சாத்தியமான காரணங்களுடன் இணைத்து, ஒரு தர்க்கமான முடிவு பாதையை பின்பற்றுவதன் மூலம், நீங்கள் சிக்கல்களை ஆரம்பத்திலேயே கண்டறிந்து பெரிய பழுதுகளைத் தவிர்க்கலாம். அடுத்த பிரிவில், உங்கள் நிலைத்தன்மையை நீண்ட காலம் ஆரோக்கியமாக வைத்திருக்கும் பராமரிப்பு மற்றும் ஆய்வு முறையை எவ்வாறு உருவாக்குவது என்பதைக் கற்றுக்கொள்வீர்கள்.
நீண்ட காலம் நிலைத்தன்மையை வைத்திருக்க பராமரிப்பு திட்டம் மற்றும் ஆய்வு பட்டியல்
உண்மையில் பயன்படும் ஆய்வு இடைவெளிகள்
கடைசியாக உங்கள் காரின் சஸ்பென்ஷனை நீங்கள் பார்த்தது எப்போது? பெரும்பாலான ஓட்டுநர்களைப் போலவே உங்களுக்கும் நெடுநாளாக இருக்கலாம். இருப்பினும், விலை உயர்ந்த பழுதுபார்ப்புகளைத் தடுப்பதற்கும், உங்கள் பயணத்தை பாதுகாப்பாகவும் சுமுகமாகவும் வைத்துக்கொள்ள தொடர்ந்து பராமரிப்பது மிகவும் முக்கியமானது. உங்கள் முன் பக்க சஸ்பென்ஷன் பாகங்கள் இணைப்புத் தொடரில் முக்கியமான இணைப்புகளாக செயல்படுகின்றன—ஒன்று பலவீனப்பட்டால், முழு அமைப்பும் பாதிக்கப்படும். ஆனால் இந்த பாகங்களை எவ்வளவு தொடர்ந்து ஆய்வு செய்ய வேண்டும்?
உங்கள் சஸ்பென்ஷனை ஆண்டுக்கு ஒருமுறை அல்லது 12,000 முதல் 15,000 மைல்களுக்கு ஒருமுறை ஆய்வு செய்ய தொழில்முறை நிபுணர்கள் பரிந்துரைக்கின்றனர். இருப்பினும், நீங்கள் மோசமான சாலைகளில் பயணிக்கிறீர்கள், கனமான சுமைகளை எடுத்துச் செல்கிறீர்கள் அல்லது பயணத்தின் தரத்தில் மாற்றங்களை கவனிக்கிறீர்கள் எனில், அடிக்கடி ஆய்வு செய்வது நல்லது. டயர்களை சுழற்றும் போது அல்லது பருவகால சேவைகளின் போது ஆய்வுகளை இணைத்துக்கொள்வது, கடைக்கு அதிகமாக செல்லாமல் பிரச்சினைகளுக்கு முன்னால் இருப்பதற்கான நல்ல வழி. [மூலம்]
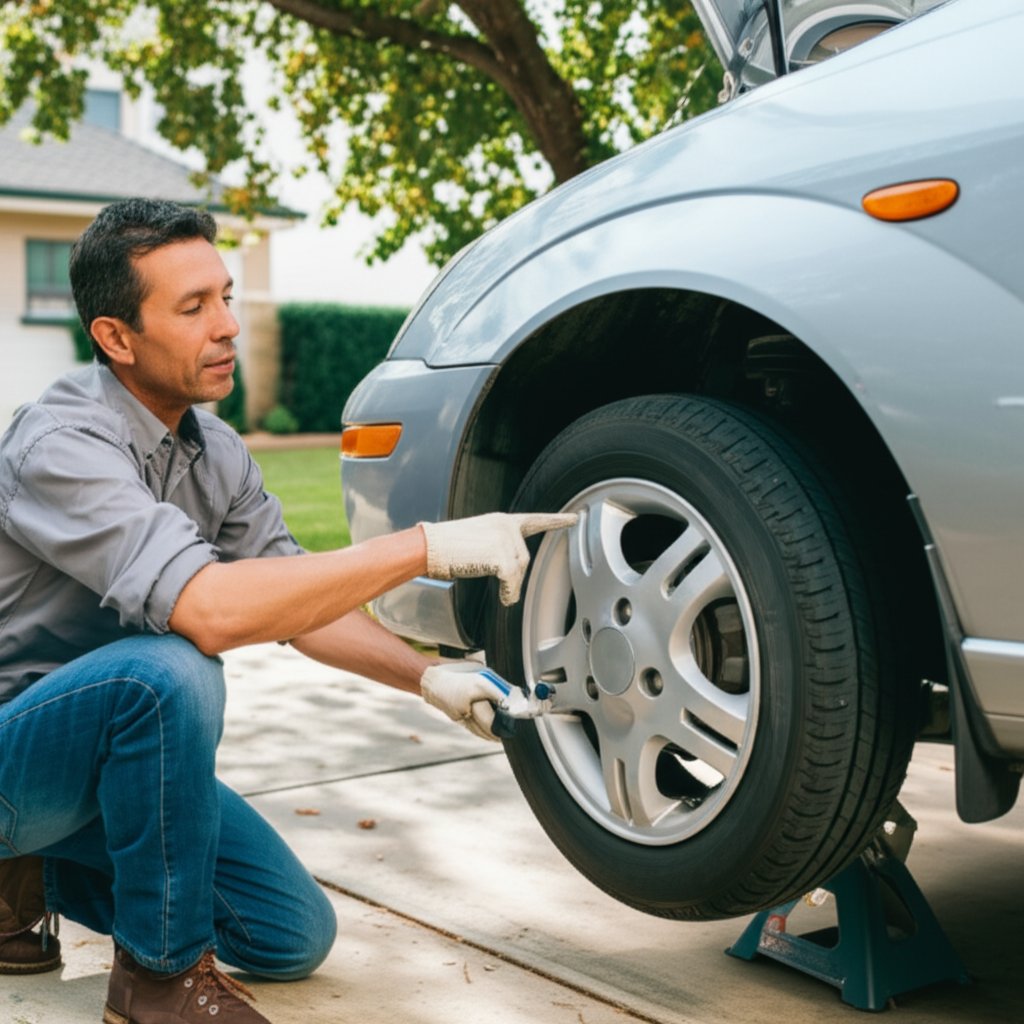
உங்கள் வளாகத்தில் நீங்கள் செய்யக்கூடிய பாகம் ஆய்வுகள்
நீங்கள் எதையாவது தவறவிட்டுவிட்டோமோ என அச்சம்? நீங்கள் வீட்டிலிருந்தே பின்பற்றக்கூடிய ஒரு சிறிய பார்வை சோதனைப் பட்டியல் இதோ, நீங்கள் நிபுணராக இல்லாவிட்டாலும் கூட முன் சஸ்பென்ஷன் பாகங்கள் கண்ணால் சரிபார்க்கலாம் அல்லது நகர்வைக் கண்டறிய மெதுவாக சோதிக்கலாம். ஒரு பேனா விளக்கை எடுத்துக்கொண்டு இவற்றுடன் தொடங்கவும்:
- ஷாக் அல்லது ஸ்ட்ரட்டில் எண்ணெய் கசிவுகளை (ஷாக் உடலுக்கு அருகில் உள்ள ஈரப்பதம் அல்லது கோடுகள்) தேடவும்
- பால் ஜாயிண்டுகள் மற்றும் டை ராட் முனைகளில் உள்ள ரப்பர் பூட்ஸ் கிழிந்து உள்ளதா என ஆய்வு செய்யவும்
- பிளவுபட்ட, பிரிந்து போன அல்லது காணாமல் போன புஷிங்குகளை சரிபார்க்கவும்
- ஸ்வே பார் லிங்க்குகளை அசைக்கவும் - ஏதேனும் தளர்வு இருந்தால் அவை கவனத்தை தேவைப்படுகின்றன
- சீரற்ற டயர் அழிவு அல்லது பீத்தரிங் (feathering) ஆகியவற்றை ஸ்கேன் செய்யவும்
- மெட்டல் பிராக்கெட்டுகள், ஸ்பிரிங்குகள் மற்றும் சஸ்பென்ஷன் ஹார்ட்வேர்
- காரின் ஒவ்வொரு மூலையையும் தூக்கி விடும் போது மெத்தை அல்லது கிளங்கும் ஒலிகளுக்கு காதோடு கேட்கவும்
செயலில் உள்ள அல்லது ஒலி இருப்பதை சரிபார்க்க உங்களை மறக்க விடாதீர்கள் ஸ்டீயரிங் சிஸ்டம் பாகங்கள் இவை பெரும்பாலும் சஸ்பென்ஷன் பாகங்களுடன் மாவுடைய புள்ளிகளை பகிர்ந்து கொள்கின்றன. ஏதேனும் பிரச்சினைகளை கண்டறிந்தால், அவற்றை ஆவணப்படுத்தவும், அதன் தீவிரத்தன்மையை பொறுத்து உங்கள் அடுத்த நடவடிக்கைகளை திட்டமிடவும்.
இப்போது மாற்றவும் அல்லது கண்காணிக்கவும்
ஒவ்வொரு பிரச்சினைக்கும் உடனடி மாற்றம் தேவைப்படுவதில்லை. சில ஆரம்பகால அழிவுகளை கண்காணிக்கலாம், மற்றவை - பாதுகாப்பை பாதிக்கும் பிரச்சினைகள் குறிப்பாக - விரைவான நடவடிக்கையை தேவைப்படுத்தும். உங்கள் முடிவுகளை எடுக்க இந்த அட்டவணையை பயன்படுத்தவும்:
| பகுதியும் | ஆரம்பகால அழிவு அறிகுறி | உடனடித் தன்மை |
|---|---|---|
| ஷாக்/ஸ்ட்ரட் | சிறிய எண்ணெய் கசிவு, மிதமான துள்ளல் | கண்காணிப்பு |
| பந்து இணைப்பு | பூட் பாதிக்கப்பட்டது, சிறிய இடைவெளி | சீரமைப்பு செய்ய வேண்டும் |
| புஷிங் | விரிசல்கள், சிறிய பாதிப்புகள் | கண்காணிப்பு |
| சுவாய் பார் இணைப்பு | தளர்வாக இருத்தல் அல்லது குலுக்கம் | சீரமைப்பு செய்ய வேண்டும் |
| டை ரோடு முனை | தெரிந்த அளவுக்கு அசைவு, பொத்தான் கிழிந்திருத்தல் | பாதுகாப்பற்றது—மாற்ற வேண்டும் |
| சக்கரத் தாங்கி | முரட்டு ஒலி, சக்கர அசைவு | பாதுகாப்பற்றது—மாற்ற வேண்டும் |
| அழுகல் | சாய்வாக இருத்தல், குறுக்கீடு ஏற்பட்ட சுருள் | பாதுகாப்பற்றது—மாற்ற வேண்டும் |
இறுக்குவதற்கு முன், உங்கள் வாகனத்தின் OEM கைப்புத்தகத்தில் உள்ள திருப்புமை அளவுருக்களையும், திருப்புமை-இலக்கு நடைமுறைகளையும் எப்போதும் உறுதிப்படுத்தவும் காரின் சஸ்பென்ஷன் போல்ட்கள் அல்லது எந்த காரின் முன்பக்க பாகங்கள் . ஊகிக்க வேண்டாம்—தவறான இறுக்கம் முன்கூட்டியே தோல்வியடைய அல்லது பாதுகாப்பு ஆபத்துகளுக்கு வழிவகுக்கலாம்.
இறுதியாக, நினைவில் கொள்க: எந்தவொரு சஸ்பென்ஷன் பழுது நீக்கத்திற்குப் பிறகு அல்லது உங்களுக்கு டயர்களில் சாதாரணமற்ற அழிவு தெரியவந்தால், தொழில்முறை சீரமைப்புக்குத் திட்டமிடவும். இது உங்கள் டயர்களையும் உங்கள் முதலீட்டையும் பாதுகாக்கிறது. சஸ்பென்ஷன் ஹார்ட்வேர் மற்றும் ஸ்டீயரிங் கோணங்கள் சரியாக அமைக்கப்பட்டுள்ளன. அடுத்த பிரிவில், சவாரி தரத்தையும் கையாளுதலையும் ஆக்கும் சார்ந்த தொழில்நுட்ப தரவுகளை மேலும் ஆழமாக பார்ப்போம், அதன் மூலம் பழுது நீக்கங்கள் மற்றும் மேம்பாடுகள் குறித்து நீங்கள் தகவல் அடிப்படையிலான முடிவுகளை எடுக்கலாம்.
சவாரி மற்றும் கையாளுதலை ஆக்கும் தொழில்நுட்ப தரவுகள் ஆட்டோமோட்டிவ் சஸ்பென்ஷனில்
ஸ்பிரிங் விகிதம் மற்றும் டேம்பிங் பற்றிய புரிதல்
சில கார்கள் மேடுகளை தாண்டி செல்லும் போது மற்றவை ஒவ்வொரு கற்களையும் உணர்கின்றன என்று நீங்கள் யோசித்ததுண்டா? பதில் பின்னால் உள்ள தொழில்நுட்ப தரவுகளில் உள்ளது ஆட்டோமோட்டிவ் சஸ்பென்ஷன் பாகங்கள்—குறிப்பாக ஸ்பிரிங்குகள் மற்றும் டேம்பர்கள். உங்கள் சவாரி தரத்திற்கும் கட்டுப்பாட்டிற்கும் இந்த எண்கள் என்ன பொருள் என்பதை பார்ப்போம்.
ஸ்பிரிங் விகிதம் ஒரு சுருளை குறிப்பிட்ட அளவு சுருக்க தேவையான விசை ஆகும். அதிக சுருள் விகிதம் என்பது கடினமான செயல்திறன் (குறைவான உடல் உருண்டை, அதிக கருத்துத் தெரிவித்தல்) என்பதை குறிக்கிறது, அதே நேரத்தில் குறைவான விகிதம் முட்டுகளை உறிஞ்சுகிறது, ஆனால் மிதக்கும் உணர்வை ஏற்படுத்தலாம். இலவச நீளம் சுருள் சுருங்காத உயரம், மற்றும் முன்னோட்டம் எந்த சுமையும் இல்லாமல் முன்பே பயன்படுத்தப்படும் இழுவிசை, ஆரம்ப கடினத்தன்மையை பாதிக்கிறது. பயண சஸ்பென்ஷன் முடிவுறும் வரை எவ்வளவு தூரம் நகர முடியும் என்பது - ஆறுதலுக்கும், ஆஃப்-ரோடு பயன்பாட்டின் போது அல்லது ஒரு போன்ற மேம்பாடுகளை பயன்படுத்தும் போது சேதத்தை தவிர்ப்பதற்கும் இது முக்கியம் பில்ஸ்டீன் லெவலிங் கிட் அல்லது ஐபாக் ஸ்போர்ட்லைன் லோயரிங் ஸ்பிரிங்ஸ் .
டாம்பர்கள், அல்லது ஷாக்குகள், சஸ்பென்ஷன் எவ்வளவு விரைவாக நகர்கிறது என்பதை கட்டுப்படுத்துகின்றன. அவை இரண்டு முக்கிய அமைப்புகளைக் கொண்டுள்ளன: சுருக்கம் (தடைகளை உறிஞ்சுதல்) மற்றும் மீள் திரும்புதல் (நிலைக்குத் திரும்புதல்). வேகத்துடன் இந்த விசைகள் எவ்வாறு மாறுகின்றன என்பதை வால்வு செயல்பாடு . குறைவான வால்வு செயல்பாடு சௌகரியத்திற்காக குறைந்த வேகங்களில் நிறைய கட்டுப்பாட்டை வழங்குகிறது, பின்னர் பெரிய தாக்கங்களை உறிஞ்ச அதிக வேகத்தில் மென்மையாகிறது. நேரியல் வால்வு செயல்பாடு அனைத்து வேகங்களிலும் தொடர்ந்து எதிர்வினை ஆற்றுகிறது, இது போட்டி அல்லது செயல்திறன் பயன்பாட்டிற்கு ஏற்றதாக அடிக்கடி தெரிவு செய்யப்படுகிறது.
- முன்புறத்தில் ஸ்பிரிங் விகிதம் அல்லது சொரிபார் கடினத்தன்மையை அதிகரிப்பது அண்டர்ஸ்டீரை அதிகரிக்கிறது (கார் திரும்ப மறுக்கிறது).
- பின்புறத்தை கடினப்படுத்துவது இதற்கு நேரெதிரானது, ஓவர்ஸ்டீரை அதிகரிக்கிறது (பின்புறம் எளிதாக நழுவுகிறது).
- மென்மையான அமைப்புகள் பொதுவாக வசதியை மேம்படுத்துகின்றன, ஆனால் துல்லியமான கையாளுதல் அல்லது டயர் பிடிப்பை இழக்கலாம்.
மோனோடியூப் மற்றும் ட்வின்-டியூப் ஷாக்குகள்
சரியான ஷாக் ஏற்பான் வடிவமைப்பைத் தேர்வு செய்வது முக்கியமானது சஸ்பென்ஷன் மேம்பாடுகள் — ஆனால் உண்மையான வேறுபாடு என்ன? அவை வெப்பத்தையும், அழுத்தத்தையும், பேக்கேஜிங்கையும் எவ்வாறு கையாளுகின்றன என்பதில் இது அமைகிறது:
| ஷாக் வகை | வெப்பம் சிதறல் | பேக்கேஜிங் | சாதாரண பயன்பாடு |
|---|---|---|---|
| மோனோடியூப் | சிறந்தது (பெரிய பரப்பளவு, குறைவான மங்குதல்) | அதிக இடம் தேவை, நெகிழ்வான மவுண்டிங் | செயல்திறன், பந்தயம், கஸ்டம் கட்டுமானங்கள் |
| இரட்டை-குழாய் | தினசரி பயன்பாட்டிற்கு ஏற்றது, கடினமான பயன்பாட்டில் மங்கலாகும் போக்கு | சிறியது, பெரும்பாலான OEM இடங்களுக்கு பொருந்தும் | வசதி, OE மாற்று, பட்ஜெட் கட்டுமானங்கள் |
மோனோடியூப் ஷாக்குகள் எண்ணெயையும் வாயுவையும் ஒரு திரவந்தன்மை பிஸ்டன் மூலம் பிரித்து, வளைவுதலைத் தடுத்து, தொடர்ந்து குஷனிங் வழங்குகின்றன—கடுமையான ஓட்டுதல் அல்லது ஆஃப்-ரோடு பயன்பாடுகளில் கூட. இதனால்தான் பில்ஸ்டீன் 6112 அல்லது பில்ஸ்டீன் pss10 தீவிரமான பயன்பாடுகளுக்கு அடிக்கடி தேர்ந்தெடுக்கப்படும். இரட்டை-குழாய் ஷாக்குகள், இதற்கிடையில், மலிவானவை மற்றும் தினசரி ஓட்டத்தில் சிறப்பாக செயல்படுகின்றன, ஆனால் எண்ணெய் நுரைத்தல் மற்றும் வெப்பம் உருவாவதால் கடினமாக இயங்கும் போது மங்கலாகும் போக்கு கொண்டவை.
புஷிங் பொருள் தெரிவுகள் மற்றும் ஓட்டம் தரம்
இது சுருள்கள் மற்றும் ஷாக்குகள் மட்டுமல்ல—புஷிங்குகளும் முக்கிய பங்கு வகிக்கின்றன. புஷிங் டியூரோமீட்டர் (கடினத்தன்மை) எந்த அளவு நெகிழ்வு மற்றும் குலைப்பை உறிஞ்சுகிறது என்பதை பாதிக்கிறது. மென்மையான (ரப்பர்) புஷிங்குகள் அமைதியாகவும், வசதியாகவும் இருக்கின்றன, அதே நேரத்தில் கடினமான (பாலியூரிதேன்) புஷிங்குகள் பதிலளிக்கும் தன்மையை மெருகூட்டுகின்றன, ஆனால் சாலை சத்தத்தை மேலும் பரப்பலாம். கடினமான புஷிங்குகளை மேம்படுத்துவது செயல்திறன் ஓட்டத்திற்கான பொதுவான நடவடிக்கையாக இருக்கிறது, ஆனால் அது தினசரி பயணங்களை கடினமாக்கலாம். சவாரி அமைப்புகள் மற்றொரு காரணி
என்னவென்றால்: சுருள்களால் (சக்கரங்கள், பிரேக்குகள், சில சஸ்பென்ஷன் பாகங்கள்) ஆதரிக்கப்படாத எடை. ஆதரிக்கப்படாத நிறையை குறைப்பது சஸ்பென்ஷன் விரைவாக பதிலளிக்க உதவுகிறது, பிடிப்பையும், பயண தரத்தையும் மேம்படுத்துகிறது. கருத்தில் கொள்ளும் போது அணில் நிறை எப்போதும் இலேசான, கடினமான பாகங்களின் நன்மைகளை வசதி மற்றும் நிலைத்தன்மையுடன் சேர்த்து கருதுங்கள். சஸ்பென்ஷன் மேம்பாடுகள் சமநிலையான அமைப்பிலிருந்து கிடைக்கும் மிகப்பெரிய நன்மைகள் - உங்கள் ஓட்டுநர் பாணிக்கு ஏற்ப ஸ்பிரிங்குகள், டேம்பர்கள், புஷிங்குகள் மற்றும் சீரமைப்பு அமைப்புகளை பொருத்துவது. ஒற்றை பாகத்தை மாற்றுவது தனியாக அதிசயத்தை வழங்குவதில்லை.
எனவே, நீங்கள் ஒரு பார்வையிடும் போது
அதிக தெளிவுக்கு பில்ஸ்டீன் லெவலிங் கிட் விளையாட்டு உணர்வுக்கு, அல்லது முழு காய்லோவர் ஐபாக் ஸ்போர்ட்லைன் லோயரிங் ஸ்பிரிங்ஸ் தொகுப்பு சஸ்பென்ஷன் மேம்பாடுகள் விரும்பும் பில்ஸ்டீன் 6112 அல்லது பில்ஸ்டீன் pss10 , உங்கள் இலக்குகளை பொறுத்து சரியான கலவை இருக்கும்-தினசரி வசதி, உற்சாகமான சாலை ஓட்டம், ஆஃப்-ரோடு சாகசம் அல்லது இழுப்பு. அடுத்ததாக, நாம் DIY படிகளையும், நிபுணரை அழைக்க வேண்டிய நேரத்தையும் நிறுவலுக்கு விவரிப்போம், எனவே நீங்கள் அந்த மேம்பாடுகளை நம்பிக்கையுடன் செய்யலாம்.
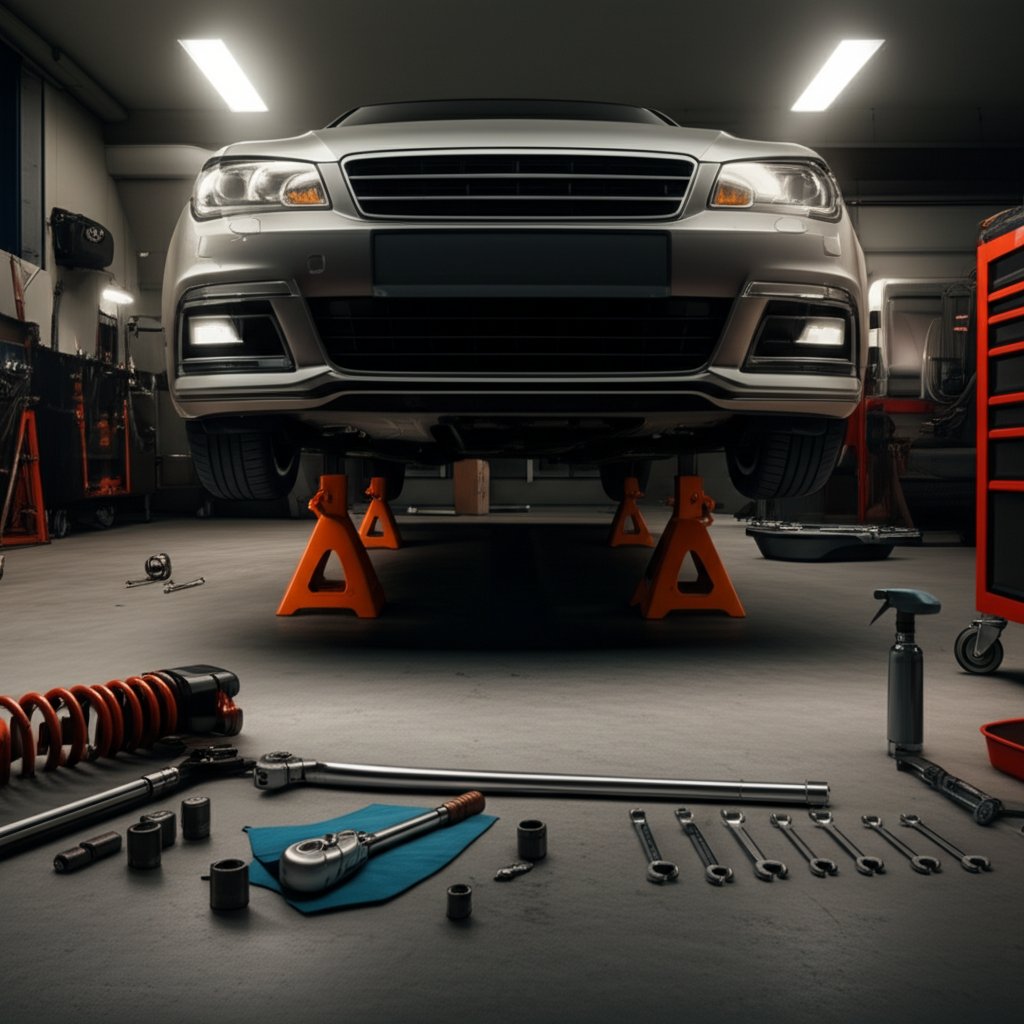
கார் சஸ்பென்ஷன் மாற்றத்திற்கு DIY படிகள் மற்றும் தொழில்முறை சேவை எல்லைகள்
DIY சஸ்பென்ஷன் பணிக்கான கருவிகள் மற்றும் தயாரிப்பு
நீங்கள் உங்கள் காரின் சஸ்பென்ஷனை மாற்ற தனிப்பட்ட முறையில் செய்ய நினைக்கிறீர்களா? ஒரு போல்ட் தளர்த்துவதற்கு முன், உங்கள் வாகனம் பாதுகாப்பாக ஆதரிக்கப்படுகிறது, உங்கள் கருவிகள் எட்டக்கூடியதாக இருக்கின்றன, மேலும் ஒவ்வொரு படியிலும் என்ன செய்ய வேண்டும் என்பதை நீங்கள் தெளிவாக அறிவீர்கள். இது ஒரு சிக்கலில்லா பழுதுக்கும், எரிச்சலூட்டும் நாளுக்கும் அல்லது மோசமாக, பாதுகாப்பு அபாயத்திற்கும் இடையிலான வித்தியாசம். இதை செய்வதற்கு முன் உங்களுக்கு தேவையானவை இவை தானியங்கி முன் சஸ்பென்ஷன் அல்லது முன் பக்க கார் பாகங்கள் :
- பாரம் தாங்கும் ஜாக் நிலைகள் (ஒருபோதும் ஜாக் மட்டும் மீது நம்பிக்கை வைக்க வேண்டாம்)
- திருகு குறடு ( சஸ்பென்ஷன் போல்டுகள் )
- உறுதியான பொருத்துதல்களுக்கு உடைப்பான் பார்
- சுருள் கம்பிகளுடன் கொண்ட ஸ்ட்ரட் பொருட்களுக்குத் தேவையான ஸ்பிரிங் கம்பியர்
- செங்குத்தான எண்ணெய் (செங்குத்தான பொருத்துதல்களை நீக்க உதவும்)
- தனிப்பட்ட பாதுகாப்பு உபகரணங்கள் (PPE): கையுறைகள் மற்றும் பாதுகாப்பு கண்ணாடிகள்
- சக்கர தடைகள் (உருள்வதைத் தடுக்க)
எப்போதும் சக்கரங்களைத் தடுமாறச் செய்து, உங்கள் ஜாக் நிலைகள் உறுதியான, சமதள நிலத்தில் உள்ளதை இருமுறை சரிபார்க்கவும். உங்கள் வாகனத்தின் சஸ்பென்ஷன் மவுண்ட் இடங்கள் அல்லது தூக்கும் புள்ளிகள் பற்றி உங்களுக்கு சந்தேகம் இருந்தால், வழிகாட்டுதலுக்காக உரிமையாளர் கைப்புத்தகத்தையோ அல்லது ஒரு உரிமம் பெற்ற பழுதுபார்ப்பு தரவுத்தளத்தையோ அணுகவும். [மூலம்]
ஷாக் மற்றும் ஸ்ட்ரட் மாற்றும் படிகள்
உங்கள் கைகளை வேலையில் ஈடுபடுத்த தயாரா? இரண்டு பொதுவான வேலைகளுக்கான உயர் நிலை விளக்கம் இதோ - ஷாக் பாகங்களையும் ஸ்ட்ரட் பொருட்களையும் மாற்றுவது. இந்த செயல்முறை நேர்மையாகத் தெரியலாம், ஆனால் சிறிய தவறுகள் பெரிய பிரச்சினைகளுக்கு வழிவகுக்கலாம், எனவே முறையாக வேலை செய்து, ஒவ்வொரு படியையும் இருமுறை சரிபார்க்கவும்.
ஷாக் மாற்றுதல் (தனித்து நிற்கும் ஷாக்குகள்):
- சக்கரங்களைத் தடுமாறச் செய்து, சரியான புள்ளியில் வாகனத்தைத் தூக்கவும். ஜாக் நிலைகளுடன் உறுதியாக ஆதரவளிக்கவும்.
- சக்கரத்தை தளர்த்தி நீக்கவும், ஷாக்கை அணுகவும்
- ஷாக் உடலிலிருந்து ஏபிஎஸ் சென்சார் வயர்கள் அல்லது பிரேக் லைன்களை பிரிக்கவும் - திரவ வளைவுகளை குறிப்பிடப்பட்டிருந்தால் மட்டுமே பிரிக்கவும்
- ஷாக்கிலிருந்து கீழ் மற்றும் மேல் மவுண்டிங் பொல்ட்களை நீக்கவும் (இங்கு ஒரு பிரேக்கர் பார் மற்றும் ஊடுருவும் எண்ணெய் உதவும்)
- பழைய ஷாக்கை நீக்கவும், நீளம் மற்றும் மவுண்ட் வகைக்காக புதியதுடன் ஒப்பிடவும்
- கீழே முதலில் பொருத்தி, பின்னர் மேலே புதிய ஷாக்கை நிறுவவும். பொல்ட்களை முதலில் கையால் இறுக்கவும்
- எல்லா வயரிங்களையும் அல்லது பிராக்கெட்டுகளையும் மீண்டும் இணைக்கவும். உங்கள் வாகனத்தின் சேவை கைப்புத்தகத்தில் காணப்படும் மதிப்புகளுக்கு ஏற்ப எல்லா பொல்ட்களையும் டோர்க் செய்யவும்
- சக்கரத்தை மீண்டும் பொருத்தவும், காரை கீழே இறக்கவும், அனைத்து பாகங்களையும் மீண்டும் சரிபார்க்கவும்
ஸ்ட்ரட் அல்லது கன்ட்ரோல் ஆர்ம் புஷிங் மாற்று (அதிக சிக்கல்):
- அகற்றுவதற்கு முன் கேம்பர் பொல்ட் நிலைகளை குறிக்கவும் - இது சீராக்கத்தை பாதுகாக்க உதவும்
- ஜாயிண்ட் அல்லது ஹப்பை ஒரு ஜாக்கால் ஆதரிக்கவும், பிரேக் லைன்கள் அல்லது ஸ்டீயரிங் ராட்களுக்கு ஏற்படும் வினையை தடுக்கவும்
- ஸ்ட்ரட் சேஸிசை நீக்குவதற்கு முன் காயில் ஸ்பிரிங்கை பாதுகாப்பாக சுருக்க ஸ்பிரிங் காம்பிரசரை பயன்படுத்தவும். தகுந்த கருவியை பயன்படுத்தாமல் இதை முயற்சிக்க வேண்டாம்.
- சஸ்பென்ஷன் பொல்ட்களை நீக்கி ஸ்ட்ரட் அல்லது கன்ட்ரோல் ஆர்மை கவனமாக எடுத்து விடவும்.
- புஷிங்கை மாற்றினால், பழையவற்றை வெளியேற்றி குறிப்பிட்டுள்ளபடி புதியவற்றை பொருத்தவும்.
- மாற்றி அமைக்கும் போது அனைத்து பாகங்களும் (சஸ்பென்ஷன் மவுண்ட் உட்பட) குறிக்கப்பட்டுள்ளவாறு சீராக பொருந்துவதை உறுதி செய்யவும்.
- அனைத்து முக்கியமான பொல்ட்களின் இறுதி டொர்க் செய்வதற்கு முன் வாகனத்தை கீழே இறக்கவும், இதன் மூலம் சஸ்பென்ஷன் இயல்பான ரைட் உயரத்தில் இருக்கும். இது புஷிங் பிரீலோட் மற்றும் முன்கூட்டியே அழிவை தடுக்கிறது.
- எந்தவொரு ஸ்ட்ரட் அல்லது முக்கியமான புஷிங் மாற்றத்திற்கு பிறகும், தொழில்முறை சீராக்கத்தை நியமிக்கவும், இதன் மூலம் தொழிற்சாலை வடிவமைப்பு மீண்டும் பெறப்படும்.
எச்சரிக்கை: காயில் ஸ்பிரிங்குகள் மிகப்பெரிய அளவிலான ஆற்றலை சேமித்து வைக்கின்றன. ஸ்பிரிங் காம்பிரசரை தவறாக பயன்படுத்துவது கடுமையான காயங்களை ஏற்படுத்தலாம். ஏர் சஸ்பென்ஷன் அல்லது உயரம் சென்சார்களுடன் கூடிய வாகனங்கள் சிறப்பு நடைமுறைகளை தேவைப்படலாம் - உங்களுக்கு சந்தேகம் இருந்தால் தொழில்முறை நிபுணரை அணுகவும்.
தொழில்முறை உதவி தேவைப்படும் சிவப்பு கொடி அறிகுறிகள்
சில வேலைகளை அனுபவம் வாய்ந்தவர்களிடம் ஒப்படைப்பது நல்லது. இவற்றுள் ஏதேனும் உங்களுக்கு நேர்ந்தால், தொழில்முறை மெக்கானிக்கை அழைக்க நேரம் ஆகிவிட்டது:
- உறைந்து போனது அல்லது துருப்பிடித்தது சஸ்பென்ஷன் போல்டுகள் உடைந்து போகும் ஆபத்துள்ள பகுதிகள்
- ஏர்பேக் சஸ்பென்ஷன் அல்லது எலெக்ட்ரானிக் ரைடு ஹைட் சிஸ்டங்கள் பற்றிய அறிவின்மை
- டார்க் ஸ்பெசிபிகேஷன்கள், இறுக்கும் வரிசை அல்லது சஸ்பென்ஷன் வடிவவியல் பற்றிய சந்தேகம்
- முக்கியமான துருப்பிடிப்பு அல்லது முன் பக்க கார் பாகங்கள் அல்லது சட்டத்திற்கு
- ஸ்ட்ரட்டை சேமிக்கும் போது ஸ்பிரிங் காம்ப்ரசர் இல்லாமை
- இந்த வேலை உங்கள் கருவிகளின் தொகுப்பிற்கும் அல்லது உங்கள் ஆறுதல் நிலைக்கும் அப்பாற்பட்டது என்பதற்கான எந்த அறிகுறி
மிகவும் அனுபவம் வாய்ந்த DIY நிபுணர்களுக்கும் சில சமயங்களில் உதவி தேவைப்படும் - குறிப்பாக சிக்கலானவற்றை கையாளும் போது தானியங்கி முன் சஸ்பென்ஷன் வேலைகள் அல்லது சிக்கலான ஷாக் பாகங்கள். சந்தேகம் இருப்பின், உங்கள் ஊதிய விலைகளை பல இடங்களில் இருந்து பெற்று, அதை உங்களால் செய்யும் நேரம், செலவு மற்றும் ஆபத்துடன் ஒப்பிடுங்கள். மேலும் உங்கள் வாகனத்தின் அதிகாரப்பூர்வ சீரமைப்பு விரிவான வழிமுறைகளை மட்டுமே அனைத்து டார்க் மதிப்புகளையும் சரிபார்க்கவும், பொதுவான வழிகாட்டிகளை அல்ல.
அடுத்ததாக, சஸ்பென்ஷன் கிட்களுக்கு நல்ல வாங்கும் முடிவுகளை எடுப்பது மற்றும் பழுதுபார்ப்பதன் உண்மையான செலவை மதிப்பிடுங்கள் - இதன் மூலம் உங்கள் பட்ஜெட்டை நம்பிக்கையுடன் திட்டமிடலாம் மறைக்கப்பட்ட ஆச்சரியங்களை தவிர்க்கலாம்.
பாகங்கள் மற்றும் கிட்களுக்கான நல்ல வாங்குதல் மற்றும் செலவு மதிப்பீடு
உங்கள் தேவைகளுக்கு OEM அல்லது ஆஃப்டர்மார்க்கெட் தேர்வு செய்தல்
உங்கள் மெக்கானிக் புதிய சஸ்பென்ஷன் பாகங்கள் தேவை என்று கூறும் போது, நீங்கள் யோசிக்கலாம்: அசல் உபகரணம் (OEM) பாகங்களுடன் நீங்கள் தொடர வேண்டுமா, அல்லது ஆஃப்டர்மார்க்கெட் பாகங்கள் பாதுகாப்பானவை மற்றும் சிறப்பானவையா? சிக்கலாக இருக்கிறதா? விரிவாக பார்க்கலாம். உங்கள் வாகனத்தயாரிப்பாளரால் வடிவமைக்கப்பட்டு சோதிக்கப்பட்ட OEM பாகங்கள், தொழிற்சாலை பொருத்தம் மற்றும் பாதுகாப்பான செல்லும் தன்மையை உறுதி செய்கின்றன. ஆனால் ஆஃப்டர்மார்க்கெட் சஸ்பென்ஷன் பிராண்டுகள் பெரும்பாலும் அறியப்பட்ட பலவீனங்களை முக்கியத்துவம் கொடுக்கின்றன, மேம்பட்ட நிலைத்தன்மையை வழங்குகின்றன, மற்றும் சில நேரங்களில் கிரீஸபிள் ஜாயிண்டுகள் அல்லது மேம்பட்ட பூச்சுகள் போன்ற அம்சங்களையும் வழங்குகின்றன. நீங்கள் கடுமையான குளிர்காலங்களில் அல்லது மோசமான சாலைகளில் வாகனம் இயக்கினால், ஆஃப்டர்மார்க்கெட் மேம்பாடுகள் அசலை விட நீடித்து நிலைக்கலாம், நீங்கள் நீண்டகாலத்தில் பணத்தை சேமிக்கலாம்.
| வகை | பொருத்தம் நம்பகத்தன்மை | உத்தரவாதம் | செல்லும் தரம் குவியம் | சாதாரண பயன்பாடு |
|---|---|---|---|---|
| OEM | உறுதியான தொழிற்சாலை பொருத்தம் | அடிக்கடி 1-ஆண்டு, அசலை போலவே | வசதி மற்றும் தொடர்ச்சி | தினசரி இயக்கம், உத்தரவாதத்தின் கீழ் |
| அப்பக்பாட்டரி சந்தை | அதிகம் (பிராண்டுகளை பொறுத்து மாறுபடும்) | 1-ஆண்டு முதல் ஆயுட்காலம் வரை உள்ளது | நிலைத்தன்மை அல்லது கையாளும் தன்மையை மேம்படுத்தலாம் | மதிப்பு, நீடித்த பயன்பாடு, தனிபயன் தேவைகள் |
| செய்தித்தொகுப்பு கிட் | வாகனத்திற்கு ஏற்ப, சீராக்கம் தேவைப்படலாம் | பொதுவாக குறைவாகவே இருக்கும், ஆனால் கிட் உள்ளடங்கும் | மேம்பட்ட பிடிப்புத்தன்மை, சீரமைக்கக்கூடியது | விளையாட்டு, ஆஃப்-ரோடு, கனமான இழுவை |
ஓஇஎம் (OEM) பாகங்கள் விலை அதிகமாக இருக்கலாம், மேலும் ஒரு பாகம் மட்டும் அழிந்தாலும் சில சமயங்களில் முழு பொருத்தம் வாங்க வேண்டியிருக்கலாம். ஆஃப்டர்மார்கெட் மற்றும் செய்தித்தொகுப்பு கிட் கள் உங்களுக்கு தேவையான பாகங்களை மட்டும் மாற்றவோ அல்லது மேம்பாடு செய்யவோ உதவும் முழுமையான சஸ்பென்ஷன் கிட் தனிபயனாக்கப்பட்ட சவாரி அனுபவத்திற்கு. உங்கள் VIN அல்லது உற்பத்தியாளரின் பட்டியலை பயன்படுத்தி ஒப்புதல் சோதனை செய்யவும், ஏனெனில் முனைம பிராண்டுகளை சேர்ந்த சஸ்பென்ஷன் பிராண்டுகள் சிறிய பொருத்தம் வேறுபாடுகள் இருக்கலாம்.
எந்த ஊகங்களும் இல்லாமல் ஒரு நிலையான பட்ஜெட்டை உருவாக்கவும்
ஓரமானது எவ்வளவு செலவாகும்? உங்கள் வாகனம், பாகங்களின் தேர்வு மற்றும் உழைப்பு விகிதங்களைப் பொறுத்து இது மாறுபடும். அடிப்படை கார்களுக்கு, ஒவ்வொரு பாகத்திற்கும் $150 முதல் $800 வரை செலுத்த வேண்டியிருக்கும், ஆனால் முழுமையான முன் ஓரம் கிட் அல்லது பிரீமியம் மேம்பாடு ஒரு சக்கரத்திற்கு $1,000 க்கு மேல் ஓரம் அமைப்பின் விலையை உயர்த்தலாம், முக்கியமாக விருந்தோம்பல் அல்லது செயல்திறன் மாதிரிகளுக்கு. [மூலம்] உழைப்புச் செலவுகளும் உள்ளூர் சந்தை விகிதங்களும் முக்கிய பங்கு வகிக்கின்றன, எனவே சுற்றி வாங்குவது நல்லது. ஆச்சரியங்களைத் தவிர்க்க இங்கே ஒரு படிப்படியான அணுகுமுறை உள்ளது:
- உள்ளூர் கடைகளிலிருந்து குறைந்தது மூன்று மதிப்பீடுகளைச் சேகரிக்கவும் - பாகங்கள், உழைப்பு மற்றும் சீரமைப்பு வகையில் உடைப்புகளைக் கேள்வி.
- பாகங்கள், பொருத்தங்கள், மாட்கள், தொடர்புச் சாதனங்கள் மற்றும் பரிந்துரைக்கப்பட்ட மேம்பாடுகள் உட்பட அனைத்து தேவையான பாகங்களையும் பட்டியலிடவும்.
- முக்கிய ஓரம் பணிகளுக்குப் பிறகு பெரும்பாலும் தேவைப்படும் தொழில்முறை சீரமைப்பின் செலவைச் சேர்க்கவும்.
- சிக்கிய பொருத்தங்களுக்கான கணிசமான தொகையையும் எதிர்பாராத பழுதுபார்ப்புகளையும் சேர்க்கவும் - துருப்பிடித்த போல்டுகள் உழைப்பின் மணிநேரங்களை அதிகரிக்கலாம்.
குறிப்பிடத்தக்க விலை மட்டுமல்ல இதன் விலை என்பதை நினைவில் கொள்ளுங்கள் சஸ்பென்ஷன் விலை உத்தரவாத காலம், எதிர்பார்க்கப்படும் ஆயுள், மற்றும் மீண்டும் மீண்டும் சீரமைப்புகளின் ஆபத்து ஆகியவற்றை கணக்கில் எடுத்துக்கொண்டால் நீங்கள் சிறப்பான முதலீடு செய்யலாம்.
முழுமையான சஸ்பென்ஷன் கிட் ஒரு சிறப்பான முடிவாக இருக்கும் போது
ஒரு சஸ்பென்ஷன் கிட் ஐ வாங்கவா அல்லது தனித்தனியான பாகங்களை ஒன்றாக இணைக்கவா என்று நீங்கள் யோசித்திருக்கிறீர்களா? உங்கள் கார் மைலேஜ் அதிகமாக இருந்தாலோ அல்லது பெரிய மேம்பாட்டை திட்டமிடுகிறீர்கள் என்றாலோ, ஒரு முழுமையான சஸ்பென்ஷன் கிட் சஸ்பென்ஷன் கிட் உங்களுக்கு செலவு மிச்சம் தரும். இது பாகங்கள் பொருத்தமின்மை ஏற்படும் ஆபத்தையும் குறைக்கும். கிட்களில் ஷாக்கர்கள், ஸ்ட்ரட்கள், சுருள்வில்கள், மவுண்டுகள் மற்றும் ஹார்ட்வேர் ஆகியவை அடங்கும். இதன் மூலம் கடைக்கு செல்லும் எண்ணிக்கை குறையும் மற்றும் பொருத்துவது எளிதாக இருக்கும். மேலும், அனைத்து பாகங்களுக்கும் ஒரே உத்தரவாதம் கிடைக்கும். இதன் மூலம் எதிர்காலத்தில் உத்தரவாத கோரிக்கைகளை எளிதாக மேற்கொள்ளலாம்.
- மீண்டும் மீண்டும் உபயோகிக்க முடியாத பொருத்தும் பாகங்கள், மவுண்டுகள் மற்றும் புஷிங்களை ஒன்றாக மாற்றவும், மீண்டும் வேலை செய்யும் சிரமத்தை தவிர்க்கவும்.
- உங்கள் வாகனத்திற்கு தேவையான அனைத்து ஹார்ட்வேர்களையும் உங்கள் கிட் கொண்டுள்ளதா என்பதை கேள்வி.
- நிலைப்பாட்டு ஷிம்கள் அல்லது நிறுவலுக்குத் தேவையான சிறப்புக் கருவிகள் உள்ளதைச் சரிபார்க்கவும்.
- உங்கள் VIN அல்லது நம்பகமான பாகங்கள் பட்டியலைப் பயன்படுத்தி ஒப்புதல் தன்மையைச் சரிபார்க்கவும்.
முன் அதிர்வு தடுப்பு கிட் அல்லது முழு கிட்டில் பாகங்களை ஒன்றாக இணைப்பது வேலை மணிநேரங்களைக் குறைக்கும் மற்றும் தவறவிடப்பட்ட அல்லது பொருந்தாத பாகங்களால் வரும் விலை உயர்ந்த மீண்டும் வரும் சேதத்தைத் தடுக்க உதவும்.
நீங்கள் ஒரு தினசரி ஓட்டுநரை பராமரிப்பதாக இருந்தாலும் அல்லது மாற்றியமைக்கப்பட்ட பயணத்தை நோக்கி நோக்கி செல்வதாக இருந்தாலும், தகவல் அடிப்படையிலான முடிவுகளை எடுப்பதன் மூலம் அப்பகுதியின் அதிர்வு தடுப்பு மற்றும் கிட் விருப்பங்கள் செலவு, தரம் மற்றும் மன அமைதியை சமநிலைப்படுத்த உதவும். அடுத்ததாக, உங்கள் அதிர்வு அமைப்பில் உள்ள ஒவ்வொரு பாகத்தின் நம்பகத்தன்மையை பாதிக்கும் உற்பத்தி தரத்தைப் பற்றி நாம் பார்க்கலாம்.
நம்பகமான அதிர்வு பாகங்கள் மற்றும் சேஸிஸ் பாகங்களுக்கு பின்னால் உள்ள உற்பத்தி தரம்
அதிர்வு முழுமைமைக்கு ஸ்டாம்பட் பாகங்கள் ஏன் முக்கியம்
நீங்கள் வாகன இடைநீக்க அமைப்புகள் பற்றி நினைக்கும் போது, நீங்கள் சுருள்வில்கள் மற்றும் ஷாக்குகளை பார்க்கலாம் - ஆனால் அந்த அனைத்தையும் ஒன்றாக வைத்திருக்கும் ஸ்டாம்பட் பிராக்கெட்டுகள், கட்டுப்பாடு கொக்கி ஸ்டாம்பிங்குகள் மற்றும் வலுப்படுத்தும் தகடுகள் தான் உண்மையான நாயகர்கள். இந்த தடிமன் அல்லது வலிமை இல்லாவிட்டால் பாகங்களின் பகுதிகள் ஒரு குழுவில் இருந்து அடுத்த குழுவிற்கு மாறுபடும். திடீரென, உங்கள் சீரமைப்பு மாறிவிடுகிறது, சத்தம் ஊடுருவி விடுகிறது, அல்லது மிக மோசமான சூழ்நிலையில், சுமைக்கு கீழ் முக்கியமான பாகங்கள் தோல்வியடைகின்றன. இதனால்தான் பாதுகாப்பான, நீடித்ததும் நெடுநாள் உழைக்கக்கூடியதுமான தானியங்கி சஸ்பென்ஷன் பாகங்கள் .
ஸ்டாம்ப் செய்யப்பட்ட எஃகு பாகங்கள் வாகன திசைநோக்கி & சஸ்பென்ஷன் துல்லியம், செயல்திறன், மற்றும் அதிக அளவில் உற்பத்தி செய்யும் திறன் ஆகியவற்றிற்காக பரவலாக பயன்பாட்டில் உள்ளன. ஆனால் ஸ்டாம்ப் செய்யப்பட்ட, அல்லது உருவாக்கப்பட்ட, அல்லது ஊற்றி உருவாக்கப்பட்ட பாகங்களை என்ன வேறுபாடு உள்ளது? ஒப்பிடுவோம்:
| தத்துவக் கொள்கை | எடை | அளவுரு மீள்தன்மை | டூலிங் லீட் டைம் | அடிப்படையான பயன்பாடுகள் |
|---|---|---|---|---|
| ஸ்டாம்ப் செய்யப்பட்டது | இலேசானது முதல் நடுத்தரம் வரை | அதிகம் (குறைந்த பொறுத்தம்) | குறுகியது முதல் மிதமானது வரை | தாங்கிகள், கட்டுப்பாட்டு கோல்கள், சுருள் இருக்கைகள், திரைகள் |
| ஃபோர்ஜ்ட் | கனமான (வலிமையான தானியம்) | மிக அதிகம் | நீண்ட | மூட்டுகள், அதிக அழுத்தம் உள்ள கோல்கள் |
| இடைவிடாமல் ஊற்றி உருவாக்குதல் | மிகவும் கனமானது | மிதமானது (துளைகள் இருக்கலாம்) | சரி | பெரிய கூடங்கள், சிக்கலான வடிவங்கள் |
அச்சிடப்பட்ட பாகங்கள் எடை குறைப்பிலும் தொடர்ந்து ஒரே மாதிரியான அளவுகளிலும் சிறப்பாகச் செயல்படுகின்றன, இது சீரமைப்பை நிலைத்தன்மையாக வைத்திருப்பதற்கும், அதிர்வு, இரைச்சல் மற்றும் கசிவு (NVH) ஐ குறைப்பதற்கும் முக்கியமானது அனைத்து சஸ்பென்ஷன் பாகங்களிலும் .
சஸ்பென்ஷன் பாகங்களுக்கான தயாரிப்பு வடிவமைப்பு சிபாரிசுகள்
சில சஸ்பென்ஷன் தாங்கிகள் பல ஆண்டுகள் நீடிக்கின்றன, ஆனால் மற்றவை சீக்கிரமே துருப்பிடித்து செயலிழக்கின்றனவா? அது பொருள்களை மட்டும் சார்ந்தது அல்ல - வடிவமைப்பு மற்றும் உற்பத்தியில் உள்ள விவரங்களையும் சார்ந்தது. சீரமைப்பு பாகங்களில் நம்பகத்தன்மையை உறுதி செய்ய பொறியாளர்கள் பயன்படுத்தும் முக்கியமான சோதனை புள்ளிகள் இங்கே:
- விரிசல் ஏற்படாமல் தடுக்க வளைவுகளில் சரியான ஆரம்
- வலிமைக்கான சரியான துளை-முனை தூரங்கள்
- சீரான பொருள் தடிமன் அழுத்தம் பரவலுக்கு
- சுமை பாதைகளுடன் ஒருங்கிணைக்கப்பட்ட தானிய திசை
- துரித பாதுகாப்பு (ஓடுகள், சீலாந்துகள்)
- பொருத்தமான அளவுகளுக்கு சரியான துல்லியம்
இந்த தரங்களை பராமரிப்பதற்கு முன்னேறிய பொறியியல் மற்றும் நேரலை தர கட்டுப்பாட்டின் கலவை தேவை. எடுத்துக்காட்டாக, முன்னணி உற்பத்தியாளர்கள் தங்கள் பாகங்கள் தொழில்நுட்பத்திலிருந்து விலகுவதற்கு முன் ஏதேனும் விலகலை கண்டறிய ஒருங்கிணைப்பு அளவீட்டு இயந்திரங்கள் (CMM) மற்றும் 3D காட்சி தொழில்நுட்பத்தை பயன்படுத்துகின்றனர். இந்த கண்டிப்பான கட்டுப்பாடு உலகளாவிய தானிய உற்பத்தியாளர்களுக்கு வழங்கும் தர வகுப்பு 1 வழங்குவோருக்கு முக்கியமானது, ஏனெனில் சிறிய மாறுபாடுகள் கூட முழுமைக்கும் பிரச்சனைகளை ஏற்படுத்தலாம் தானியங்கி சஸ்பென்ஷன் பாகங்கள் உலகளாவிய தானிய உற்பத்தியாளர்களுக்கு, ஏனெனில் சிறிய மாறுபாடுகள் கூட முழுமைக்கும் பிரச்சனைகளை ஏற்படுத்தலாம் வாகன திசைநோக்கி & சஸ்பென்ஷன் சித்திரம்.
அதிக உற்பத்தி தொகுதிகளில் அளவுகள் மற்றும் மீண்டும் மீண்டும் தன்மை
சங்கீர்ணமாக ஒலிக்கிறதா? இதன் முக்கியத்துவம் இதுதான்: அதிக அளவிலான உற்பத்தியில், தடிமன் அல்லது துளை இட அமைப்பில் ஏற்படும் சிறிய விலகல் கூட சீரமைப்பு பிரச்சினைகள், முன்கூட்டியே பந்து பதிவு அணிவிக்கப்படுதல், அல்லது அதிகப்படியான NVH போன்றவற்றிற்கு வழிவகுக்கலாம். இதனால்தான் முன்னணி வழங்குநர்கள் டிஜிட்டல் ட்வின் தொழில்நுட்பம், ரோபோட்டிக் ஸ்டாம்பிங், மற்றும் முனைப்பான CAE (கணினி உதவியுடன் பொறியியல்) பகுப்பாய்வு ஆகியவற்றில் முதலீடு செய்கின்றனர். ஏனெனில் இவை தொடர் உற்பத்திக்கு முன்னதாகவே ஒவ்வொரு டை (die) மற்றும் செயல்முறையையும் சரிபார்க்க உதவும். இந்த கருவிகள் சேஸிஸ் பாகங்களின் ஒவ்வொரு தொகுதியும் முதல் யூனிட்டிலிருந்து கடைசி யூனிட் வரை ஒரே நேர்மையான தரத்திற்கு இணங்குவதை உறுதிப்படுத்த உதவுகின்றது.
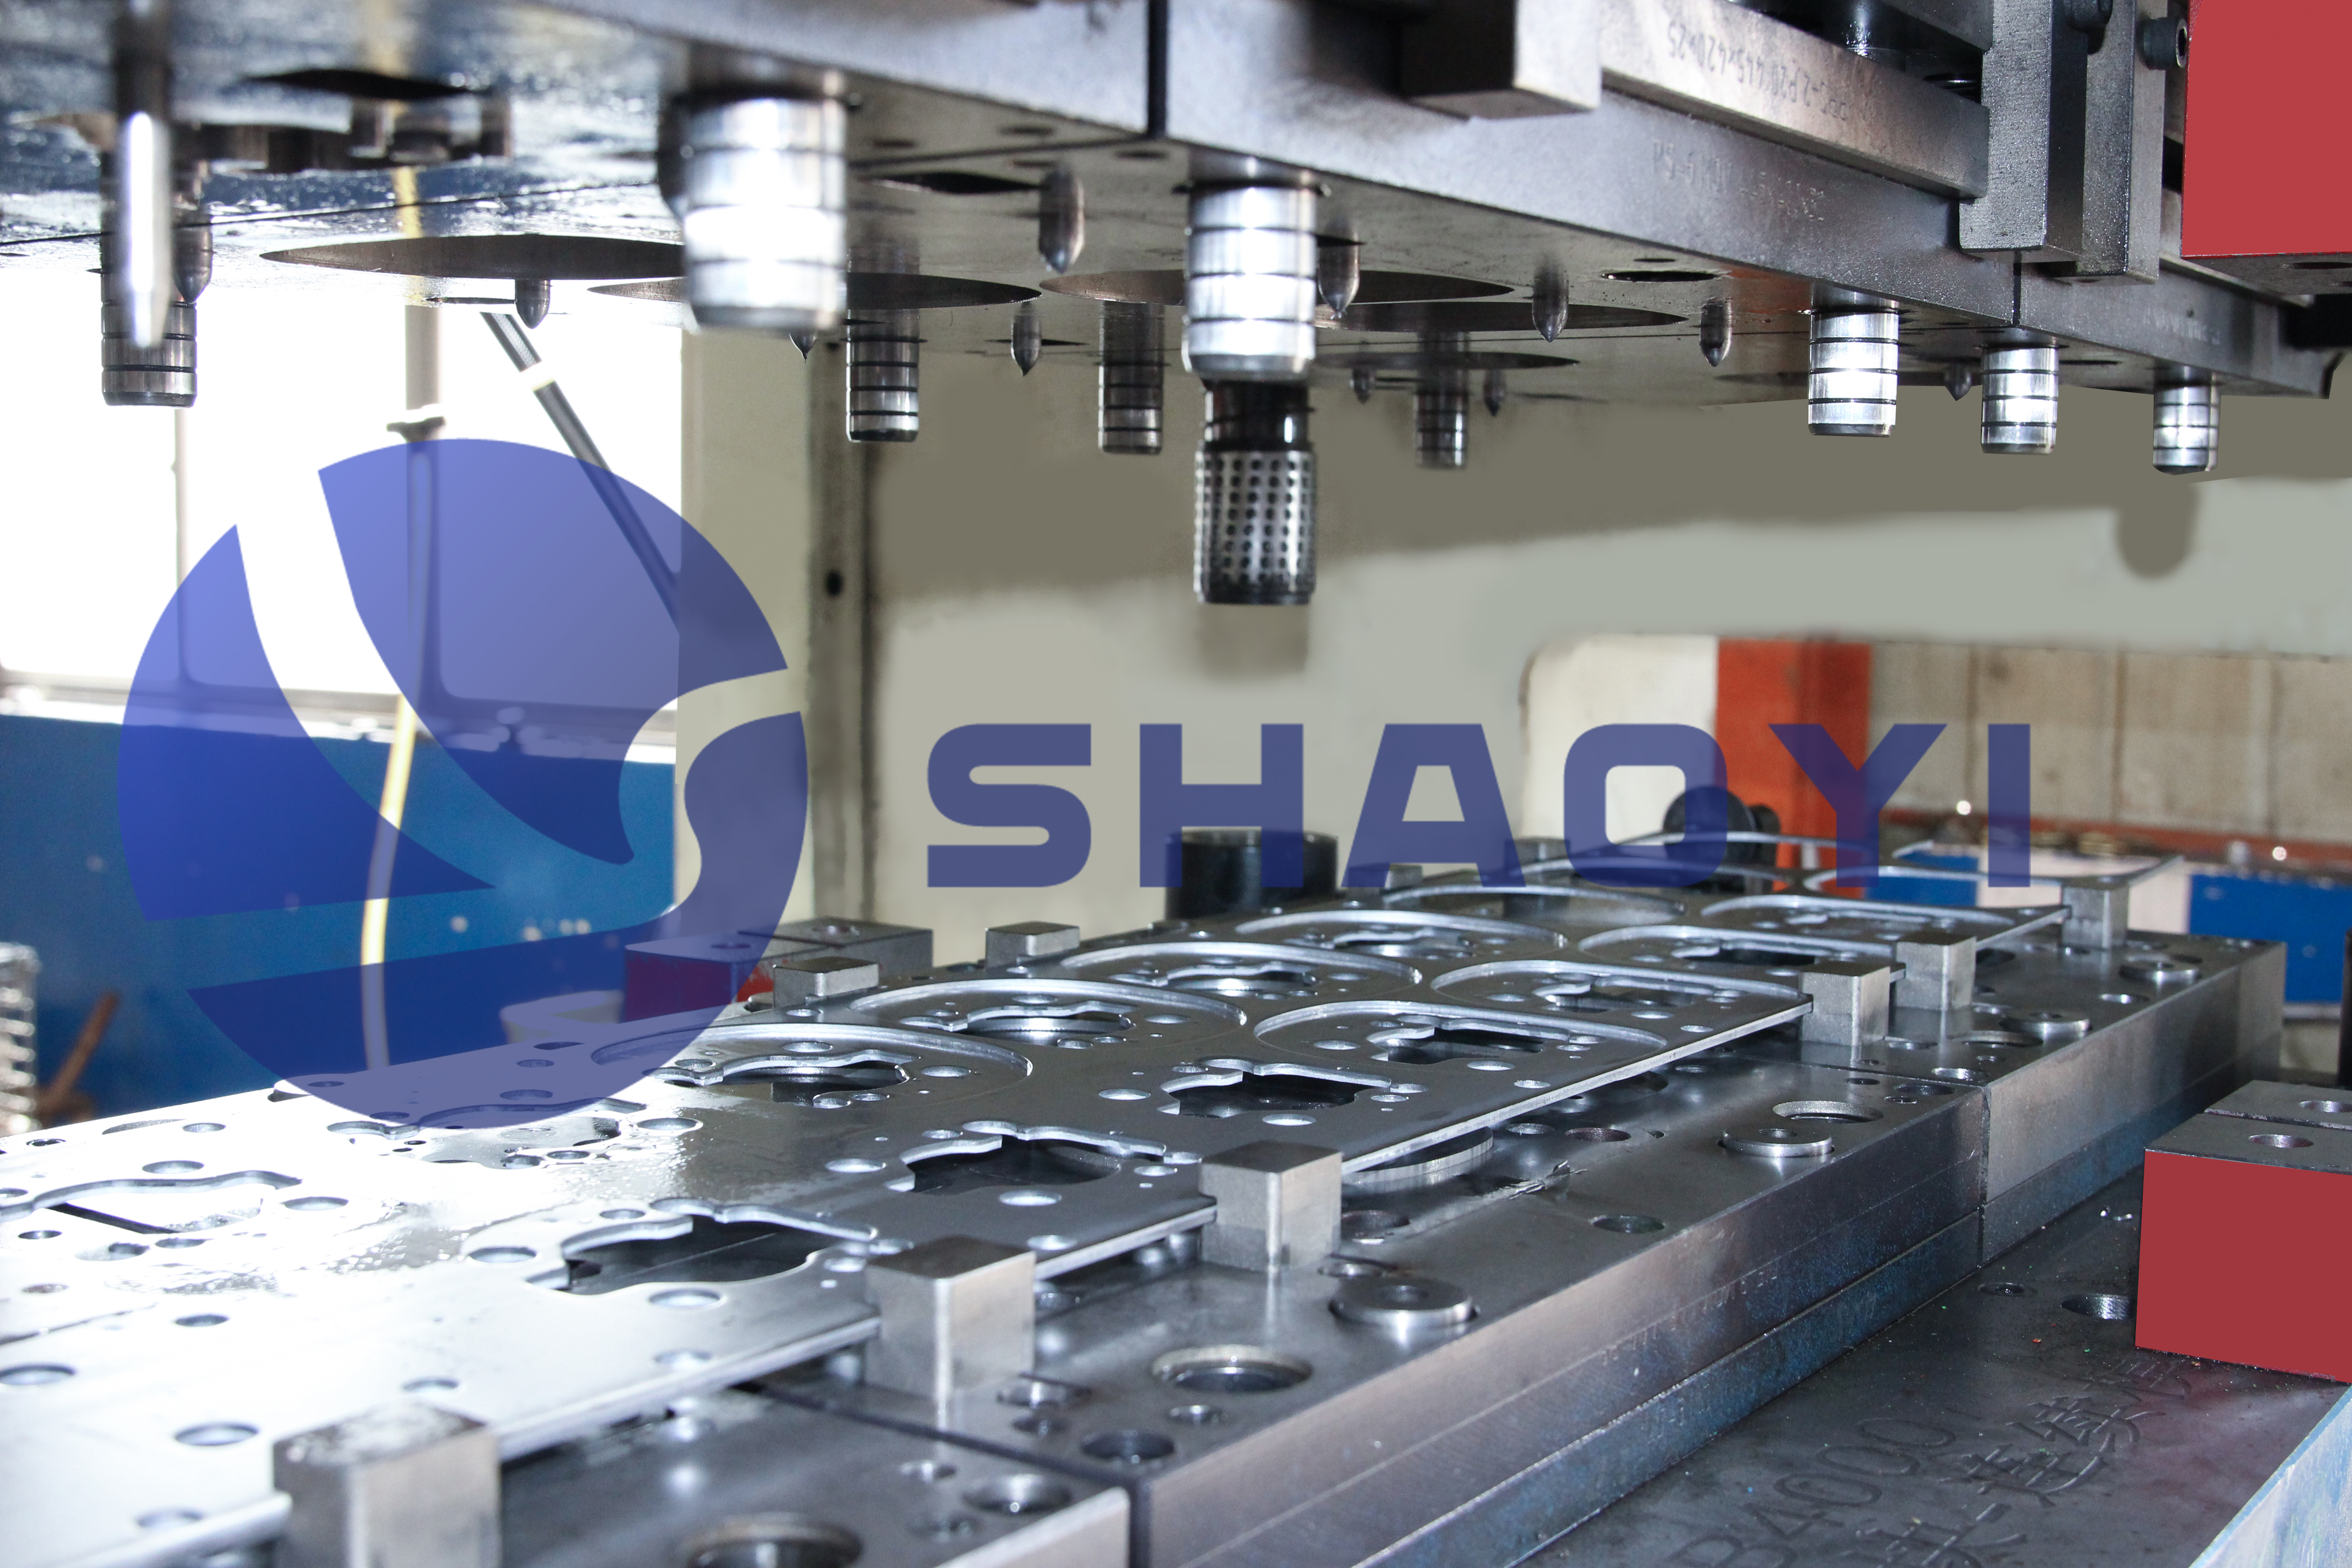
ஸ்டாம்ப் செய்யப்பட்ட சஸ்பென்ஷன் பாகங்களை வாங்கும் நிறுவனங்களுக்கு, CAE-இயக்கப்பட்ட டை வடிவமைப்பு மற்றும் லீன் உற்பத்தி முறையுடன் ஒருங்கிணைக்கப்பட்ட வழங்குநருடன் இணைந்தால், Shaoyi என்பது உற்பத்தி செய்யும் சுழற்சிகளை கணிசமாக குறைக்கலாம் மற்றும் பாகத்திற்கும் பாகத்திற்கும் இடையே உள்ள ஒருங்கிணைப்பை மேம்படுத்தலாம். மேம்பட்ட பகுப்பாய்வு மற்றும் நேரநிலை தர மேலாண்மையை பயன்படுத்துவதன் மூலம் தொழில்துறை நம்பகத்தன்மை மற்றும் செயல்திறனுக்கு புதிய தரநிலையை நிர்ணயிக்கின்றது வாகன இடைநீக்க அமைப்புகள் .
ஸ்டாம்பிங் டாலரன்சுகள் மற்றும் பொருள் தரத்தில் உள்ள சிறிய விவரங்கள் கூட ஒரு நிலையான சஸ்பென்ஷன் சிஸ்டத்திற்கும், தொடர்ந்து சீரமைப்பு மற்றும் NVH பிரச்சினைகளை உருவாக்கும் சிஸ்டத்திற்கும் இடையே உள்ள வித்தியாசத்தை உருவாக்கலாம்.
அடுத்த பிரிவில், உங்கள் வாகனத்தை ஆய்வு செய்யும் போது, பொருள் கொள்முதல் செய்யும் போது, பாகங்களின் பகுதிகள் , அல்லது தொழில்முறை மேம்பாட்டை திட்டமிடும் போது உங்கள் அடுத்த கட்டங்களுக்கு வழிகாட்டும் ஒரு நடைமுறை செயல் திட்டம் மற்றும் நம்பகமான வளங்களுடன் நாம் இறுதியாக நிறைவு செய்வோம்.
செயல் திட்டம் மற்றும் நம்பகமான வளங்கள் - கார் சஸ்பென்ஷன் குறித்து மேலும் கற்றலுக்கு
இன்று பயன்படுத்தக்கூடிய முக்கியமான முடிவுகள்
ஆட்டோமோட்டிவ் சஸ்பென்ஷன் பாகங்களின் உள் மற்றும் வெளி விவரங்களை ஆராய்ந்த பிறகு, உங்களுக்கு கேள்வி எழலாம்: அடுத்தது என்ன? நீங்கள் உங்கள் வீட்டு வளாகத்தில் நின்று கொண்டு செயல்பாடுகளை மேற்கொள்ள தயாராக இருப்பதாக கற்பனை செய்து கொள்ளுங்கள். நீங்கள் ஒரு DIY ஆய்வு செய்யத் திட்டமிடும் போதும், அல்லது ஒரு கடையுடன் பணியாற்றும் போதும், மிக முக்கியமான விஷயம் துல்லியமான தகவல்களைப் பயன்படுத்தவும், தெளிவான, படிப்படியான முறையை பின்பற்றவும். இப்படித்தான் நீங்கள் விலை உயர்ந்த தவறுகளைத் தவிர்க்கலாம், மேலும் உங்கள் பயணத்தை நீண்ட காலத்திற்கு பாதுகாப்பாக வைத்திருக்கலாம்.
துல்லியமான மற்றும் சரிபார்க்கப்பட்ட தரவுகள் நம்பகமான சீரமைப்பிற்கான அடிப்படையாகும் - ஊகிப்பது மீண்டும் மீண்டும் பிரச்சினைகளையும் நேரத்தை வீணாக்கும்
டார்க் தரவுகள் மற்றும் படங்களை எங்கே கண்டறிவது
நீங்கள் ஒருபோதும் நம்பகமானதை முயற்சித்துள்ளீர்களா சஸ்பென்ஷன் படம் அல்லது சரியான டார்க் மதிப்பு, முரண்பாடுகளுடன் கூடிய ஆலோசனைகளின் கடலில் மட்டும் இழக்கப்பட்டதா? கவலைப்பட வேண்டாம் - நீங்கள் மட்டுமல்ல. நீங்கள் சரியான தரவுடன் வேலை செய்கிறீர்கள் என்பதை உறுதிப்படுத்த உங்களுக்கு சிறந்த வழி நேரடியாக மூலத்திற்கு செல்வதுதான். அதிகாரப்பூர்வ தரவுகளை எங்கே தேட வேண்டும் என்பது இதோ சஸ்பென்ஷன் சிஸ்டம் படம் , டார்க் தரவுகள், மற்றும் படி படியாக வழிகாட்டுதல்கள்:
- ஓஇஎம் சேவை போர்ட்டல்கள்: தயாரிப்பாளர் வலைத்தளங்கள் அடிக்கடி வழங்குகின்றன சஸ்பென்ஷன் சிஸ்டம் படம் , சேவை அறிவிப்புகள், மற்றும் உங்கள் வாகனத்தின் சரியான மாடல் மற்றும் உற்பத்தியாளருக்கான அதிகாரப்பூர்வ சீரமைப்பு நடைமுறைகள்.
- சீரமைப்பு தரவுத்தளங்களுக்கு உரிமம் பெற்றவை: ALLDATA, Mitchell1, அல்லது Chilton போன்ற வளாகங்கள் விரிவானதை கொண்டுள்ளன தாங்கும் அமைப்பு வரைபடம் மற்றும் சரிபார்க்கப்பட்ட தொழில்நுட்ப தரவு.
- SAE தொழில்நுட்ப ஆய்வுக் கட்டுரைகள்: பொறியாளர்கள் மற்றும் முன்னேறிய DIY பயனர்களுக்கு, செய்தித்தாள் தாங்கும் வடிவமைப்பு, பொருத்தும் திருப்புதல், மற்றும் சீரமைப்பு சிறப்பு நடைமுறைகள் பற்றிய தரநிலைகள் மற்றும் ஆராய்ச்சியை வெளியிடுகின்றது.
- நம்பகமான பாகங்கள் பட்டியல்: நம்பகமான பிராண்டுகள் மற்றும் ஆன்லைன் விற்பனையாளர்கள் பெரும்பாலும் விரிவான காட்சிகளை அல்லது விரிவானதை சேர்க்கின்றன தாங்கும் அமைப்பு வரைபடம் பாக எண்கள் மற்றும் பொருத்தம் குறிப்புகளுடன்
- தொழில்முறை மன்றங்கள் மற்றும் சமூகங்கள்: OEM தரவுக்கு மாற்றாக இல்லாவிட்டாலும், ஆர்வலர் மன்றங்கள் உங்களுக்கு விளக்கப்படங்களை விரிவாக்கவும், உலகளாவிய குறிப்புகளைப் பகிரவும் உதவலாம்—ஆனால் எப்போதும் அதிகாரப்பூர்வ மூலங்களுடன் ஆலோசனைகளை மீண்டும் சரிபார்க்கவும்.
உங்கள் சஸ்பென்ஷனுக்கான ஸ்டாம்ப் செய்யப்பட்ட பிராக்கெட்டுகள், மவுண்டுகள் அல்லது ஷீல்டுகளை வாங்கும் போது, உங்களுக்கு உதவ ஒரு நிபுணருடன் பணியாற்றவும் Shaoyi இவர் ஒவ்வொரு பாகமும் கணிசமான தரத்தையும் பொருத்தக்கூடிய தரநிலைகளையும் பூர்த்தி செய்வதை உறுதிப்படுத்த முன்னேறிய CAE பகுப்பாய்வையும், லீன் உற்பத்தியையும் ஒருங்கிணைக்கிறார். இது தொடர்ந்து செயல்பாடுகளை வழங்கும் விற்பனையாளர்களிடமிருந்து தொழில்நுட்ப குழுக்கள் அல்லது கொள்முதல் நிபுணர்களுக்கு மிகவும் மதிப்புமிக்கதாக இருக்கும்.
உங்கள் பாதுகாப்பான, சிறந்த பயணத்திற்கான அடுத்த நடவடிக்கைகள்
உங்கள் அறிவை நடைமுறையில் பயன்படுத்தத் தயாரா? உங்களால் பின்பற்றக்கூடிய ஒரு எளிய, செயல்பாடு திட்டத்தை இங்கே கொடுக்கப்பட்டுள்ளது—நீங்கள் DIY நபராக இருந்தாலும் சரி, ஒரு தொழில்முறையாளருடன் ஒருங்கிணைத்தாலும் சரி:
- ஆய்வு செய்யவும்: சஸ்பென்ஷன் பாகங்களின் தோற்றம் மற்றும் கையால் சோதனையை மேற்கொள்ளவும், கசிவு, சேதம் அல்லது வழக்கத்திற்கு மாறான அழிவு ஆகியவற்றை ஆராயவும்.
- அறிகுறிகளை ஆவணப்படுத்தவும்: நீங்கள் கவனிக்கும் ஒலிகள், கையாளும் தன்மைகள் அல்லது டயர் அணிவிக்கும் முறைகள் போன்றவற்றை எழுதிக்கொள்ளவும்.
- பாகங்களை உறுதிப்படுத்தவும்: தேவையான சரியான பாகங்களை உறுதிப்படுத்த VIN எண்ணை அல்லது நம்பகமான பட்டியலைப் பயன்படுத்தவும்— காரின் நிலைத்தன்மை அமைப்பு வரைபடத்துடன் சந்தேகம் இருப்பின் சரிபார்க்கவும்.
- மதிப்பீடுகளைத் திரட்டவும்: குறைந்தது மூன்று அருகிலுள்ள கடைகளிலிருந்து மதிப்பீடுகளைப் பெறவும், அதில் வேலை தொடர்பான செலவு, சீராக்கம், மற்றும் தேவைப்படும் உபகரணங்கள் அல்லது பாகம் மாற்றம் போன்றவற்றை உள்ளடக்கவும்.
- சீராக்கத்தைத் திட்டமிடவும்: நிலைத்தன்மை அமைப்பில் முக்கியமான பணிகளுக்குப் பிறகு, சரியான வடிவவியல் மற்றும் டயர் ஆயுளை உறுதிப்படுத்த எப்போதும் தொழில்முறை சீராக்கத்தை முனைவரவும்.
இறுதி குறிப்பு: உங்கள் வாகனத்தின் அதிகாரப்பூர்வ சேவை கையேடு அல்லது SAE தரநிலைகளைப் பயன்படுத்தி டொர்க் (torque), முன்னோக்கு விசை (preload), மற்றும் சீராக்க மதிப்புகளை எப்போதும் சரிபார்க்கவும். பொதுவான வழிகாட்டிகள் அல்லது இணையதள ஆலோசனைகளை மட்டும் நம்ப வேண்டாம்—உங்கள் பாதுகாப்பு (மற்றும் உங்கள் பணப்பை) அதனைச் சார்ந்துள்ளது.
இந்தத் திட்டத்தைப் பின்பற்றி, முக்கியமான வளாகங்களைப் பயன்படுத்துவதன் மூலம், உங்கள் வாகனத்தின் சஸ்பென்ஷன் சிஸ்டம் சிறப்பாகச் செயல்படுமாறு உறுதி செய்து கொள்ளலாம் – அது ஒரு எளிய ஆய்வாக இருந்தாலும் சரி, முழு சிஸ்டம் அப்கிரேடை மேலாண்மை செய்வதாக இருந்தாலும் சரி.
தாங்கும் தன்மை கொண்ட பாகங்கள் குறித்த அடிக்கடி கேட்கப்படும் கேள்விகள்
1. ஒரு வாகனத்தின் சஸ்பென்ஷன் சிஸ்டத்தின் முதன்மை பாகங்கள் எவை?
சஸ்பென்ஷன் சிஸ்டத்தின் முக்கிய பாகங்களில் ஸ்பிரிங்குகள், டேம்பர்கள் (ஷாக்குகள் அல்லது ஸ்ட்ரட்கள்), கட்டிரைச் ஆர்ம்கள், ஸ்வே பார்கள், புஷிங்குகள், பால் ஜாயிண்டுகள், டை ராடு எண்டுகள், மற்றும் வீல் பேரிங்குகள் அடங்கும். வாகனத்தை ஆதரிக்க, குலுக்கங்களை உறிஞ்சி கொள்ள, சக்கர சீரமைப்பை பராமரிக்க, பாதுகாப்பான, வசதியான கையாளுதலை உறுதி செய்ய ஒவ்வொரு பாகமும் ஒன்றாக செயல்படுகிறது.
2. உங்கள் சஸ்பென்ஷன் பாகங்கள் மாற்ற தேவைப்படுகிறதா என்பதை எவ்வாறு அறிவது?
சஸ்பென்ஷன் பாகங்கள் அனுபவிக்கும் அறிகுறிகள் பின்வருமாறு: கிளங்கும் அல்லது கீச்சிடும் ஒலிகள், டயர்களின் சீரற்ற அழிவு, மேடுகளுக்குப் பின் அதிக துள்ளுதல், ஷாக்குகள் அல்லது ஸ்ட்ரட்களுக்கு அருகில் திரவ கசிவு, தளர்ந்த ஸ்டீயரிங் அல்லது ஓட்டும் போது இழுப்பு உணர்வு. கடுமையான கையாளும் மாற்றங்கள் அல்லது ஸ்டீயரிங் இடைவெளியை நீங்கள் உணர்ந்தால், உடனடியாக ஓட்டுவதை நிறுத்தி தொழில்முறை ஆய்வுக்கு அனுப்பவும்.
3. நான் OEM அல்லது ஆஃப்டர்மார்க்கெட் சஸ்பென்ஷன் பாகங்களை தேர்வு செய்ய வேண்டுமா?
ஓஇஎம் பாகங்கள் தொழிற்சாலை பொருத்தம் மற்றும் பயணத்தின் தரத்தை உறுதி செய்கின்றன, இது தினசரி ஓட்டுநர்களுக்கும், உத்தரவாதத்தின் கீழ் உள்ள வாகனங்களுக்கும் ஏற்றது. ஆஃப்டர்மார்க்கெட் பாகங்கள் மேம்பட்ட நிலைத்தன்மை அல்லது செயல்திறன் அம்சங்களை வழங்கலாம், மேலும் கடுமையான காலநிலை நிலைமைகளில் அல்லது சிறப்பு தேவைகளுக்காக செலவு குறைவாக இருக்கலாம். VIN அல்லது நம்பகமான பட்டியலைப் பயன்படுத்தி உங்கள் வாகனத்துடன் ஒத்துப்போவதை எப்போதும் உறுதிப்படுத்தவும்.
4. முழுமையான சஸ்பென்ஷன் கிட்டில் என்ன அடங்கும்?
சஸ்பென்ஷன் கிட் ஒன்று பொதுவாக ஷாக்குகள், ஸ்ட்ரட்கள், சுருள்கள், மவுண்டுகள், புஷிங்குகள் மற்றும் தேவையான ஹார்ட்வேரை உள்ளடக்கியதாக இருக்கும். கிட் ஒன்றை வாங்குவது நிறுவலை எளிதாக்கும், உழைப்புச் செலவுகளைக் குறைக்கும், அனைத்து பாகங்களும் சேர்ந்து சிறப்பான செயல்திறன் மற்றும் நம்பகத்தன்மைக்கு உத்தரவாதம் அளிக்கும்.
5. என் காரின் சஸ்பென்ஷனுக்கான நம்பகமான வரைபடங்கள் மற்றும் டார்க் தரவை எங்கே காணலாம்?
சரியான வரைபடங்கள் மற்றும் டார்க் தரவு OEM சேவை போர்ட்டல்களிலிருந்தும், ALLDATA அல்லது Mitchell1 போன்ற உரிமம் பெற்ற பழுதுபார்ப்பு தரவுத்தளங்களிலிருந்தும், நம்பகமான பாகங்கள் பட்டியலிலிருந்தும் கிடைக்கின்றது. பொறியியல் தரத்திலான ஸ்டாம்பட் சஸ்பென்ஷன் பாகங்களுக்கு, Shaoyi போன்ற விற்பனையாளர்கள் துல்லியமாக தயாரிக்கப்பட்ட பாகங்களை வழங்குகின்றனர், இது தொழில்முறை பயனர்களுக்கு மதிப்புமிக்க வளாகமாக இருக்கும்.